Introduction to Homemade Hot Sauce
Homemade hot sauce isn’t just a kitchen trend—it’s a game-changer for anyone who loves bold, fresh flavors and a touch of creativity. By crafting your own DIY hot sauce from homegrown peppers, you get to control every ingredient, ensuring your sauce is free of unnecessary additives and tailored exactly to your taste buds.
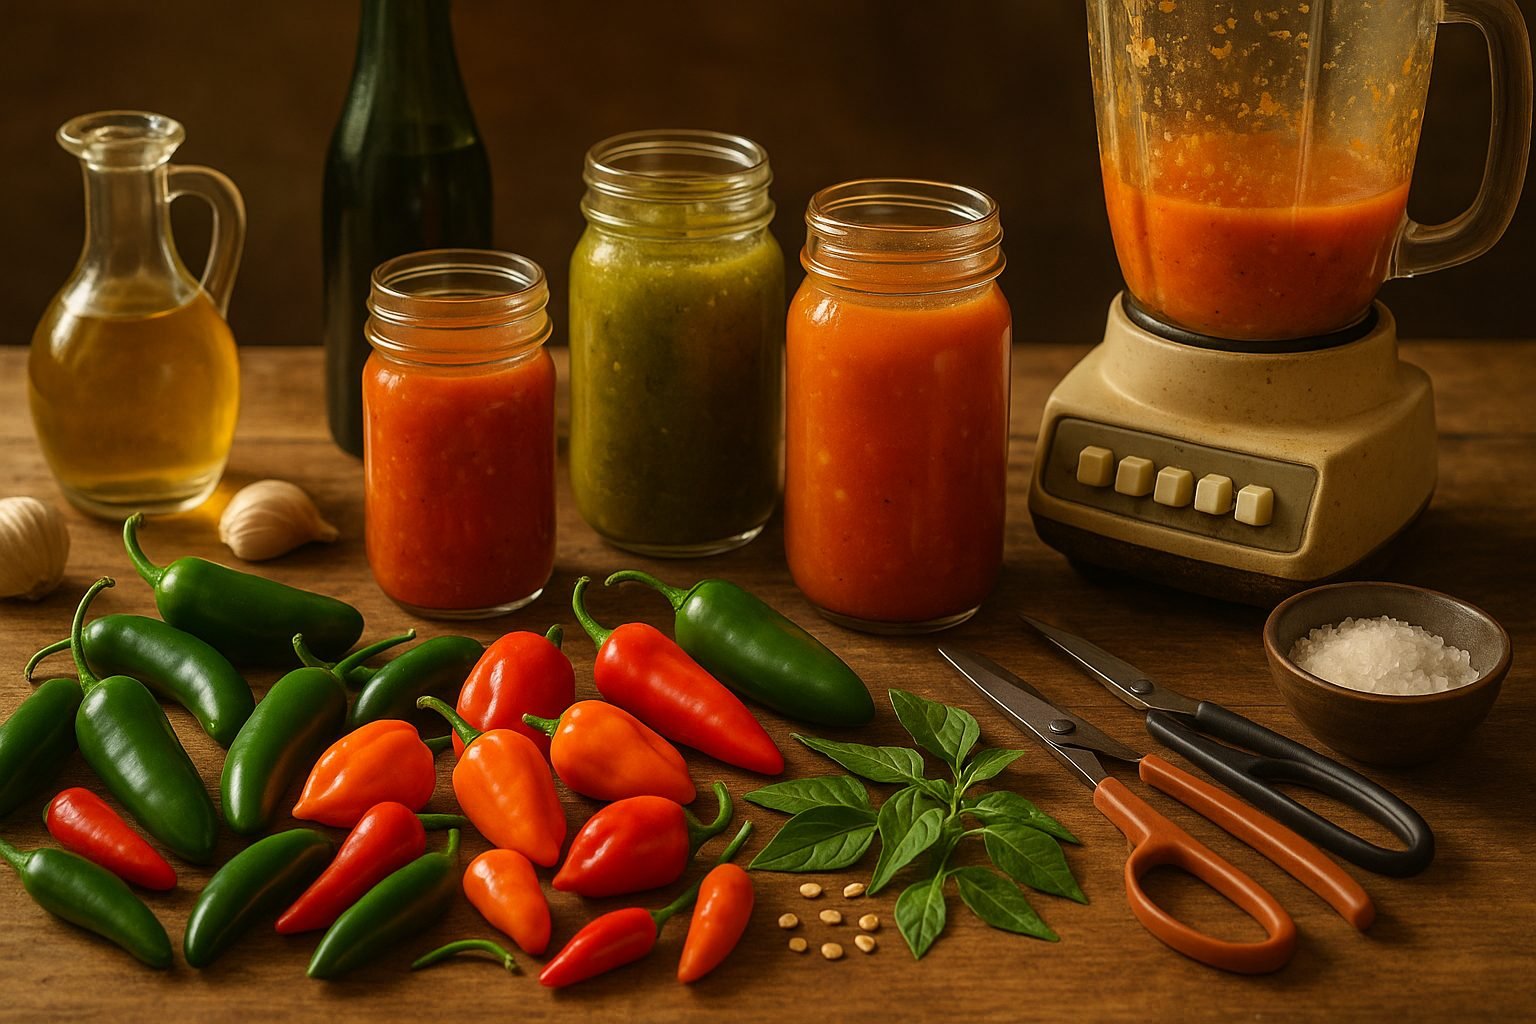
The appeal of making hot sauce at home goes far beyond the satisfying “I made this!” feeling. With just a handful of fresh peppers, vinegar, salt, and some optional flavors like garlic or fruit, the process is surprisingly simple and beginner-friendly. You don’t need fancy equipment—just a blender, some gloves for chopping, and clean bottles or jars to store your creation.
One of the biggest benefits of homemade hot sauce is customization. Whether your garden yields fiery habaneros or mellow jalapeños, you can tweak heat levels, add sweetness with mango, or bring in earthy depth with roasted garlic. You’ll also enjoy a fresher, brighter flavor than anything you’ll find on a store shelf, since your sauce is made from just-picked peppers.
Plus, homemade hot sauce lets you avoid preservatives and excess sodium, making it a healthier choice. In short, making your own hot sauce lets you bottle up summer’s bounty and spice up every meal, your way.
Choosing Your Peppers and Ingredients
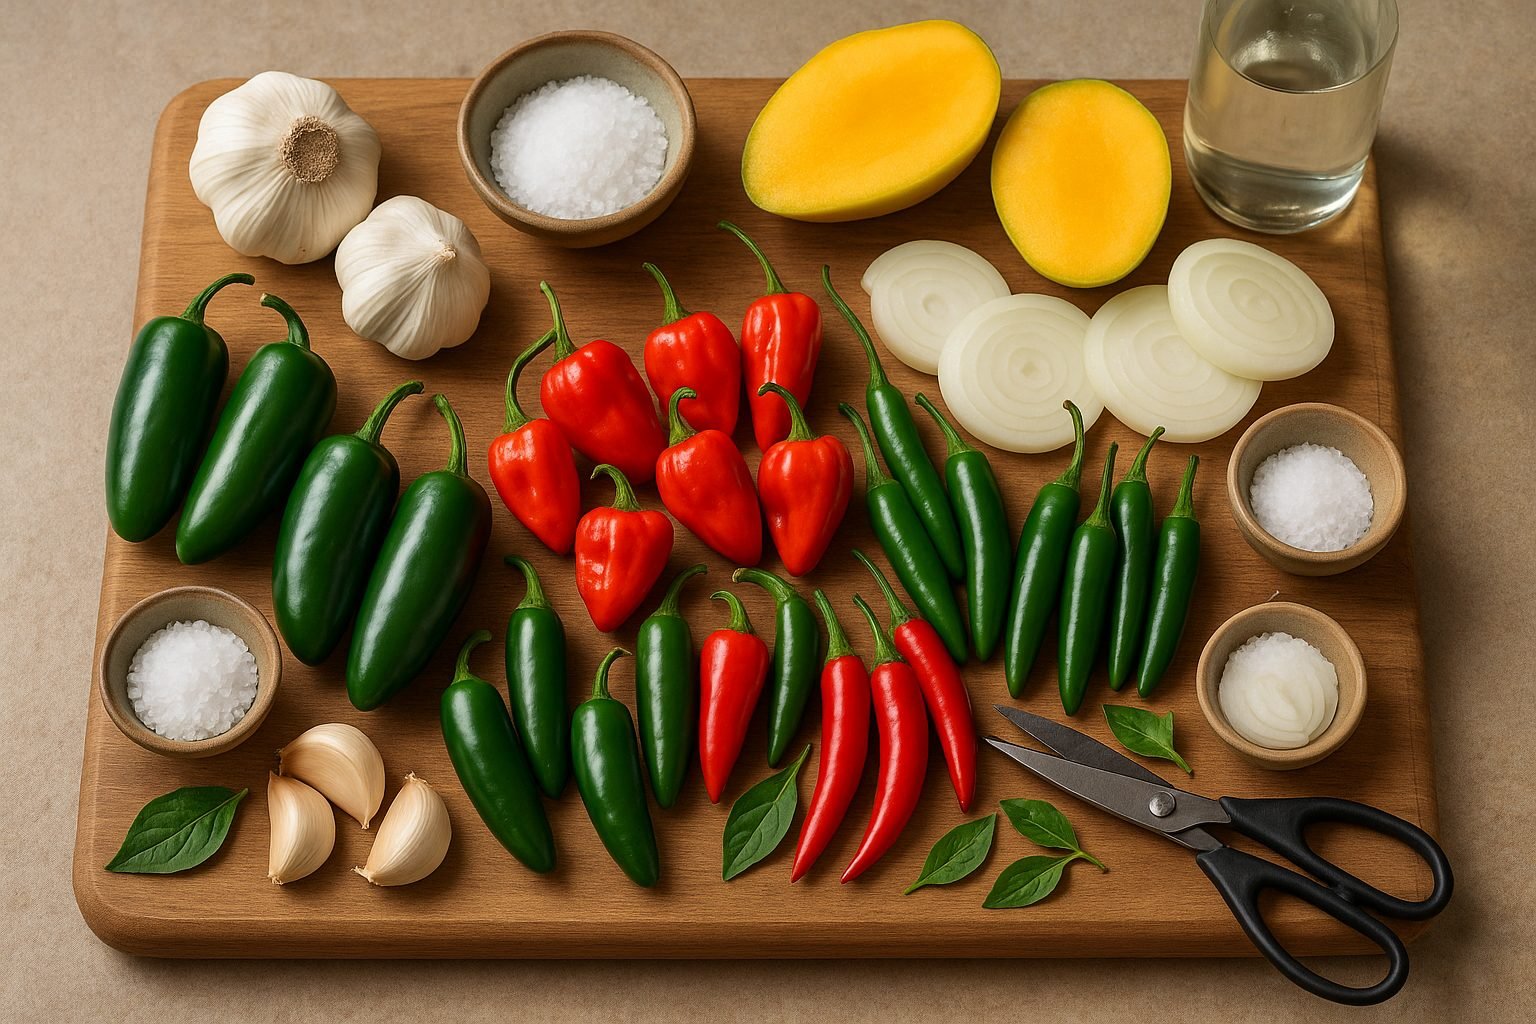
When it comes to making homemade hot sauce, selecting the right chili peppers is crucial for both flavor and heat. The Scoville scale, which measures a pepper’s spiciness, can help guide your decision.
For a mild sauce, try jalapeños (2,500–8,000 Scovilles) or Anaheim peppers (500–2,500). For medium heat, serranos (10,000–23,000) add a nice kick, while habaneros (100,000–350,000) and ghost peppers (over 1,000,000) bring intense fire for thrill-seekers.
Visit your local market and look for peppers that are firm, glossy, and free of soft spots, as freshness translates to vibrant flavor.
Alongside chilies, you’ll need high-quality vinegar (like white, apple cider, or rice vinegar) for acidity and preservation, and a non-iodized salt (such as sea salt or kosher salt) to round out the taste.
Don’t be afraid to experiment with fresh ingredients on hand—garlic, onions, carrots, and fruit can mellow the heat and add complexity.
To balance heat and flavor, start with a blend of milder and hotter peppers, taste frequently, and adjust with sweet or acidic elements as needed; a dash of honey or a squeeze of citrus can tame overpowering spice.
Using locally sourced produce not only guarantees freshness but lets you showcase unique regional flavors—think smoked chipotles from farmers’ markets or even homegrown chilies.
Ultimately, choosing peppers and ingredients is about finding the right balance for your palate while making the most of what’s available in your area.
Types of Hot Sauce: Fermented vs. Quick-Cook
When it comes to making hot sauce, two popular methods stand out: traditional fermentation and the quick-cook technique.
Fermentation involves combining chili peppers with salt and water, then letting the mixture sit for one to three weeks as natural bacteria break down the sugars. This creates a tangy, complex flavor that’s hard to replicate with other methods. Plus, fermentation can extend the shelf life by producing a naturally acidic environment that keeps harmful microbes away. On the downside, fermentation requires patience, some monitoring to prevent mold, and a bit of trial and error, especially for beginners.
The quick-cook method skips the waiting—you simply simmer peppers, vinegar, and spices on the stove, then blend for an immediate, yet still delicious, hot sauce. This method is fast and straightforward, perfect for those just starting out or anyone craving near-instant gratification. However, quick-cook sauces usually have a brighter, more direct flavor and lack the depth of aged, fermented batches. They may also have a shorter shelf life unless properly acidified.
Which method is better depends on your goals:
- If you’re eager to experiment with bold, nuanced flavors and don’t mind waiting, fermentation can be very rewarding—just be sure to use sanitized equipment and follow a reliable recipe to avoid spoilage.
- For speed, simplicity, and safety, the quick-cook style is the easiest way to dip your toe into homemade hot sauce, with less risk and plenty of room to mix and match ingredients.
No matter which route you choose, both methods open up a world of spicy possibilities in your kitchen.
Step-by-Step Hot Sauce Making Process
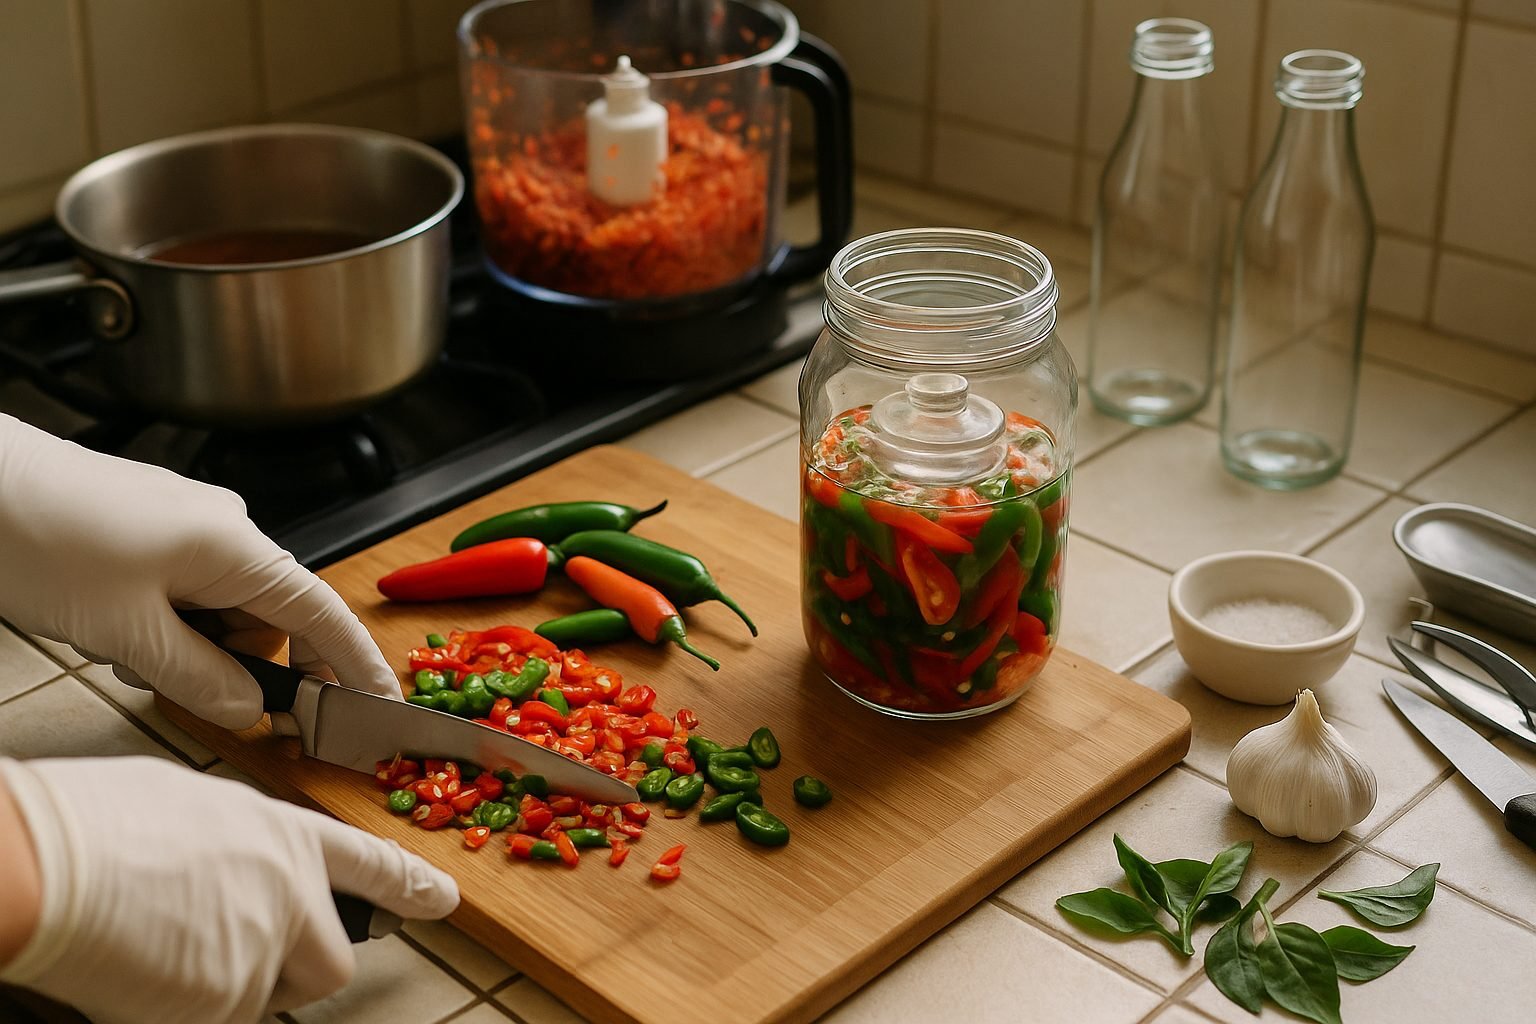
Making your own hot sauce can be as simple or complex as you like, but it all starts with preparing your ingredients. For both the fermentation and quick-cook methods, wash your chili peppers thoroughly and remove the stems. If you want to reduce the heat, you can remove the seeds, but for maximum flavor and spice, leave them in.
It’s smart to wear gloves when handling hot peppers to avoid skin irritation, and you may want to cut your peppers in a well-ventilated area. You’ll also need fresh garlic, onions, and any other flavor add-ins you enjoy, like carrots or fruit.
Fermentation Method
For fermentation, pack your chopped peppers and any other veggies tightly into a clean glass jar. Make a salt brine using non-iodized salt (about 2-3% salt by weight of water), then pour it over the peppers until they’re fully submerged. Use a fermentation weight or a small bag of brine to keep everything underwater.
Choose a glass or food-safe ceramic container with a loosely fitted lid or fermentation airlock. Place the jar out of direct sunlight at room temperature, ideally between 65–75°F, for about 7 to 14 days.
Check for bubbles that indicate fermentation, and watch for any mold—if you see fuzz or bright colors, discard the batch.
Quick-Cook Method
For the quick-cook method, simply add chopped peppers, veggies, garlic, and vinegar to a saucepan and simmer for 10–20 minutes until softened. Allow the mixture to cool, then transfer it carefully to a blender or food processor and blend until smooth.
Finishing Touches
For both methods, strain the hot sauce through a fine-mesh sieve if you prefer a thinner texture, or leave it chunky for more body.
Essential Equipment
- Nitrile or latex gloves for safe pepper handling
- A strong blender or food processor
- Non-reactive glass jars for fermenting
- A saucepan for cooking
- Glass bottles or jars for storing your finished sauce
Always label bottles with the batch date, and store finished hot sauce in the fridge to preserve freshness and flavor.
Customizing Your Hot Sauce
Customizing your hot sauce at home is the best way to create a flavor profile that’s uniquely yours. Start by experimenting with classic enhancers like fresh garlic and onion, which bring savory depth. Toast spices such as cumin, coriander, or smoked paprika before blending them in for a rich, complex base.
If you’re feeling adventurous, add a handful of fresh herbs like cilantro or basil for a herbal note, or include fruits like mango, pineapple, or peaches for a touch of sweetness balanced with acidity. For extra sweetness, a splash of honey, maple syrup, or agave can help round out sharp edges.
Adjusting the heat level is just as customizable: blend different chili varieties, pairing fiery habaneros or Thai chilies with milder jalapeños or poblanos for a balanced burn. You can also remove seeds and membranes from peppers to mellow the spice even more.
For consistency, remember that adding water, fruit juice, or vinegar will thin your sauce, while adding cooked vegetables like carrots, roasted bell peppers, or even tomato paste can create a thicker, chunkier texture.
Taste as you go, adding acids like lime juice or apple cider vinegar for tang, and a pinch of salt to enhance all the flavors. If your batch turns out too hot, blend in more non-spicy ingredients or a bit of sugar to calm the heat.
Finally, let your sauce rest in the fridge for a day or two before using; this helps the flavors meld, resulting in a sauce that’s even more vibrant and well-rounded. With a bit of trial and error and these simple tweaks, you’ll find the perfect blend to spice up your meals just the way you like.
Bottling, Storing, and Shelf Safety
When it comes to bottling homemade foods, cleanliness is your first line of defense against spoilage and foodborne illness. Sterilize bottles and lids by boiling them in water for at least 10 minutes, or run them through a hot dishwasher cycle right before use. Choose containers made from food-safe glass or plastic, opt for airtight seals, and avoid reusing old lids, as even minor scratches or dents can harbor bacteria.
Acidity is another key factor in food safety—many preserved foods rely on vinegar or citrus juice to lower the pH below 4.6, which inhibits the growth of harmful microbes like botulism. Use a digital pH meter if possible, especially with thicker sauces or low-acid vegetables, and never guess—follow trusted recipes for recommended acid amounts.
For storage, keep freshly bottled goods in a cool, dark place like a pantry or basement for long-term shelf stability, ideally between 50–70°F (10–21°C). Refrigerate any open bottles or recipes with low vinegar or sugar content and consume them within a few weeks. Always label your jars with the date, keep an inventory list, and rotate your stock so older items are used first.
Watch for classic spoilage signs such as bulging lids, fizzing, odd colors or smells, or cloudy liquids—when in doubt, throw it out. These careful steps help ensure your homemade creations stay safe, tasty, and enjoyable for months to come.
Ways to Use Homemade Hot Sauce
Homemade hot sauce is a secret weapon for adding bold flavor to more than just tacos or sandwiches—think beyond the basics to bring a spicy twist to almost any dish. For a zesty marinade, blend your hot sauce with olive oil, garlic, and a squeeze of lime, then soak shrimp or chicken before grilling for a punch of heat and tang.
If you love pasta, try stirring a spoonful into creamy mac and cheese for a comforting dish with a fiery kick. Hot sauce also makes a brilliant pizza drizzle—just mix a little with honey to balance the spice and sweetness, then swirl it over a slice for a gourmet touch.
Breakfast can benefit too: add a dash to scrambled eggs, avocado toast, or even your next batch of breakfast potatoes. Don’t forget drinks—spike your next Bloody Mary or michelada with homemade hot sauce for a custom-crafted cocktail.
Beyond your own kitchen, homemade hot sauce makes a thoughtful and personal gift; pour it into a pretty bottle, add a handwritten label with the heat level or suggested pairings, and share it with friends, neighbors, or hosts at your next gathering. To really impress, include a small recipe card with your favorite ways to use it—people will love discovering new ways to enjoy the flavors you’ve created.
Tips, Troubleshooting, and FAQs
If your homemade hot sauce separates or turns cloudy, don’t worry—this is often normal and simply means the ingredients need a good shake before each use. However, if you notice any signs of mold or a foul odor, it’s time to toss it out.
Achieving the perfect heat level takes some trial and error; always taste and adjust with small amounts of chili at a time, rather than adding too much all at once.
When handling hot peppers, wear gloves to avoid skin irritation, and be careful not to touch your face, especially your eyes. Washing your hands thoroughly afterwards is a must.
Want to scale up your hot sauce? Use the same ratios for larger batches, and store them in sterilized glass bottles to extend shelf life.
For vegan or gluten-free versions, simply swap out honey for agave or maple syrup, and check that your vinegar and other additives are certified gluten-free.
Don’t be afraid to experiment with flavor! Adding fruits like mango or pineapple can bring sweetness, while a splash of smoked paprika can deepen the complexity.
It’s all about finding the right balance for your taste buds, so jot down your adjustments to replicate your favorites next time.