Introduction
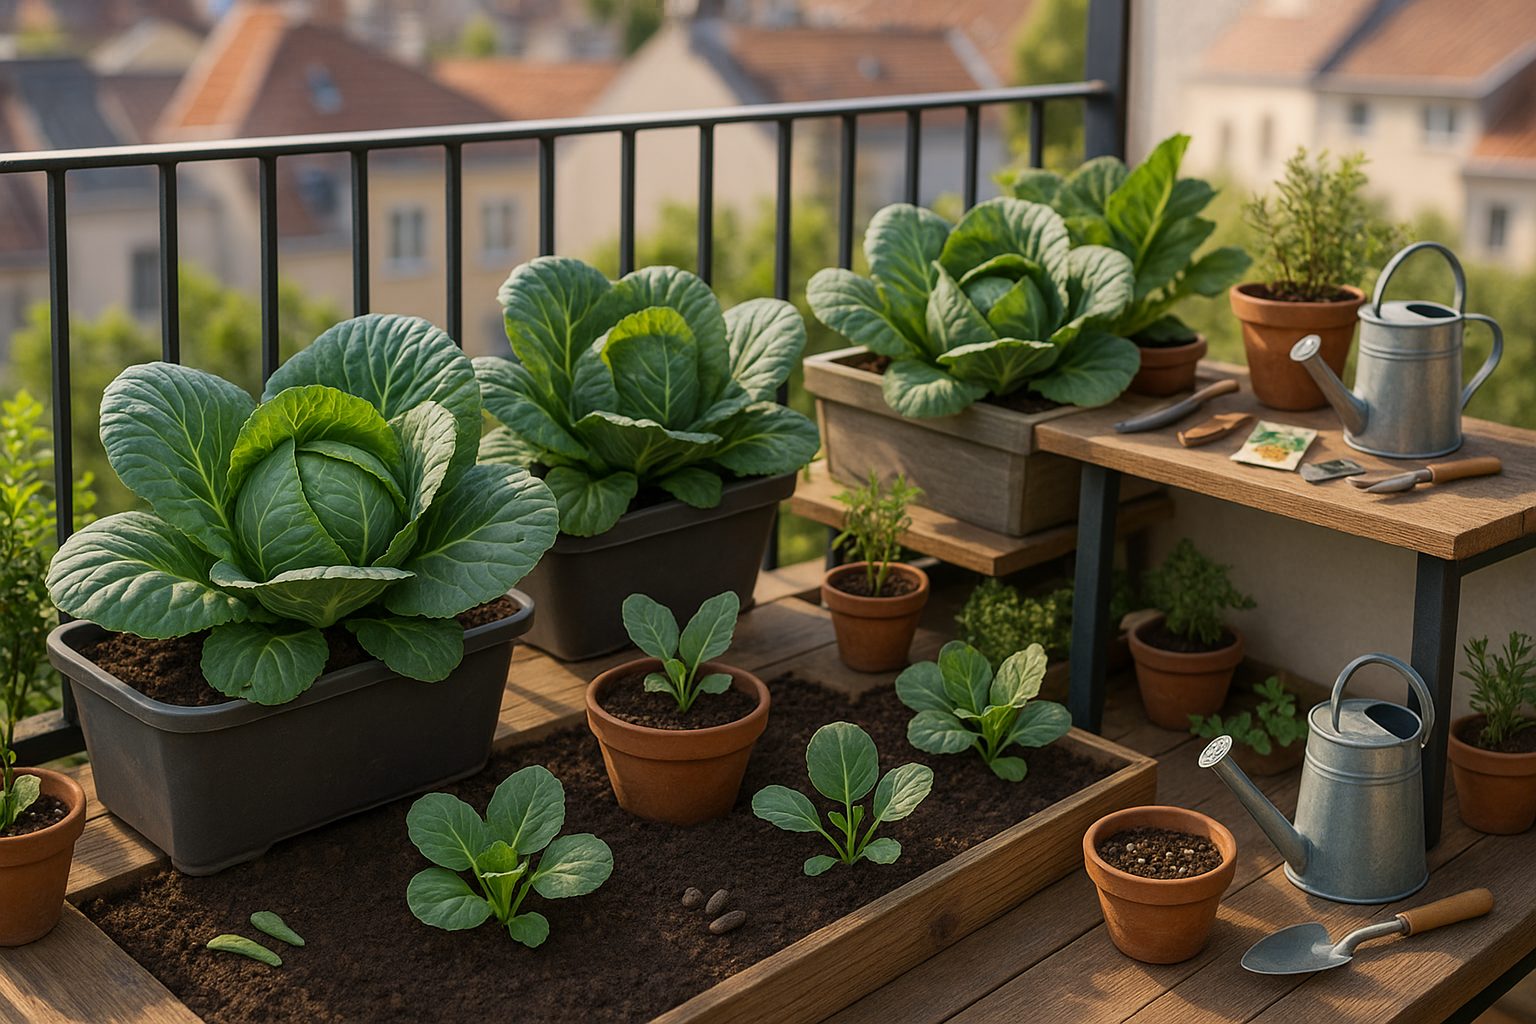
Urban cabbage gardening is changing the way city dwellers grow fresh produce, making it possible to enjoy crisp, home-grown heads of cabbage even if you’re limited to a balcony, patio, or windowsill. Growing cabbage in pots or containers fits perfectly into small urban spaces and offers many benefits: you gain better control over soil quality, can easily move your plants to follow the sun, and avoid common ground-based pests that often trouble traditional gardens. Plus, the satisfaction of harvesting a full, leafy cabbage from a cozy corner of your apartment or rooftop is hard to beat.
Container gardening empowers urban growers to break free from the constraints of concrete and limited space. Whether you have a sunny doorstep or a narrow fire escape, you can create your own mini cabbage patch customized to your space and schedule. In the posts ahead, we’ll explore the best cabbage varieties for pots, how to choose the right container, and practical care tips to ensure healthy, robust heads. We’ll also cover effective pest prevention methods, as well as when—and how—to harvest your crop for maximum flavor and crunch. If you’re ready to put fresh greens on your plate straight from your urban oasis, this guide is your next step.
Choosing the Right Cabbage Varieties for Containers
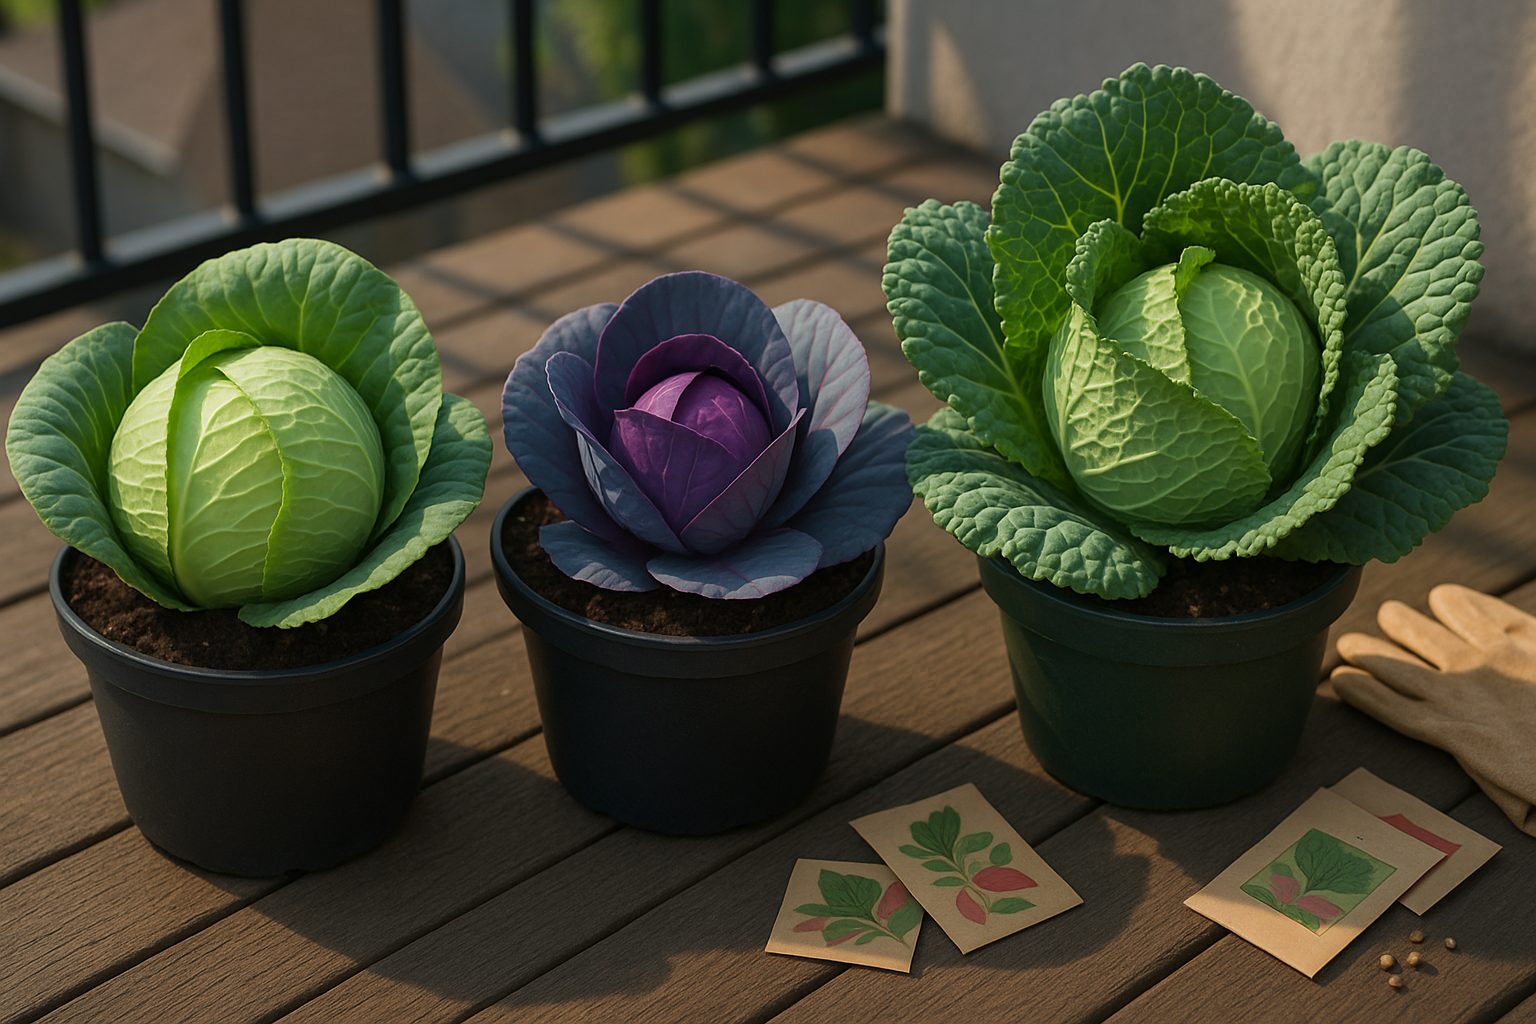
If you’re planning to grow cabbage in containers, picking the right varieties can make all the difference. Focus on compact or mini types that mature quickly—these are best suited for limited space and save you from waiting months for harvest.
‘Golden Acre’ is a popular choice for small gardens and pots, forming tight, round heads that are ready in just 60–65 days. It’s great for moderate climates and won’t sprawl beyond its bounds. If you want a colorful twist, try ‘Red Express’—this variety matures even faster (about 60 days), grows neatly upright, and adds a punch of vibrant red to your container garden.
For something a bit different, ‘Savoy’ cabbages like ‘Savoy King’ have crinkled, tender leaves and a mild flavor; they’re compact, look attractive, and handle cooler climates well.
When selecting seeds or seedlings, always check the days to maturity and choose types labeled as “mini,” “compact,” or “early.” This is especially important if your growing season is short or your patio receives less sun. If you live in a particularly warm or cold area, ask local nurseries which cabbage varieties perform best so your container crop thrives, not struggles.
No matter what, pick sturdy, disease-resistant varieties for healthier, less fussy growth. By matching your choice to your climate and container size, you’ll enjoy crisp, homegrown cabbage—even if you’re short on space or new to gardening.
Selecting and Preparing the Perfect Container
Choosing the right container is key for healthy cabbage growth. Aim for a pot or planter that’s at least 12-14 inches deep and wide—cabbage roots need ample room to grow and avoid crowding, which can stunt your plant and reduce your harvest. Good drainage is essential; without it, the soil stays soggy, leading to root rot. Look for containers with several holes at the base, or drill your own if needed.
When it comes to material, consider these options:
- Sturdy plastic pots: lightweight and retain moisture well
- Ceramic pots: offer stability and look great
- Fabric grow bags: provide excellent drainage and aeration, reducing the risk of overwatering
To prepare your container, start with a rich, well-draining soil mix—combine two parts high-quality potting soil with one part compost for a nutrient boost. You can also add a handful of perlite or coarse sand to improve drainage. Before planting, fill the container about an inch below the rim to prevent overflow during watering, then water the mix lightly to settle it.
For an extra healthy start, mix in a slow-release organic fertilizer according to the package instructions. Place your container in a spot that gets at least six hours of direct sunlight per day. If you’re setting up outside, prop the container on pot feet or bricks to encourage air circulation below, which keeps roots healthier.
Preparing your container properly gives cabbage seedlings the best possible start, so take a few extra minutes to set up right—you’ll enjoy stronger, more productive plants all season long.
Planting Cabbage: Step-by-Step Guide
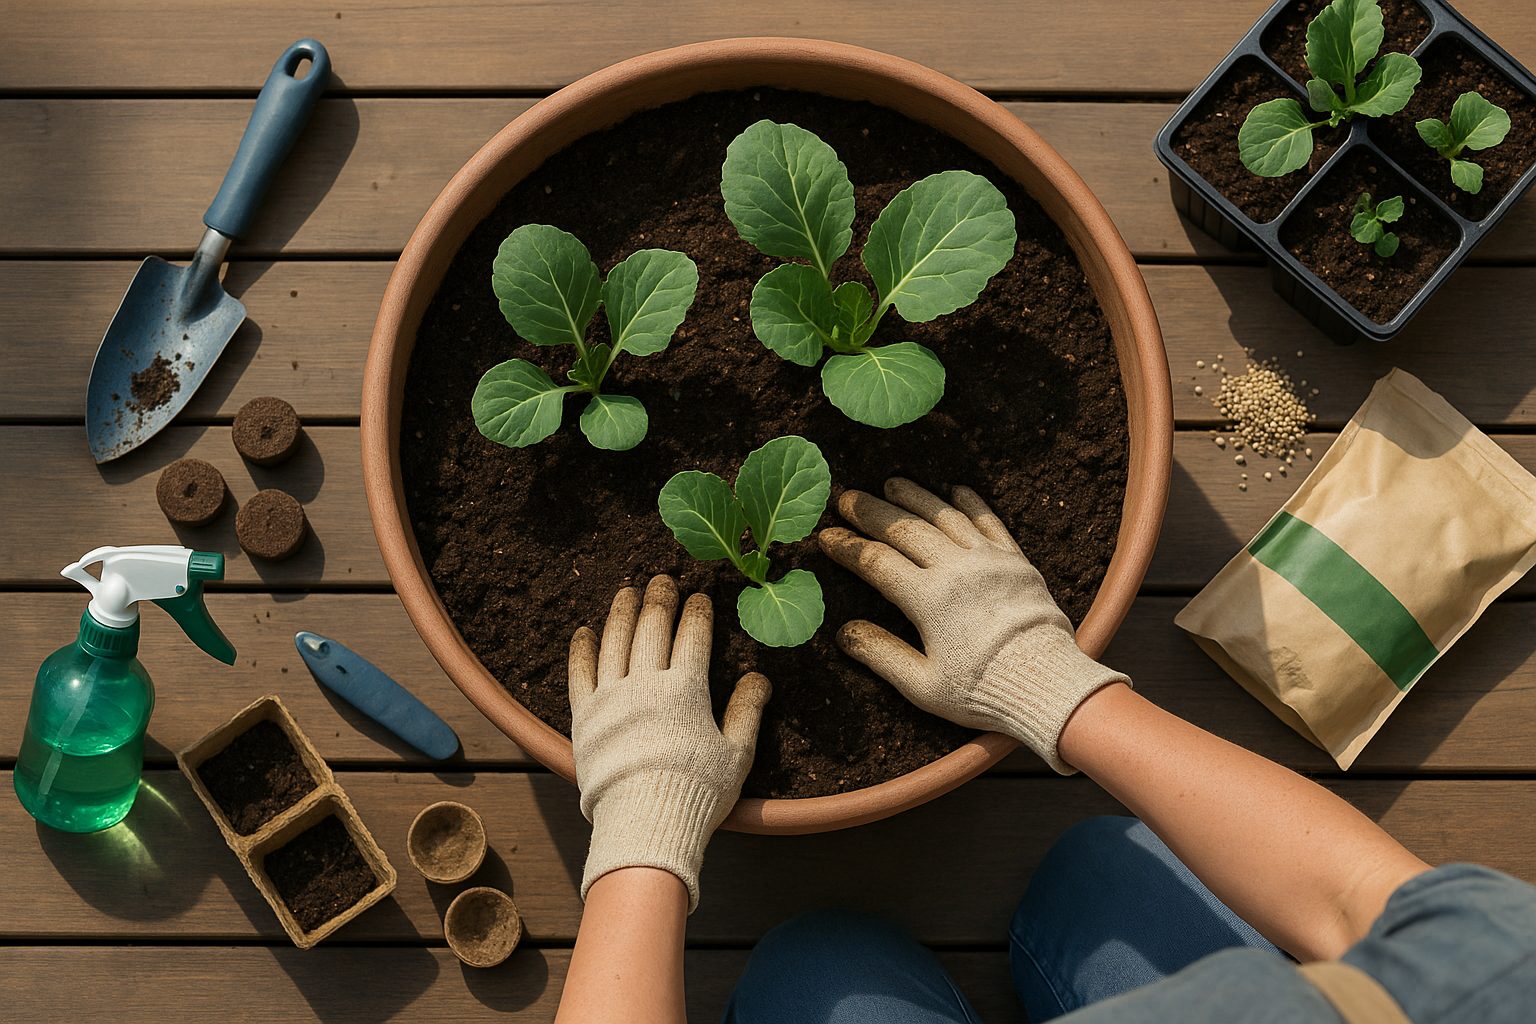
When planting cabbage, you’ll first need to decide whether to start from seeds or purchase young seedlings. Seeds can be sown indoors about 6–8 weeks before your last expected spring frost, allowing you to nurture them under controlled conditions before transplanting outdoors. Seedlings from a nursery are a good shortcut if you want to save time or have a short growing season.
When it’s time to plant, bury seeds or plant seedlings about a quarter-inch deep. In the garden, space each cabbage plant 12–24 inches apart, leaving 24–36 inches between rows—this gives their leaves enough room to spread and heads to form.
Timing is key:
- In cool climates, plant in early spring or mid-to-late summer for a fall crop.
- Gardeners in warmer zones do best with fall and winter sowings to avoid summer’s extreme heat.
If growing in containers, select pots at least 12 inches in diameter and depth. Place containers where they’ll receive at least six hours of direct sunlight daily, such as a south-facing patio or balcony.
To protect young plants from damaging winds, position them near a wall or use temporary windbreaks like garden fabric or old screens. Regularly check the soil moisture, especially for containers, as they dry out faster.
With the right start and careful placement, you’ll give your cabbage the best chance at thriving.
Essential Care: Watering, Fertilizing, and Maintenance
A successful cabbage patch starts with nailing down the basics: watering, fertilizing, and steady maintenance. For watering, consistency is key—cabbage likes even moisture, not soggy soil. Aim for around 1 to 1.5 inches of water per week, whether from rain or hoses, and make a habit of watering early in the day at the base to avoid fungal diseases.
Watch for signs like wilting (underwatering) or yellowing, limp leaves (overwatering), and adjust your schedule as the weather changes.
When it comes to fertilizing, cabbages are heavy feeders and benefit from an initial application of balanced fertilizer at planting, followed by a side-dressing of nitrogen-rich fertilizer when heads start to form. Organic options like compost or fish emulsion enrich the soil naturally, while synthetic fertilizers deliver quick results—just check labels for essential nutrients: nitrogen for leafy growth, phosphorus for root strength, and potassium for resilience.
Maintenance goes beyond feeding and watering. A 2–3 inch layer of straw or shredded leaves keeps the soil cool, locks in moisture, and dramatically cuts down on weeds. Check weekly and pull any weeds by hand before they steal nutrients.
As heads start to develop, mound soil gently against the plant’s base to keep them upright, or use stakes if your region is windy. Regularly remove yellowing leaves and inspect for pests; healthy plants recover from small setbacks easily.
With some attention to these essentials, your cabbage crop will stay vibrant and productive all season.
Managing Pests and Diseases in Container Cabbage
Container-grown cabbage often faces fewer pest and disease problems than garden-planted cabbage, but it’s still important to stay vigilant. Two of the most common pests you might encounter are cabbage worms and aphids.
Cabbage worms—small green caterpillars—can be handpicked in the morning or managed with organic solutions like Bacillus thuringiensis (Bt) spray, which targets caterpillars without harming beneficial insects. Aphids, those tiny green or black bugs clustering on leaves, can be removed by spraying plants with a strong blast of water, introducing ladybugs, or applying a mild insecticidal soap.
Diseases such as clubroot and powdery mildew are less prevalent in containers because fresh, well-draining potting mix is less likely to harbor pathogens. However, to avoid clubroot—a soil-borne disease causing swollen roots and stunted growth—always use clean containers and sterile soil, and avoid reusing soil where brassicas previously grew. Mildew appears as a white, powdery coating and thrives in damp, crowded conditions, so space your cabbage plants well and water at the base to keep leaves dry.
Preventative measures, like crop rotation, regular inspection, and promptly removing any yellowed or damaged leaves, go a long way in keeping issues at bay. If you do spot pests or signs of disease, act quickly:
- Use neem oil
- Apply diluted hydrogen peroxide sprays
- Maintain consistent cleaning around your containers
These offer eco-friendly remedies that help manage problems effectively. By keeping containers elevated, providing good air circulation, and practicing attentive care, you’ll give your cabbage the healthiest possible conditions and minimize the risk of pests and diseases sneaking in.
Harvesting and Storing Your Homegrown Cabbage
Knowing when your potted cabbage is ready to harvest is key for the best taste and texture. Most cabbage heads are ready around 70 to 100 days after planting, depending on the variety. Look for a firm, dense head that feels solid when gently squeezed—if it feels loose or soft, it may need more time.
When harvesting, use a sharp knife to cut the head at the base, leaving a few outer leaves and part of the stem behind; this can help smaller heads sprout later, giving you a bonus crop. Don’t toss the tough outer leaves either—while they may be too fibrous for salads, they work great for soups, compost, or as a natural mulch for your other container plants.
For short-term storage, keep harvested cabbage in your fridge’s crisper drawer, wrapped loosely in a damp paper towel inside a perforated plastic bag; this can keep it fresh for up to two weeks. If you need it to last longer, consider fermenting the cabbage into sauerkraut, or store whole heads in a cool (around 32°F), humid spot like a cellar—just check regularly for signs of wilting or rot.
By making the most of every part of your homegrown cabbage, you’ll reduce waste, stretch your harvest further, and enjoy crisp, home-fresh flavor in your meals for weeks to come.
Creative Uses and Simple Recipes for Fresh Cabbage
Fresh cabbage is a versatile ingredient that shines in quick, healthy meals. If you’re growing it in a container garden, the flavor and satisfaction only get better. Try slicing cabbage thin for a crunchy base in colorful salads—combine it with carrots, apples, and a zesty vinaigrette for a refreshing slaw that’s perfect for picnics or lunchboxes.
For weeknight dinners, toss chopped cabbage into your favorite stir-fry; it cooks fast, so add it at the end with garlic, soy sauce, and a sprinkle of sesame seeds for a crisp, flavorful finish. Homemade sauerkraut is another rewarding option: simply massage shredded cabbage with salt, pack it tightly into a clean jar, and give it a few days to ferment into a tangy, probiotic-rich topping for sandwiches or grain bowls.
Cabbage leaves also make sturdy, healthy wraps—fill them with rice, beans, or leftovers for a quick, satisfying bite. Harvesting a head of cabbage from your patio or balcony garden adds a burst of freshness and pride to each dish, turning ordinary meals into homegrown triumphs.
Whether raw, sautéed, or pickled, fresh cabbage is a budget-friendly way to add vitamins, crunch, and vibrant flavor to any table.