Choosing the Right Kale Variety
kale growing time is a crucial consideration for anyone hoping to enjoy this popular, nutritious, and versatile vegetable fresh from the garden. Whether you’re craving crispy kale chips, adding leafy greens to your smoothies, or tossing tender leaves into salads, knowing how long each kale variety takes to mature is key for planning your harvest.
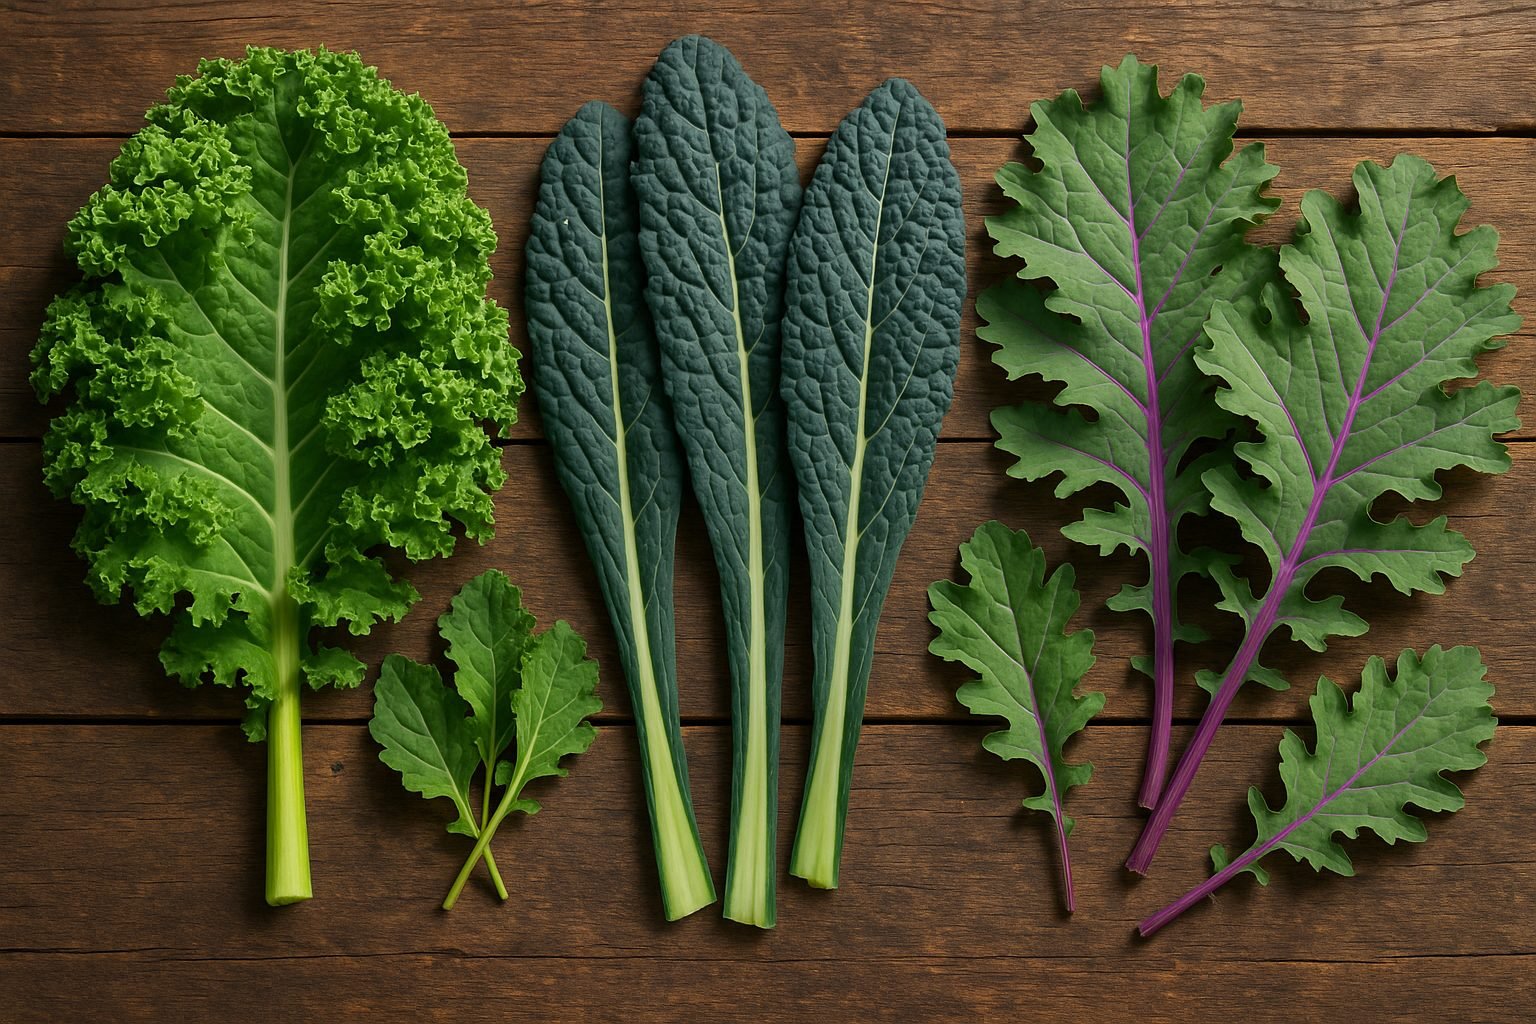
Not all kale is created equal—some varieties, like classic curly kale, boast bright green, ruffled leaves and a robust, slightly peppery flavor. Tuscan kale (also called Lacinato or dinosaur kale) features elongated, dark blue-green leaves with a more delicate, slightly sweet taste. Red Russian kale stands out with its frilly, reddish-tinged leaves and mild flavor, making it a favorite for raw dishes, while dwarf varieties grow compactly and are perfect for smaller gardens or container growing.
Consider Your Climate
When choosing which type of kale to grow, think about your local climate. Curly kale and red Russian tend to withstand colder temperatures well—some gardeners even say frost improves their flavor—while Tuscan kale thrives in milder conditions.
If you love a mild-tasting leaf for eating fresh, red Russian and Tuscan might be your best bet. Curly kale’s bolder bite makes it ideal for cooking. Limited on space? Dwarf varieties let you tuck leafy greens into tight spaces or containers.
Starting with Quality Seeds or Plants
Sourcing high-quality seeds or healthy young plant starts is one of the simplest ways to boost your chances for a thriving kale patch. Look for well-known, reputable seed suppliers, and check for organic or disease-resistant options if possible. Local nurseries may also offer varieties chosen specifically for your region.
Investing a little effort in selecting the right kale variety and starting with good seeds pays off in faster growth, bigger harvests, and a more satisfying homegrown experience.
Preparing the Soil and Planting Site
Getting your soil and planting site right sets the stage for a thriving garden. Most vegetables and flowers grow best in a spot that gets at least six hours of direct sunlight daily—south-facing areas often provide the best light. Aim to plant during the mild temperatures of spring or fall; most crops do well between 60 and 75 degrees Fahrenheit, while cool-season plants like lettuce or broccoli tolerate slightly cooler snaps.
When prepping your garden beds, loosen the soil to a depth of 8 to 12 inches and mix in plenty of compost or well-rotted manure to boost nutrients and improve drainage. Choose a loamy, well-draining soil with a neutral to slightly acidic pH of 6.0 to 7.0—simple home test kits can help you check and adjust the pH if needed. If you’re working with heavy clay or poor drainage, create raised beds or plant in containers with holes at the bottom.
Always rotate where you plant major crop families each year—don’t grow tomatoes in the same spot two seasons in a row—to keep pests and soil-borne diseases in check. To further minimize risk, avoid planting new crops near obvious disease or pest habitats, such as compost piles or old debris.
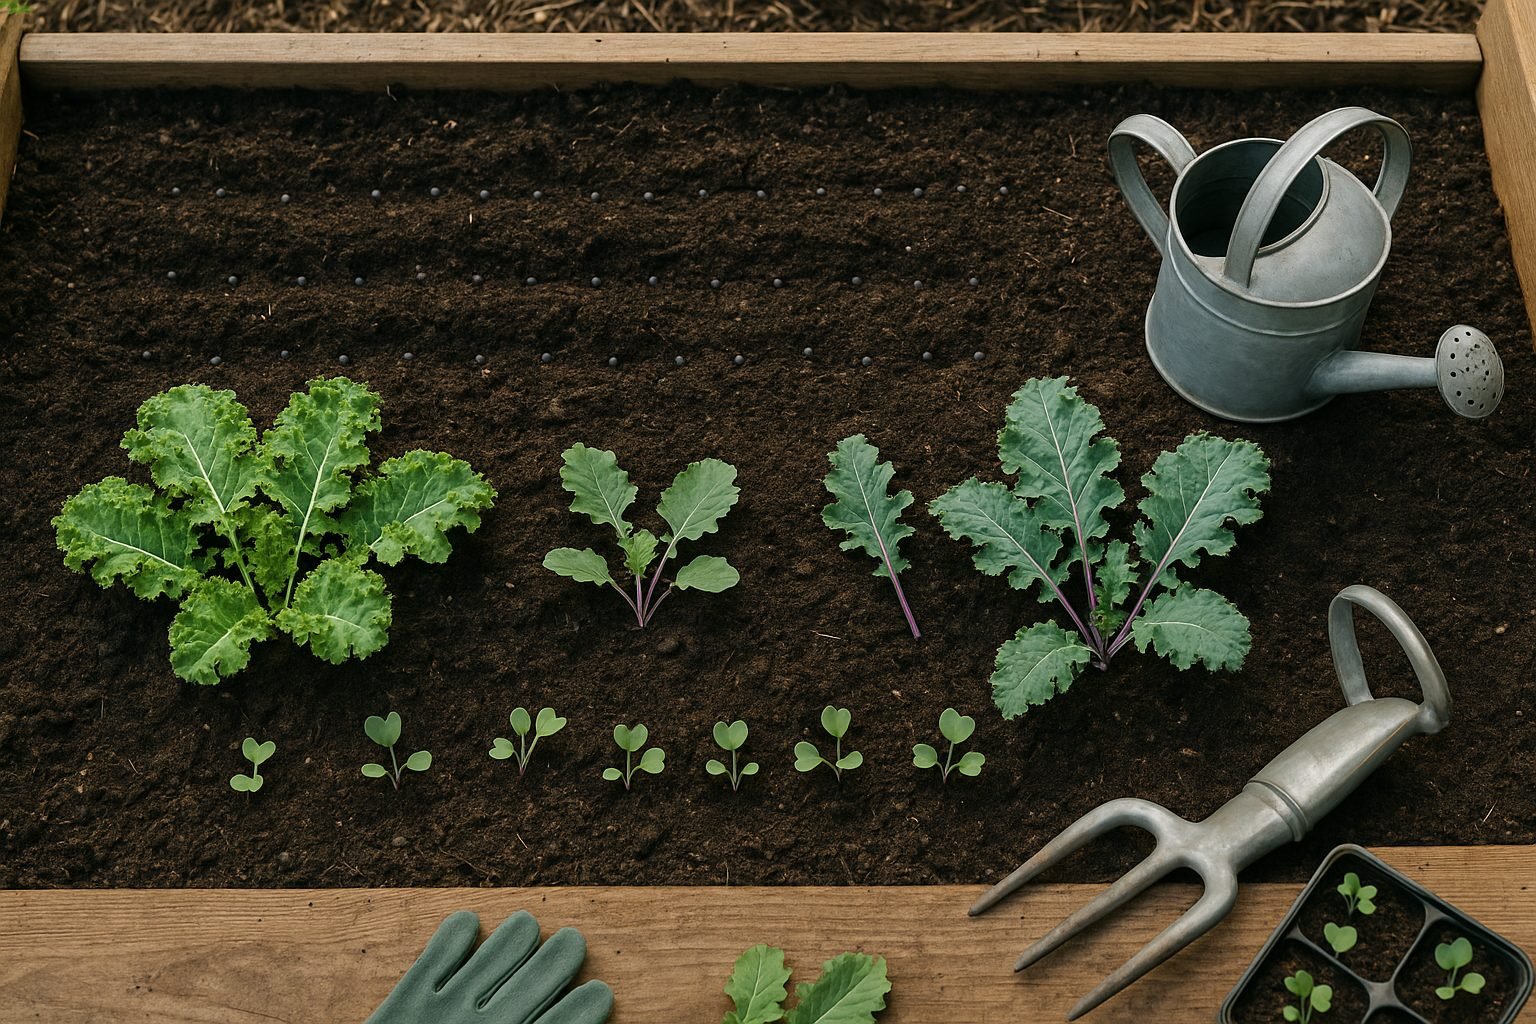
Finally, resist the urge to overcrowd: check your seed packet’s recommendations for proper spacing, and thin seedlings as they grow. Crowded plants compete for light, nutrients, and water, making them weaker and more prone to disease. Whether sowing seeds in rows or setting out young plants, factoring in enough elbow room now means healthier, more productive harvests later.
How to Plant Kale: Seeds vs. Starts
Planting kale can be done in two main ways: direct sowing seeds into your garden or transplanting young seedlings (starts).
If you want to start with seeds, wait until the soil temperature is consistently above 40°F (about 4°C)—typically two to four weeks before your last expected spring frost. Prepare the soil by loosening it and mixing in compost. Then, plant seeds ¼ to ½ inch deep and about an inch apart in rows spaced at least 12 inches apart.
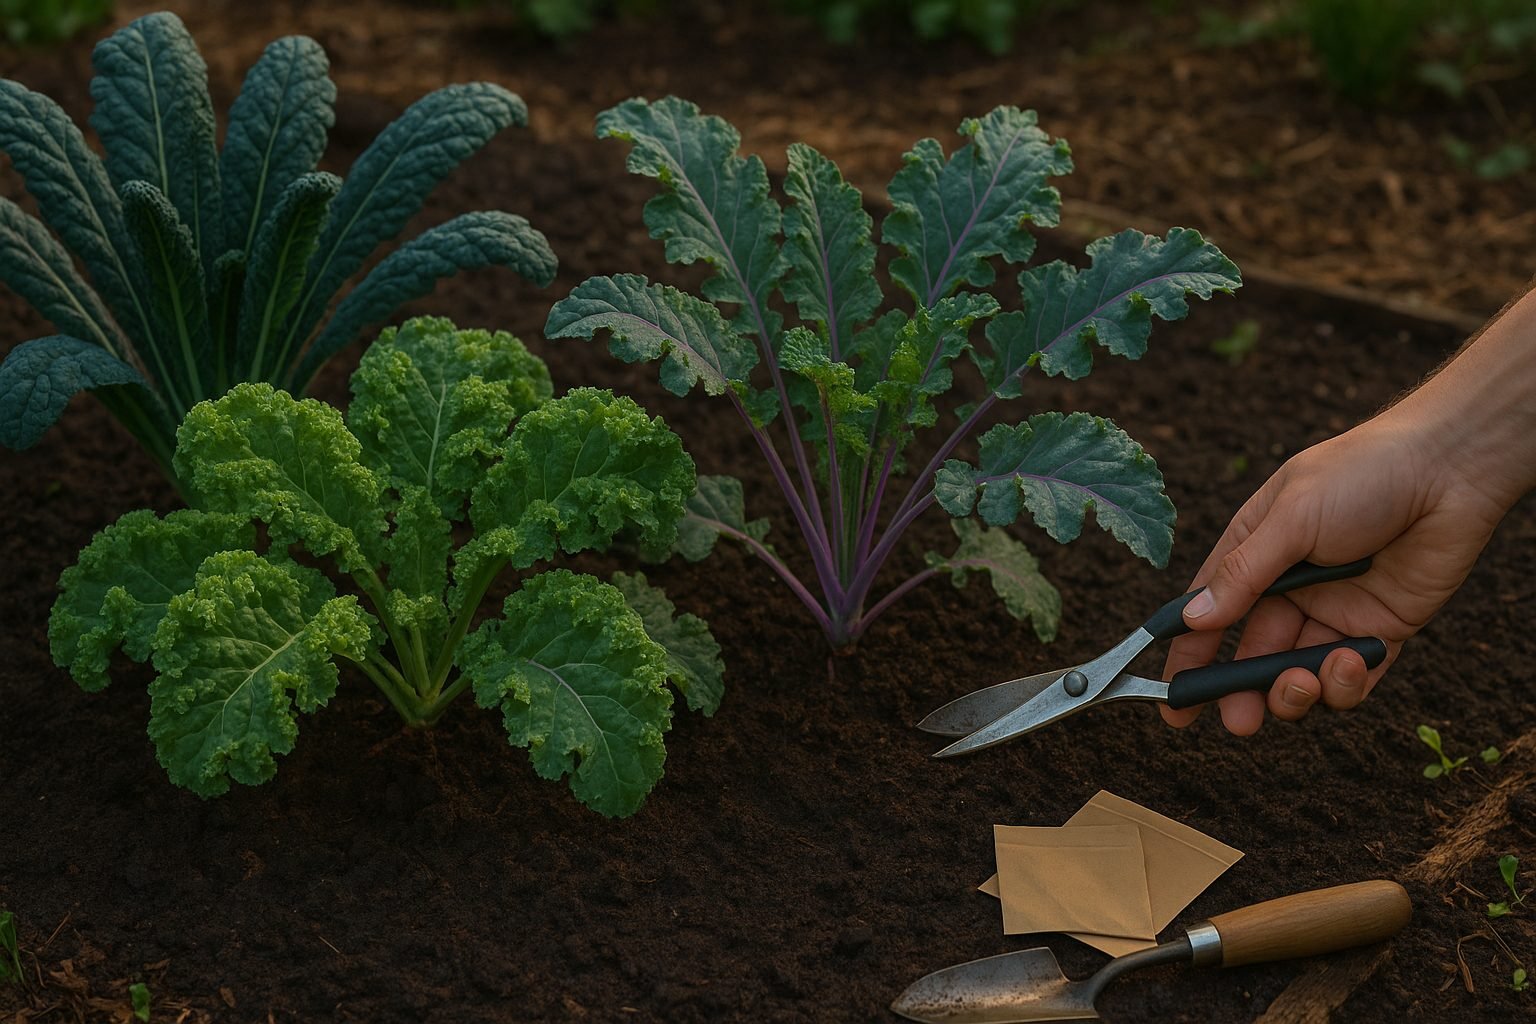
Gently water the soil after planting, keeping it consistently moist but never soggy. Kale seeds usually germinate within 5 to 10 days in cool spring soil. Once the seedlings are a couple of inches tall and have at least two sets of true leaves, thin them so plants are spaced 8 to 12 inches apart. Use small scissors to snip extra seedlings at soil level, rather than pulling them out—this helps avoid disturbing the roots of remaining plants.
If you opt for kale starts, you can give your plants a head start by sowing seeds indoors 4 to 6 weeks before the last frost. Fill seed trays or pots with seed-starting mix, sow seeds at the same depth (¼ to ½ inch), and keep the mix evenly moist.
Seedlings can stay inside under grow lights or near a sunny window until they’re about 3 to 4 inches tall and have developed several true leaves. Before moving them into the garden, harden off the young plants over a week by gradually exposing them to outdoor conditions. Start with an hour or two outside in a sheltered spot, increasing the time and sunlight exposure each day until they’re spending full days outside.
When ready to plant, pick a cloudy day or late afternoon to reduce transplant shock, and set each seedling 8 to 12 inches apart, at the same depth they were growing indoors. Water deeply after transplanting and keep the soil consistently moist as the starts settle in.
Whether sowing seeds directly or transplanting young plants, proper spacing and consistent moisture are crucial for growing robust, leafy kale.
Caring for Your Kale Plants
Caring for your kale plants starts with getting the watering routine just right; kale thrives when the soil is consistently moist but not soggy. Aim for about one to one and a half inches of water each week, adjusting as needed during hot or dry spells. Water at the base of the plants in the morning to help prevent fungal diseases and encourage deep root growth, which in turn supports lush, healthy leaves.
Alongside proper watering, fertilizing is key to robust kale. For organic options, side-dress every 3-4 weeks with well-composted manure or apply a balanced organic fertilizer—this helps gradually feed the plants while supporting soil health. If you prefer conventional fertilizers, use a slow-release, balanced product (like 10-10-10) once at planting and again midway through the season, but be cautious not to overdo it; too much nitrogen can lead to lots of leafy growth with reduced flavor. Whichever method you choose, always follow label directions, and water plants before and after fertilizing to prevent root burn.
Weed Control
Weed control is another important aspect of kale care. Weeds compete for nutrients and moisture, so make a habit of gently pulling them by hand or using a hoe, especially when plants are young and more vulnerable. To cut down on weeding and help your soil retain moisture, spread a two- to three-inch layer of organic mulch such as straw, compost, or shredded leaves. Mulching also keeps roots cooler during the heat, conserves water, and can even help deter some pests. Pay attention to keeping the mulch a few inches away from the plant stems to avoid encouraging rot or harboring unwanted insects.
Pest and Disease Management
Speaking of pests, kale can attract a variety of unwelcome guests like aphids, cabbage worms, and slugs, as well as fungal diseases. To fend off aphids, spray your plants with a strong jet of water or introduce beneficial insects like ladybugs—which can be purchased from many garden centers. For cabbage worms, floating row covers can physically block butterflies from laying eggs, and hand-picking caterpillars in the morning works surprisingly well if you have a small patch.
Removing lower leaves that touch the soil and spacing plants properly improves airflow, which helps reduce the risk of fungal infections such as downy mildew. If disease appears, trim off affected leaves promptly, rotate crops each year, and avoid overhead watering to stop the spread.
Troubleshooting Common Issues
When troubleshooting issues, yellowing kale leaves often signal overwatering, nitrogen deficiency, or pest problems. Make sure the soil drains well and check for clusters of insects under the leaves. Slow growth could mean the soil is too cool, low on nutrients, or you’ve planted your kale in too much shade—relocate to a sunnier spot or feed the plants to help them thrive.
If your kale suddenly sends up a flower stalk (bolting), it’s usually a result of warm temperatures or longer daylight, which signals the plant to go to seed. While bolting can’t always be prevented, planting kale early in spring or mid-to-late summer for a fall crop helps minimize this, as cool weather extends the harvest.
Ultimately, careful daily observation, prompt attention to problems, and a little preventive care will keep your kale beds productive and teeming with nutrient-rich greens all season long.
Harvesting and Storing Kale
Harvesting kale at the right time is key to getting leaves that are both tender and flavorful. The best moment is when the leaves are about the size of your hand, usually 55 to 75 days after planting for mature plants, or even sooner for baby greens. Pick in the early morning when temperatures are cool—this preserves crispness and reduces wilting.
To maximize your harvest and keep the plants growing, use a simple technique: snip or pinch off only the outermost, lower leaves, leaving at least 4 central leaves (the crown) intact so the kale can keep producing. Avoid removing the top center bud, as it’s the growth point for future leaves. Check your plants every few days; regular, gentle harvesting will prompt the plant to send out new foliage, letting you enjoy a steady supply throughout the season.
Storing Kale for Freshness
Once harvested, how you store your kale makes all the difference for freshness and flavor. For short-term storage, rinse the leaves gently, shake off excess water, and wrap them in a slightly damp paper towel before tucking them into a perforated bag or an open plastic produce bag. Then, refrigerate in your crisper drawer. This simple method keeps them crisp for up to a week.
For longer storage, freezing is a great option: blanch chopped kale for two to three minutes in boiling water, cool quickly in ice water, drain well, and pack into freezer-safe bags, squeezing out as much air as possible. This preserves color, flavor, and nutrients for up to six months.
If you prefer, dehydrating is another long-term option. Spread kale leaves in a single layer on a dehydrator tray or baking sheet, and dry at low heat (around 125°F or 52°C) until brittle. Store the dried leaves in an airtight jar and crumble them into soups, stews, or smoothies for a nutritional boost.
Cooking with Homegrown Kale
Homegrown kale is incredibly versatile in the kitchen, making it easy to rotate through meal ideas and avoid boredom.
- Sauté kale with garlic and olive oil for a quick side dish.
- Blend it into smoothies for a nutritious breakfast.
- Toss chopped kale into soups and stews.
- Bake it with a sprinkle of salt for crispy, homemade kale chips.
- Massage kale with lemon juice and olive oil for a tender salad.
- Stir it into pasta.
- Add it to egg dishes like frittatas or quiches.
With all these storage and meal options at your disposal, you’ll be able to enjoy the flavors of your kale harvest well into the off-season.
Growing Connections: Community and Resources
Getting involved with local gardening groups or online communities can totally transform your gardening journey, especially if you’re just starting out. Whether you’re meeting neighbors at the community garden or posting questions in a Facebook group, these spaces let you swap seeds, share practical tips, and troubleshoot common problems together.
You’ll often find someone who’s grown exactly the variety of kale or tomatoes you’re eyeing and can offer hands-on advice. Don’t overlook Cooperative Extension services—they provide free, science-backed information, soil testing, and workshops tailored to your region.
Websites like the National Gardening Association, RHS, or your local botanical garden’s site are absolute goldmines for trusted guidance on everything from sowing schedules to pest management.
For in-depth reading, beginner-friendly books such as The Vegetable Gardener’s Bible by Edward C. Smith or All New Square Foot Gardening by Mel Bartholomew can serve as your go-to manuals.
As you dig deeper, remember that no two gardens—or gardeners—are alike. So, experiment with small plots, try new seed varieties, and keep notes on what works (and what flops).
Most communities welcome volunteers in shared gardens or school plots. Joining these not only sharpens your skills but also supports local food systems and inspires others to grow their own veggies.
Let curiosity lead the way, and you’ll soon find gardening is as much about growing connections as it is about growing crops.