Why Grow Garlic in Raised Beds?
Building a budget garlic bed might be one of the smartest gardening moves you’ll make this season. Raised beds offer tangible benefits when growing garlic, making them a go-to choice for home gardeners looking to maximize flavor and yield without breaking the bank.
With raised beds, drainage is vastly improved — crucial for garlic, which hates soggy roots and is prone to rot in poorly drained soil. You also get full control over the soil mix, letting you fine-tune fertility, texture, and pH to suit garlic’s needs, all while keeping costs low by sourcing compost or amendments locally. Managing weeds becomes less of a headache, too; a well-prepared budget garlic bed can use cardboard or mulch to suppress weeds, freeing you to focus on bigger harvests instead of constant weeding.
The practical advantages go beyond plant health. Raised beds are most efficient for small spaces and make it simpler to reach and tend your plants, reducing back strain and making garlic cultivation accessible to all ages. In contrast, traditional in-ground planting may expose garlic to compacted soil, inconsistent nutrients, and competition from persistent weeds, often resulting in stunted bulbs and disappointing yields.
Why Is Garlic So Popular Among Home Growers?
Beyond the punch it adds to countless dishes, garlic is ultra-versatile: roasted whole, minced into vinaigrettes, or blended into pestos—the uses are endless. Plus, homegrown garlic typically boasts stronger flavor and stores longer than supermarket options, rewarding you for your efforts.
Whether you’re new to gardening or a seasoned grower, a budget garlic bed in a raised setup can make your experience both successful and satisfying. You don’t need fancy materials—recycled wood or no-frills cinder blocks can do the trick. With minimal investment and smart planning, you’ll enjoy garlic that outshines store-bought bulbs, with superior taste and a sense of homegrown accomplishment.
Choosing the Best Garlic Varieties for Raised Beds
When choosing garlic for your raised beds, start by understanding the two main types: softneck and hardneck. Softneck garlic is often favored by home gardeners, especially in milder climates, because it generally stores longer and can yield more bulbs per plant. Varieties like California Early, Inchelium Red, and Silver Rose are popular softnecks that offer mild to robust flavors and can last up to eight months when stored properly.
Hardneck garlic, on the other hand, thrives in colder regions and is prized for its complex flavors, along with easy-to-peel cloves. Reliable hardneck varieties for raised beds include Music, known for its rich, spicy flavor and strong growth habit, German Extra Hardy, and Chesnok Red, which is sweet when roasted and stores surprisingly well compared to other hardnecks. Both types perform well in raised beds, but the looser, well-draining soil found in these gardens especially benefits hardneck garlic, which is susceptible to rot in soggy conditions.
When deciding which variety to plant, think about your climate, preferred flavor profile, and how long you want your garlic to last in storage. For example, gardeners in the northern US or Canada often succeed with hardneck types thanks to their winter chill requirement, while those in southern climates usually opt for softneck varieties. Raised beds offer excellent drainage and aeration for bulb formation, which minimizes disease risks, but make sure to plant certified seed garlic rather than supermarket bulbs, which may not be disease-free or appropriate for your local plant hardiness zone.
Reliable sources for seed garlic include specialty online retailers like Filaree Garlic Farm, Seed Savers Exchange, or local farmers’ markets in the fall. Many of these sources offer detailed notes on each variety’s strengths, ideal planting time, and local adaptability, making it easier to find a match for your garden conditions. Avoid grocery store garlic, as it’s often treated to prevent sprouting and may carry soil-borne diseases that can linger in your garden beds.
By choosing reputable seed stock and selecting varieties tailored to your region, you’ll set yourself up for a bountiful garlic harvest that’s flavorful, reliable, and suited for long-term storage, making raised bed gardening both fun and rewarding.
Preparing Your Raised Bed for Garlic
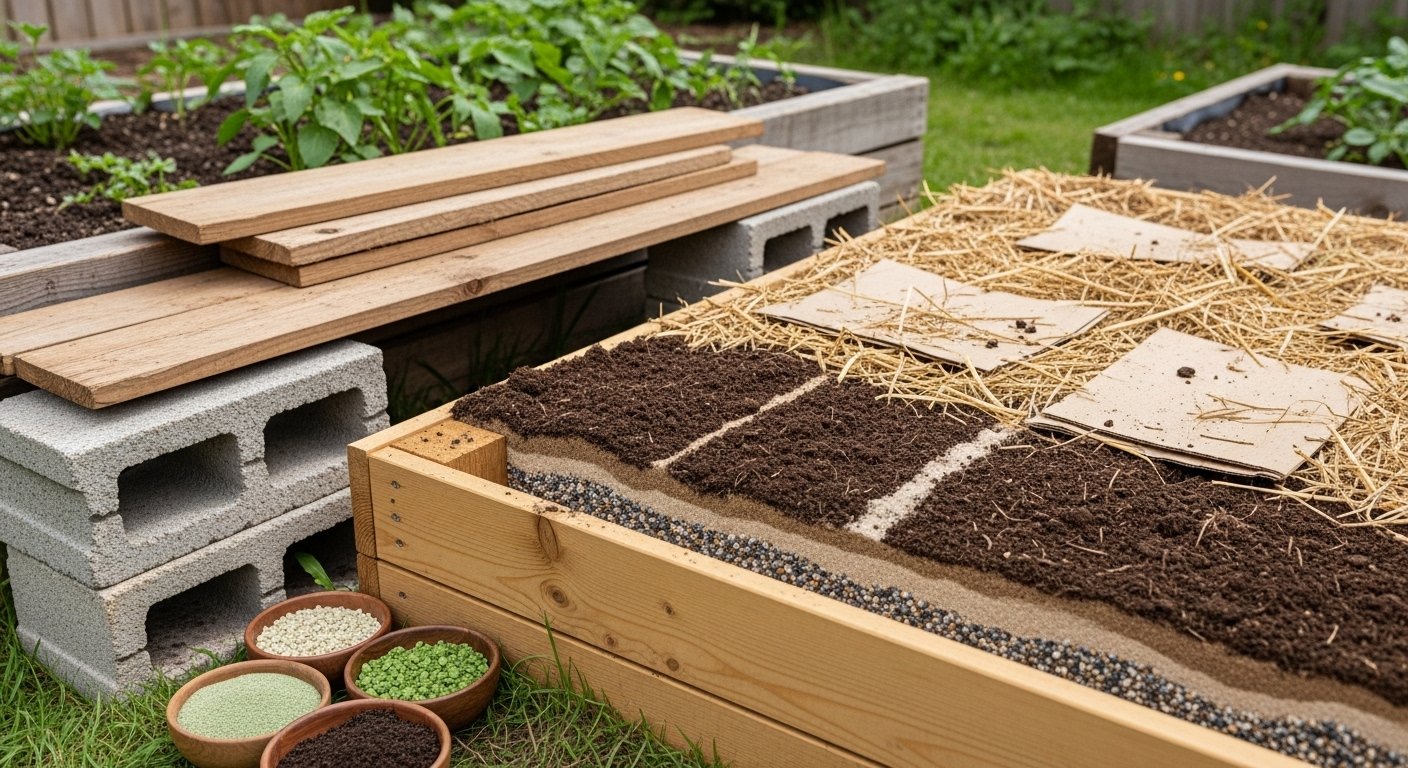
Getting your raised bed ready for garlic is all about creating the right soil environment and setting up a layout that makes planting, watering, and harvesting easy. Garlic thrives in loose, well-drained soil with a loamy or sandy texture — anything too heavy or clay-based can cause compacted roots and poor bulb development.
Aim for a pH between 6.0 and 7.0, which you can check with an inexpensive soil test kit (many garden centers carry these). Garlic is a heavy feeder, so start by mixing several inches of high-quality compost or well-rotted manure into the bed to deliver organic matter and nutrients. If your soil test shows low phosphorus or potassium, add amendments like bone meal, rock phosphate, or greensand.
For drainage, make sure your bed is at least 8–12 inches deep. If you’re starting with dense native soil underneath, consider putting a layer of coarse sand or gravel before adding your soil mix to prevent soggy garlic beds. Be sure to avoid fresh manure, which can burn tender cloves and encourage disease.
For a raised bed, shoot for a width of about 3–4 feet — this allows you to reach across easily from either side, minimizing soil compaction. The length is flexible, but keep the paths at least 18 inches wide so you can access every plant without stepping into the bed.
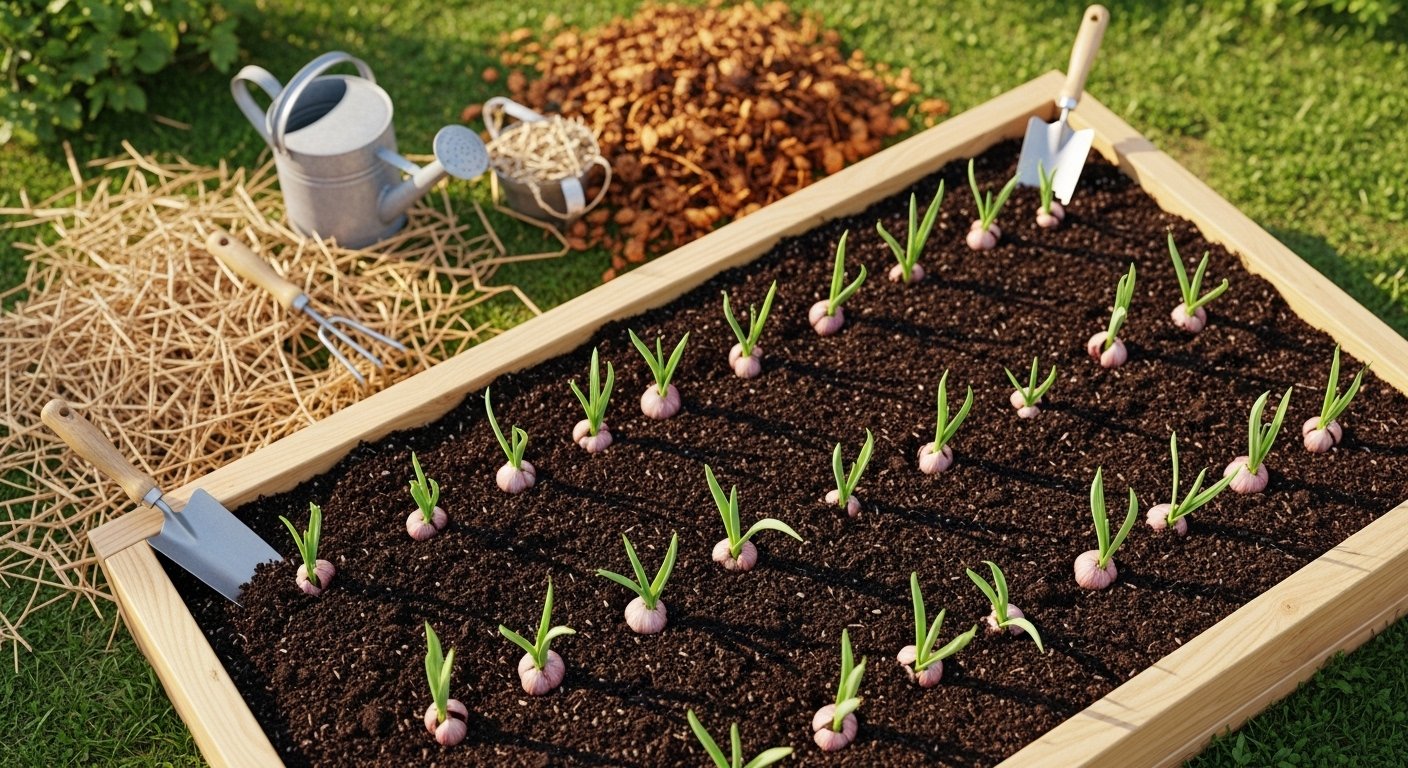
Laying Out Your Garlic
When planting, set cloves in rows 6 inches apart, spacing each clove 4–6 inches apart within the row. Stagger the rows in a zig-zag pattern for maximum airflow and sunlight.
Consider edging your bed with wood or stone to retain soil and moisture, but make sure there’s no treated lumber that could leach chemicals. Top the bed with a 2–3 inch layer of mulch—like straw or shredded leaves—to help conserve moisture, suppress weeds, and protect overwintering cloves in cold climates.
By focusing on these soil and layout details before you plant, you’ll give your garlic its best shot at producing big, healthy bulbs come harvest time.
How and When to Plant Garlic in Raised Beds
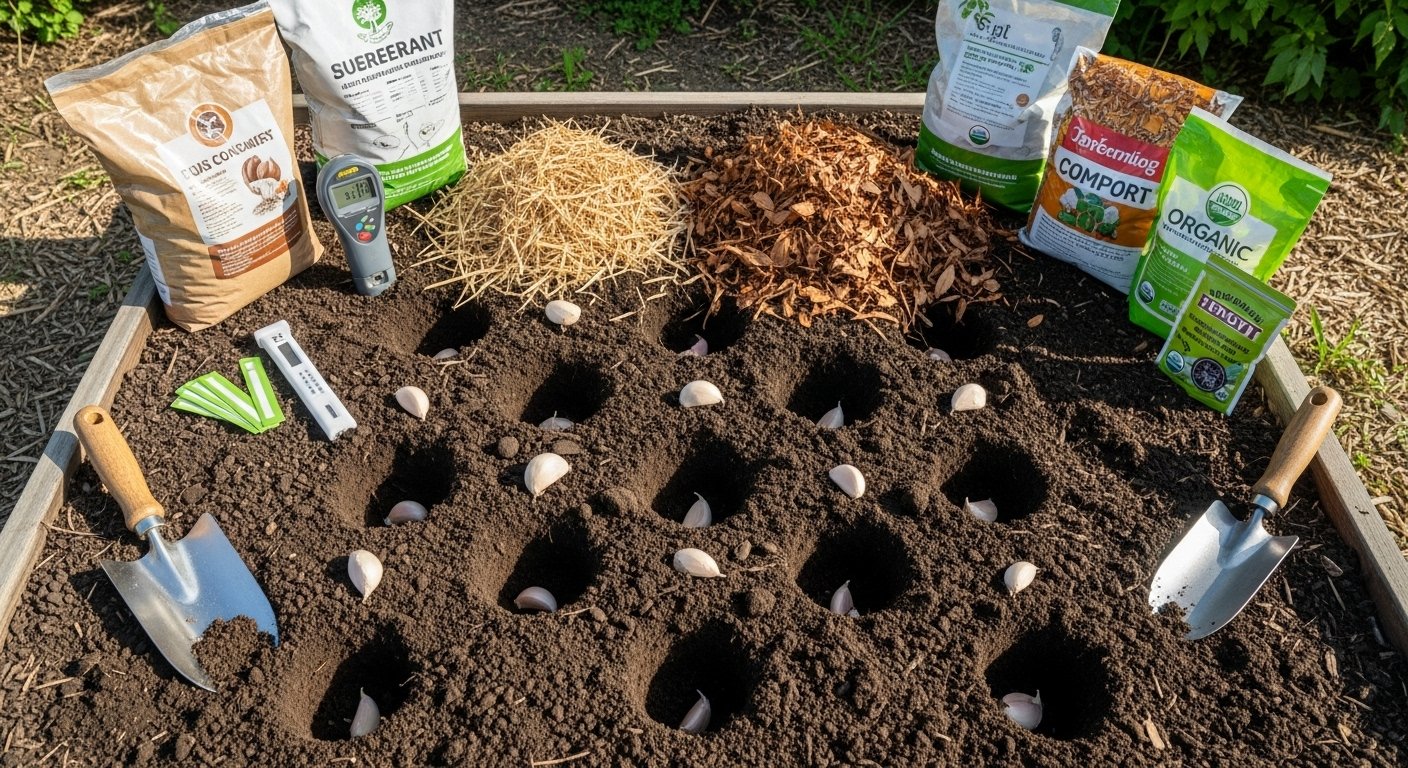
Garlic thrives when planted in raised beds during the cooler months, ideally a few weeks before your region’s ground freezes—typically mid to late fall (October in most temperate zones). To get started, first choose healthy, plump garlic cloves. Avoid any that look shriveled or have mold.
Break apart the garlic bulbs just before planting, leaving the papery skins on each clove. In your raised bed, use a trowel to make rows or holes about 2 to 3 inches deep. Space each clove 4 to 6 inches apart, with rows about 8 inches apart to promote good airflow and growth.
Always place each clove with the pointed end facing up and the flat end (root side) down—this ensures strong upward growth. Once the cloves are nestled in, cover them with soil and gently press down to remove air pockets.
Immediately after planting, water thoroughly to help settle the soil and jump-start root development. To protect the cloves from temperature fluctuations and retain soil moisture, spread a layer of mulch—such as straw, shredded leaves, or loose grass clippings—about 2 inches thick over the bed. Mulching not only insulates the garlic through winter but also helps suppress weeds in spring.
With these steps, your garlic will quietly establish roots before the ground freezes and be ready to burst into growth as soon as warmer weather returns.
Growing and Caring for Garlic Through the Seasons
Garlic is a resilient crop, but it thrives best with a little attention throughout the seasons. After planting cloves in the fall—about 2 inches deep and 6 inches apart—give the newly planted garlic a thorough watering, then keep the soil just moist (not soggy) as the roots establish.
Mulching right after planting is key; a 3-4 inch layer of straw or shredded leaves insulates the bulbs, conserves moisture, suppresses weeds, and offers crucial winter protection. As temperatures drop, this mulch helps prevent frost heaving, where freezing and thawing push bulbs out of the soil. In colder climates, check that the mulch remains thick and even to shelter garlic from harsh winds and temperature swings.
Come spring, as shoots emerge, gradually remove some mulch to let the soil warm up, but keep enough to control weeds since garlic doesn’t compete well with them. A little hand-weeding now and then saves the plants from stress.
Spring Growth and Watering
Consistent, even moisture is vital during garlic’s rapid spring growth. Water deeply once the top inch of soil feels dry, but avoid soaking, as garlic hates wet feet, and soggy bulbs can rot. As the leaves start to yellow in early summer, taper off watering—this signals harvest time is approaching.
Fertilizing Your Garlic
Garlic is a moderate feeder. Work a balanced, slow-release fertilizer or compost into the soil at planting time, then side-dress with nitrogen-rich fertilizer in early spring as new green shoots appear. Watch your plants:
- Yellowed tips may indicate nitrogen deficiency.
- Purpling leaves could signal a lack of phosphorus.
- Weak, pale growth sometimes points to insufficient potassium.
Adjust fertilizer slowly, as overfeeding can harm bulbs. If in doubt, a soil test takes the guesswork out of fertilizing.
Winter Care and Overwintering
When caring for garlic through winter, especially in areas with deep frost or fluctuating temperatures, reinforce the mulch and make sure the bed isn’t in a spot where water pools. Raised beds help drain excess winter moisture.
If an unexpected warm spell causes shoots to break dormancy early, don’t panic—leave the mulch in place to gently slow growth until true spring returns.
By paying attention to watering, mulching, weed control, overwintering, and timely fertilizing, you’ll guide your garlic from chilly planting days to abundant summer harvests, with each clove maturing into a plump new bulb ready for the kitchen.
Harvesting, Curing, and Storing Garlic
Knowing when to harvest garlic is key to enjoying a flavorful, long-lasting crop. Watch for the lower leaves to turn yellow and dry—a sign the bulbs have matured—while the top five or six leaves remain mostly green. This usually happens in midsummer, about seven to eight months after planting.
Avoid waiting until all leaves have died back, as overripe bulbs will split their papery skins underground, making them prone to disease and poor storage. Choose a dry day to harvest, and use a garden fork or shovel to gently loosen the soil around a clump of garlic. Take care not to stab or bruise bulbs, as even small injuries can shorten storage life.
Grasp the stems near the base and lift the bulbs from below, shaking off excess dirt but avoiding washing them—moisture encourages rot.
Curing Garlic
Once you’ve gathered your harvest, the next step is curing, which ensures long-term freshness and rich flavor. Lay garlic bulbs in a single layer on a screen, rack, or mesh tray, or tie them in loose bunches and hang them to dry.
Cure garlic in a well-ventilated, shaded space where air can circulate freely (a garage, carport, or covered porch works well). Avoid direct sunlight—it can cause bulbs to sunburn and lose flavor. Let them dry for two to four weeks, depending on weather humidity, until the outer skins are papery and the necks are dry.
After curing, trim the roots to about a quarter inch and cut stems down to an inch above the bulbs, or braid softneck varieties if you prefer.
Storing Garlic
To store garlic long-term, keep the cured bulbs in a cool (50–60°F), dry, and well-ventilated place like a pantry, unheated basement, or cellar. Mesh bags, paper bags, or slatted baskets are ideal since they allow airflow and prevent mold.
Don’t refrigerate whole bulbs; the fridge’s humidity and cold can trigger sprouting. Store only intact, firm bulbs—use up any damaged or small ones first. Check your garlic stash every few weeks, removing any soft or sprouting bulbs to keep the rest healthy.
With these steps, your homegrown garlic could last six months or more, ready to infuse flavor into your favorite dishes all winter long.
Common Questions and Troubleshooting Raised Bed Garlic
Gardening with raised beds makes growing garlic both rewarding and straightforward, but it’s natural to have a few questions or run into some hiccups along the way. One common concern is garlic’s cold tolerance—fortunately, garlic is very hardy and can survive winter temperatures as low as -30°F when planted in the fall and insulated with a layer of mulch, such as straw. Just ensure your bed drains well, as soggy soil over winter is more damaging than the cold itself.
Pests and diseases can sometimes crop up, with onion maggots and thrips being the most frequent insect culprits; these can be managed by rotating your garlic with other crops each year and keeping beds weed-free to reduce places for pests to hide. Fungal issues like white rot or rust can also appear, especially in wet years—if you spot yellowing leaves with fuzzy spots or white, fluffy growth at the base, pull affected plants and avoid planting garlic or other alliums in that spot for a few years.
Harvesting Small Garlic Bulbs
A classic frustration for many gardeners is harvesting small garlic bulbs. This can result from planting small cloves, overcrowding, or inadequate sunlight. Always plant large, healthy cloves 4–6 inches apart, in a sunny location with at least six hours of direct sun each day.
Raised beds tend to dry out faster than in-ground gardens, so check moisture often—garlic likes consistently moist but not soggy soil. Mulching helps retain moisture and keeps weeds at bay, but don’t mulch too heavily as this can slow spring growth.
Don’t overlook proper nutrition: garlic is a heavy feeder. If bulbs seem small, side-dress with compost in early spring or use a balanced organic fertilizer when shoots are a few inches tall.
Dealing with Yellowing Leaves and Other Issues
Sometimes garlic leaves will yellow or die back before bulbs have matured, which can indicate either overwatering, underwatering, or nutrient deficiencies. Try using your finger to check soil moisture a few inches down—if it’s dry, water deeply; if it’s puddling, your bed may need better drainage.
Also, watch for signs of nitrogen deficiency, such as pale, stunted leaves—adding blood meal or fish emulsion can help. Another tip is to stop watering altogether two or three weeks before harvesting; this makes bulbs cure better and enhances flavor.
Final Tips
With these troubleshooting tips—ensuring good drainage, sun, occasional feeding, and pest vigilance—you’ll be well on your way to big, flavorful garlic heads each summer. Don’t get discouraged by setbacks; even seasoned gardeners run into challenges, but with patience and a sharp eye, you can consistently improve your results year after year.