
Introduction to Kale Gardening
Growing curly kale has become a favorite project for home gardeners—and with good reason. This vibrant leafy green isn’t just stylish in salads and smoothies; it packs an incredible punch of vitamins, minerals, and antioxidants, making it a nutritional superstar for families everywhere.
Kale’s rich doses of vitamins A, C, and K, along with fiber, calcium, and disease-fighting compounds, have helped fuel its meteoric rise from humble garden staple to must-have kitchen ingredient. But beyond the nutrition, curly kale is truly rewarding to grow at home.
It thrives in a variety of conditions, resists most common pests, and can be harvested over many weeks, making it both practical and satisfying for beginners and experienced green thumbs alike. Whether you have a backyard plot, raised bed, or only a few containers on a balcony, curly kale doesn’t demand much: it’s cold-hardy, tolerates partial shade, and bounces back from light frosts sweeter and more flavorful than ever.
Imagine picking fresh curly leaves just steps from your door—whether you’re tossing them into a salad, crisping them up as chips, or stirring them into your favorite stew, homegrown kale will elevate your meals and impress your friends. If you’ve wished for a productive and low-fuss crop, there’s no better place to start than with kale.
Over the next steps, you’ll learn how to choose the best spot, sow seeds, and care for your crop, ensuring success no matter the size of your garden.
Choosing the Best Kale Varieties
When choosing the best kale varieties for your garden or kitchen, it helps to know the main types and what sets them apart.
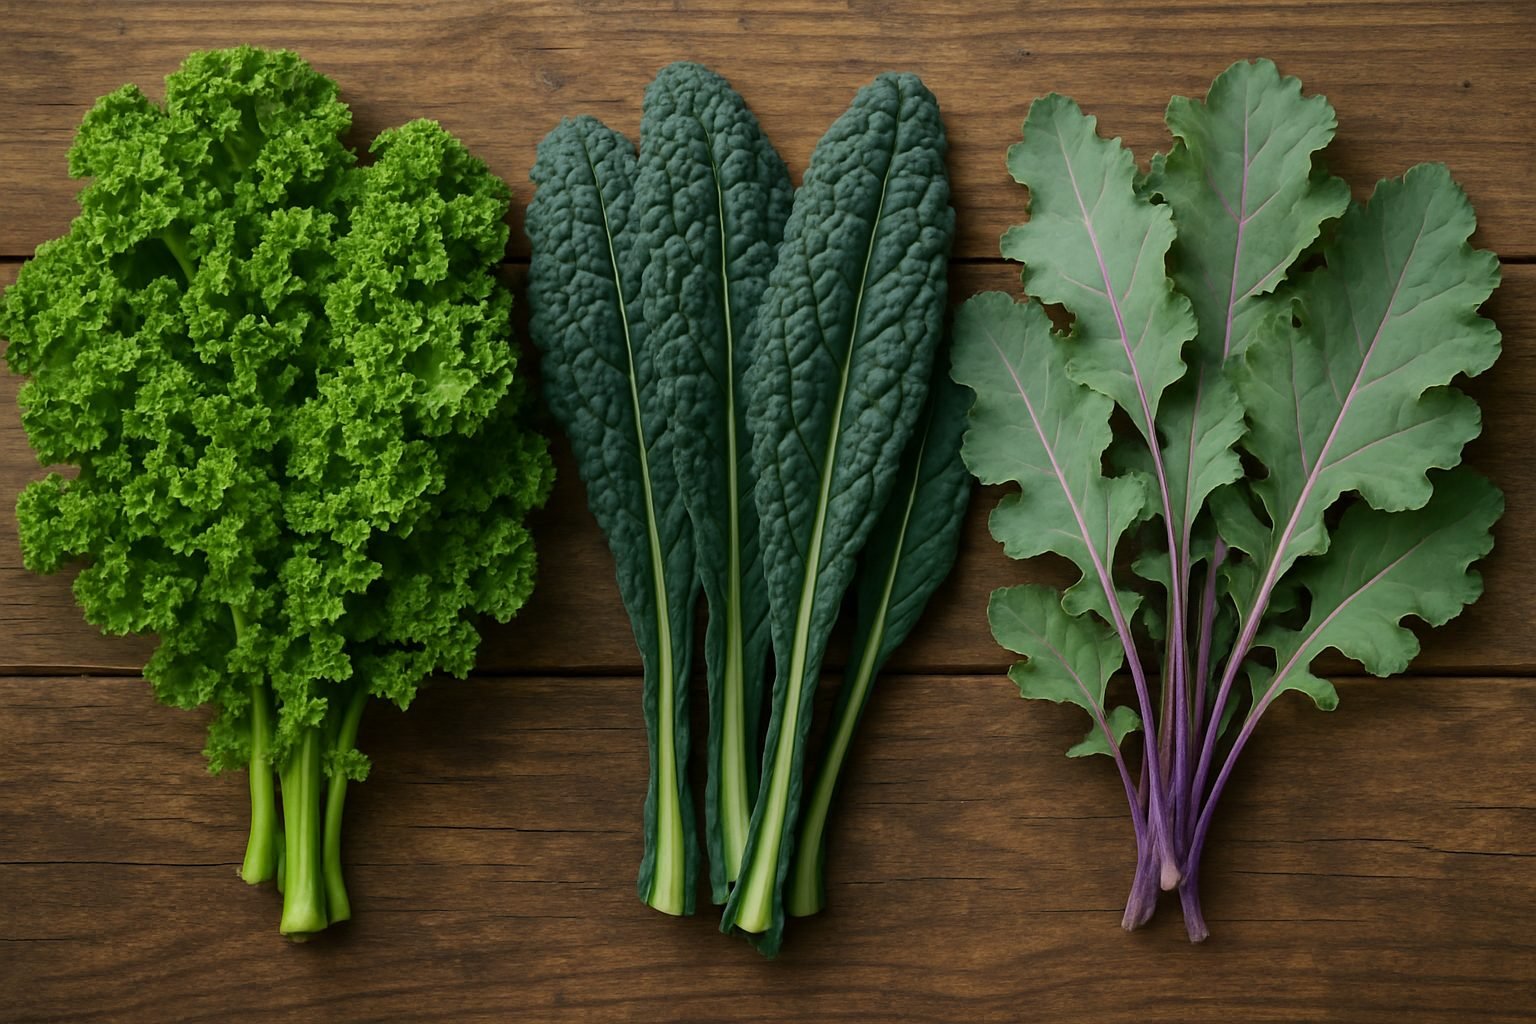
Curly kale is the most common, with ruffled green leaves and a peppery flavor that mellows when cooked—it’s great for tossing into salads, smoothies, and soups.
Lacinato kale, often called dinosaur or Tuscan kale, has dark blue-green, bumpy leaves and a sweeter, earthier taste, making it perfect for sauté́s and hearty stews.
Red Russian kale brings visual flair with its purple stems and tender, flat leaves, offering a milder, slightly sweet flavor that’s ideal raw or lightly wilted.
When selecting a variety, consider your local climate; Lacinato tolerates heat better than curly kale, while Red Russian excels in cooler temperatures and can even survive light frosts, which boost its sweetness.
Think about your preferred flavors too—if you dislike bitterness, go for Red Russian, or choose baby kale leaves of any type for the mildest taste.
Space and harvest style matter as well: curly kale grows bushy and tall, Lacinato is more upright and compact, and Red Russian sprawls.
If visual appeal is important, mixing varieties creates a vibrant, textured salad bed.
For reliable seeds, stick to local garden centers, especially those specializing in organic varieties, or reputable mail-order companies and online stores such as Johnny’s Selected Seeds, Baker Creek Heirloom Seeds, or Seed Savers Exchange. These sources offer clear descriptions and growing advice, making it easier to match your ideal kale to your region and taste preferences.
Preparing to Plant Kale

Kale thrives when you set it up for success right from the start—beginning with the soil. This leafy green loves rich, well-draining soil with plenty of organic matter; mixing in a couple of inches of mature compost goes a long way to boost nutrients. Aim for a neutral to slightly acidic pH, ideally between 6.0 and 7.0, which you can check with an inexpensive soil kit from a garden center.
Good drainage is crucial since soggy roots lead to disease. If your garden soil is heavy clay, consider adding coarse sand or starting kale in raised beds or large containers with holes for excess water to escape.
Sunlight is another must: kale grows best with at least 6 hours of direct sun per day, so pick a spot that avoids long stretches of shade, whether you’re planting in the yard or on an apartment balcony.
For spacing, give each plant about 12 to 18 inches between neighbors in garden beds to allow their leaves room to spread and prevent fungal problems. In containers, select pots that are at least 12 inches wide and deep, planting one kale per pot or spacing multiples about 10 to 12 inches apart in long balcony planters.
Timing is flexible—if your region has a cool spring or fall, kale seeds can go directly into the ground as soon as the soil warms to about 45°F (7°C). For an earlier jumpstart or to avoid unpredictable weather, start seeds indoors about 4-6 weeks before the last expected frost, then transplant sturdy seedlings outside.
Remember to harden off your plants by placing them outside for a few hours daily about a week before moving them to the garden, so they don’t get shocked.
By focusing on these basics—healthy soil, the right light, proper spacing, and good timing—you set yourself up for a bountiful kale harvest, whether you’re growing in a backyard patch or a sunny urban balcony.
Planting and Growing Healthy Kale
Growing healthy kale starts with choosing the right planting method and timing your sowing for the best results. For a head start, sow seeds indoors 6-8 weeks before your last expected frost, using seed trays filled with quality potting mix. Place trays in a sunny window or under grow lights, keeping the soil moist but never soggy—aim for temperatures between 60-70°F for the best germination.
When seedlings are about 2 inches tall and have at least two sets of true leaves, harden them off by gradually exposing them to outdoor conditions for a week. Outdoors, direct sow seeds as soon as the soil can be worked in early spring, or in late summer for fall crops. Plant seeds a half-inch deep and about an inch apart; thin them later to 10-12 inches apart so each kale plant has room to thrive.
Transplant indoor seedlings outdoors when the danger of severe frost has passed; gently loosen their roots and plant them at the same depth they grew indoors, spacing them as above. Water seedlings thoroughly after transplanting and consider floating row covers for early protection from chilly nights and pests.
Ongoing Care for Robust Kale
Ongoing care is key to growing robust, productive kale in any setting. Thinning overcrowded sprouts early prevents weak, spindly growth, so don’t skip this step. Add a 2-inch layer of mulch, such as shredded leaves or straw, to lock in soil moisture and block weeds.
Water deeply once or twice a week, especially in dry spells, but avoid overwatering, which can cause root rot. Feed your kale every few weeks with a balanced, organic fertilizer or a side-dressing of compost; kale is a heavy feeder and will reward you with fuller leaves.
Watch for extreme temperatures—young plants may need shade cloth in hot spells or row covers during unexpected cold snaps.
Growing Kale in Containers
For container-grown kale, choose a pot at least 12 inches wide and deep, with drainage holes, and fill it with a rich, well-draining mix containing compost. Containers dry out faster, so monitor soil moisture daily and move pots to shelter if summer sun gets too intense or if frost threatens.
Harvesting Tips
Practice clean harvesting by picking outer leaves first, and your kale will remain productive for months, rewarding you with crisp, nutritious greens straight from the garden or patio.
Ongoing Kale Plant Care
Caring for kale doesn’t stop after planting; routine maintenance goes a long way in ensuring a healthy, productive patch. Start by keeping the area around your kale free from weeds, as these compete for nutrients and water. A weekly hand-pulling or using a small hoe works well, and mulch helps suppress new weeds.
Regular, even watering is crucial—aim for about 1 to 1.5 inches per week. Try to water in the early morning, targeting the soil (not the leaves) to discourage fungal issues.
Every 4-6 weeks, feed your kale with an organic fertilizer high in nitrogen, like compost tea or fish emulsion, to encourage lush, leafy growth. Applying a top-dressing of compost around each plant also works wonders.
Pest Management
Watch out for pests:
- Aphids congregate under leaves and can be managed with a soapy water spray.
- Cabbage worms and slugs are best handpicked or deterred with floating row covers, crushed eggshells, or diatomaceous earth sprinkled at the soil line.
- Pigeons love young kale, so lightweight netting can protect seedlings until they’re established.
Disease Prevention
For diseases, yellowing, spotting, or wilting leaves often signal trouble—remove affected foliage immediately to prevent spread. Good airflow is key, so space plants adequately and avoid overhead watering to minimize fungal diseases like powdery mildew or root rot.
Rotate crops each season to prevent soil-borne issues, and never compost diseased plant material.
Harvesting
To promote the healthiest kale, harvest outer leaves often once they’re palm-sized. This not only encourages new growth but keeps plants vigorous.
By staying observant and proactive, you’ll enjoy a robust harvest of kale with big, nutrient-dense leaves all season long.
Harvesting and Storing Kale
Knowing when to harvest kale is key to getting the best flavor and ensuring your plants keep producing. Look for mature leaves about the size of your hand, deep green, and with a crisp, tender feel. Smaller, younger leaves are great for salads, while bigger ones work well for cooking.
When harvesting, snip only the outer leaves, cutting them close to the main stem with clean scissors or garden shears. Always leave at least four to five leaves in the center so the plant can keep growing. Aim to pick your kale every week or two—consistent harvesting encourages new, healthy leaves.
For storage, wrap dry, unwashed kale in a paper towel and tuck it into a breathable plastic bag or container in the fridge’s crisper drawer. This keeps it fresh for up to a week. For longer storage, blanch the leaves in boiling water for about two minutes, then plunge them into ice water, drain well, and freeze in airtight bags—this way you’ll have kale ready for smoothies or soups months later.
If you notice leaves are tough, it might be a sign the plant is getting too old, it’s too hot, or you waited too long to harvest. Try picking more frequently or sticking to younger leaves. Holey leaves often result from pests like caterpillars or beetles; simply wash the leaves thoroughly, remove any damaged sections, and consider using row covers or handpicking pests early in the season next time for cleaner crops.
With these strategies, you’ll have a continual supply of tasty kale right from your garden.
Enjoying Your Kale: Uses and Recipe Ideas
Kale’s versatility makes it a staple for all kinds of meals, from quick salads to hearty soups. For salads, use baby kale or massage mature leaves with a bit of olive oil to soften their texture and mellow the taste.
If you’re craving something warm, try a simple sauté: just wash, de-stem, and chop your kale, then cook it in a hot pan with garlic and olive oil until wilted.
Kale also shines in soups and stews, adding nutrients and a burst of green—just toss in chopped leaves during the last few minutes of simmering.
If you’re after a crunchy snack, homemade kale chips are a favorite: tear dry, de-stemmed leaves into bite-sized pieces, toss with olive oil and salt, and bake at 350°F for 10-15 minutes.
For an easy nutrient boost, handfuls of raw kale blend right into smoothies; the mild flavor gets masked by sweet fruits like banana and pineapple.
To prep kale, always rinse thoroughly to remove any grit, and strip the tough stems before chopping. Store clean, dry leaves in a sealed container with a paper towel to extend their freshness.
For beginners, try a massaged kale salad: combine chopped kale, a squeeze of lemon juice, olive oil, and a pinch of salt, then rub the leaves until they’re darkened and tender—top with your favorite nuts or cheese.
Or, quickly sauté chopped kale with a little garlic and serve as a flavorful side.
Don’t be afraid to get creative, either—add kale to pasta, blend it into pesto, or stir it into your morning omelet.
Experiment and make it your own, and feel free to share your favorite kale creations with friends or online communities for fresh inspiration.
Troubleshooting and Kale FAQs
Kale is a resilient crop, but even experienced gardeners encounter common issues like slow growth, bolting, pale leaves, and poor yields.
If your kale is growing slowly, first check for compacted soil and lack of sunlight—make sure plants get at least six hours of direct sun and loosen the soil before planting.
Bolting, or premature flowering, often happens during sudden heatwaves. You can help prevent this by planting kale early in spring or choosing bolt-resistant varieties.
Pale leaves can signal a nitrogen deficiency, so side-dress plants with organic compost or a balanced fertilizer to boost vigor.
If your overall yield seems low, check spacing—crowded plants compete for nutrients, so thin young seedlings to at least a foot apart.
Weather surprises, like early frosts or heat spells, can also challenge kale. Use row covers to protect young plants from cold snaps and mulch to keep roots cool during unseasonal warm spells.
For seed saving, let a few healthy plants overwinter and flower in their second year; collect the dry pods and store seeds in a cool, dry place.
To improve future crops, rotate where you plant kale each year to avoid soil-borne diseases, and try mixing in legumes or marigolds nearby for natural pest control.
With a little troubleshooting and planning, your kale can reward you with steady harvests and robust leaves season after season.