Introduction
Learning how to save bell pepper seeds from store-bought peppers is a simple, rewarding skill that offers lasting benefits for your garden and your wallet. By saving seeds, you not only reduce annual seed costs but also take an active role in preserving your favorite pepper varieties—especially those vibrant colors or unique flavors that can be hard to find year after year. Plus, it’s a sustainable habit that cuts down on waste and encourages a more eco-friendly approach to home gardening.
Whether you’re a green-thumbed enthusiast or just starting out with container plants on your patio, this seed-saving method suits all levels of gardening experience—no specialized tools or large garden beds needed.
In this guide, you’ll learn when and how to harvest seeds from fresh peppers, tips for proper drying and storage, and what to expect if you plant seeds from store-bought produce (including potential surprises with hybrids). Ready to take charge of your pepper patch and build a seed stash for seasons to come? Let’s dive into the simple steps to ensure your next harvest starts with a seed you saved yourself.
Choosing the Right Peppers for Seed Saving
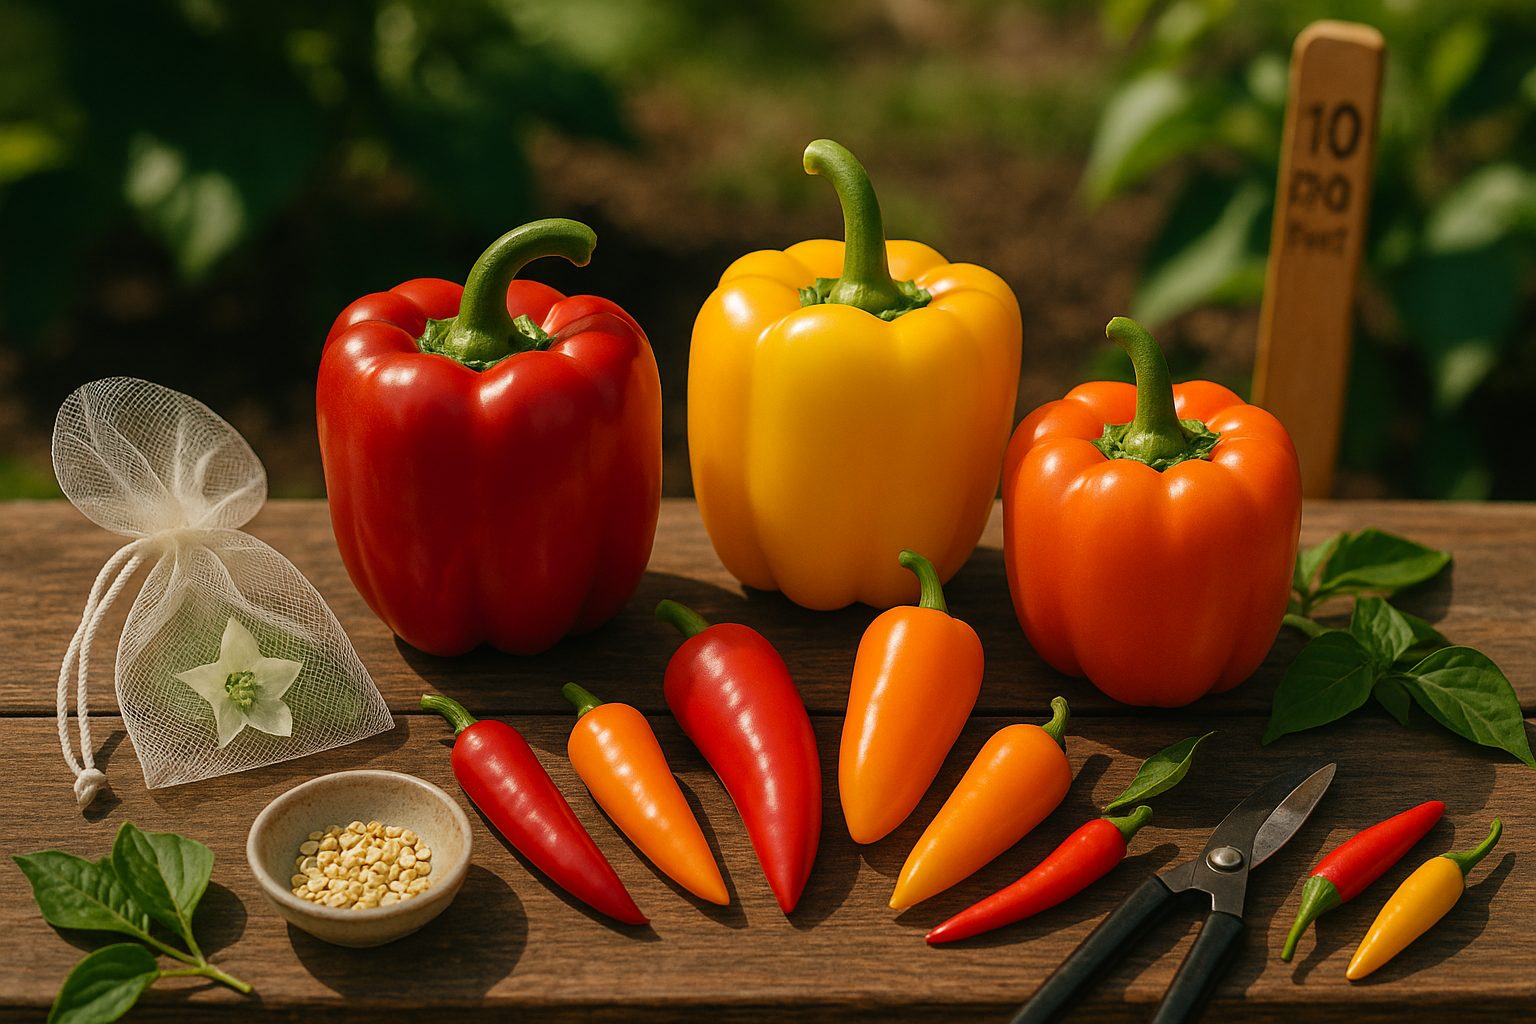
When it comes to saving pepper seeds, start by choosing fully ripe, healthy peppers—those that are vibrant in color and free from disease or damage. Ripe peppers produce mature seeds, which are more likely to sprout successfully next season.
It’s also essential to understand the difference between hybrid and open-pollinated varieties. Hybrid peppers, often labeled F1 at garden centers, are bred from two distinct parents; their seeds may not produce plants true to type, leading to unpredictable results. Open-pollinated varieties, on the other hand, reliably pass on the parent plant’s traits, making them the preferred choice for seed savers who want consistent yields and quality.
To maintain pure seed lines and prevent cross-pollination (a common issue, especially if you grow multiple pepper types), practice isolation techniques. You can plant different varieties at least 10–20 feet apart and use physical barriers like mesh bags over blossoms. Or, simply dedicate one season to growing a single variety for seed collection.
With these strategies, you’ll preserve the qualities you love and ensure a reliable harvest for years to come.
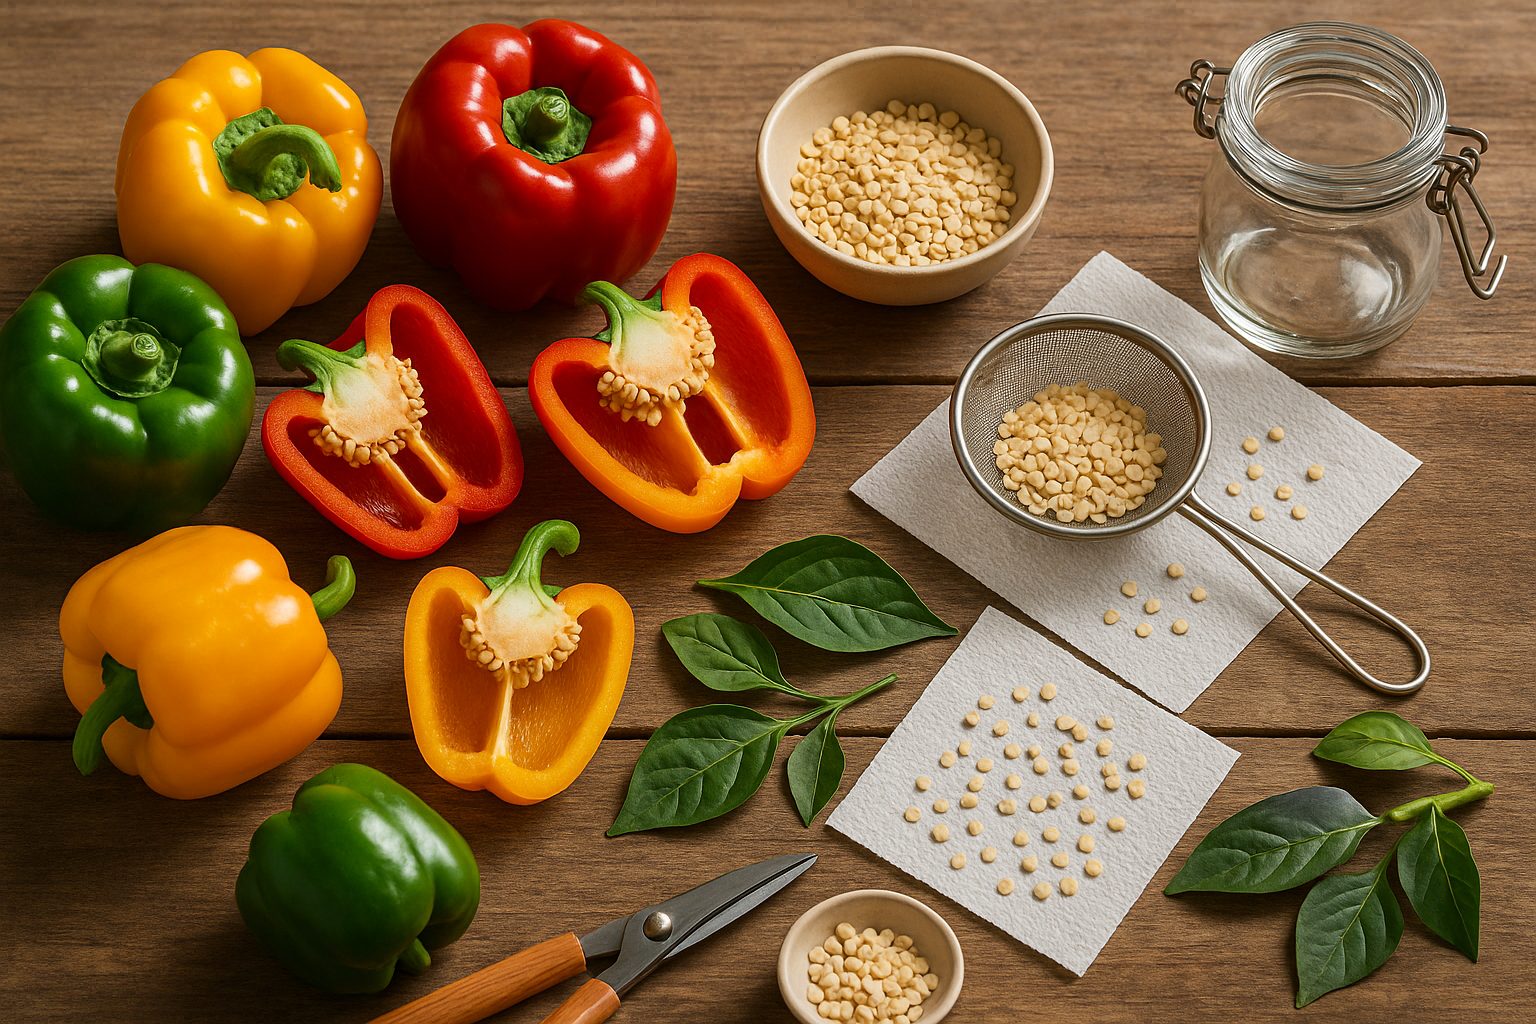
Harvesting and Extracting Pepper Seeds
Timing is crucial when it comes to harvesting peppers for seed saving. Wait until the peppers are fully mature, which usually means they turn a deep, rich color—whether red, yellow, or orange—depending on the variety. Mature peppers feel firm and easily detach from the stem with a gentle twist.
To begin the seed extraction process, wash your hands thoroughly and wipe down all tools and surfaces with a mild bleach solution to prevent the spread of plant diseases. Using a clean, sharp knife, cut the pepper lengthwise and gently pull it open. You’ll see the seeds clustered around the inner core or attached to the membrane.
Carefully scrape the seeds out into a clean bowl, avoiding any damage. Discard any seeds that look dark, shriveled, or moldy—they won’t germinate well. After extraction, rinse the seeds in a sieve under cool water to remove any leftover pulp.
Then, spread the seeds in a single layer on a paper towel or coffee filter to dry. Make sure they’re in a well-ventilated area out of direct sunlight, and stir them daily for even drying; this process usually takes about a week.
Throughout the process, keep your hands and tools clean, and use separate utensils for different pepper varieties to avoid cross-contamination. Wearing disposable gloves is also a good idea—especially when handling hot pepper varieties—to protect your skin and prevent accidental irritation later.
With these steps, you’ll have healthy, viable pepper seeds ready for your next growing season.
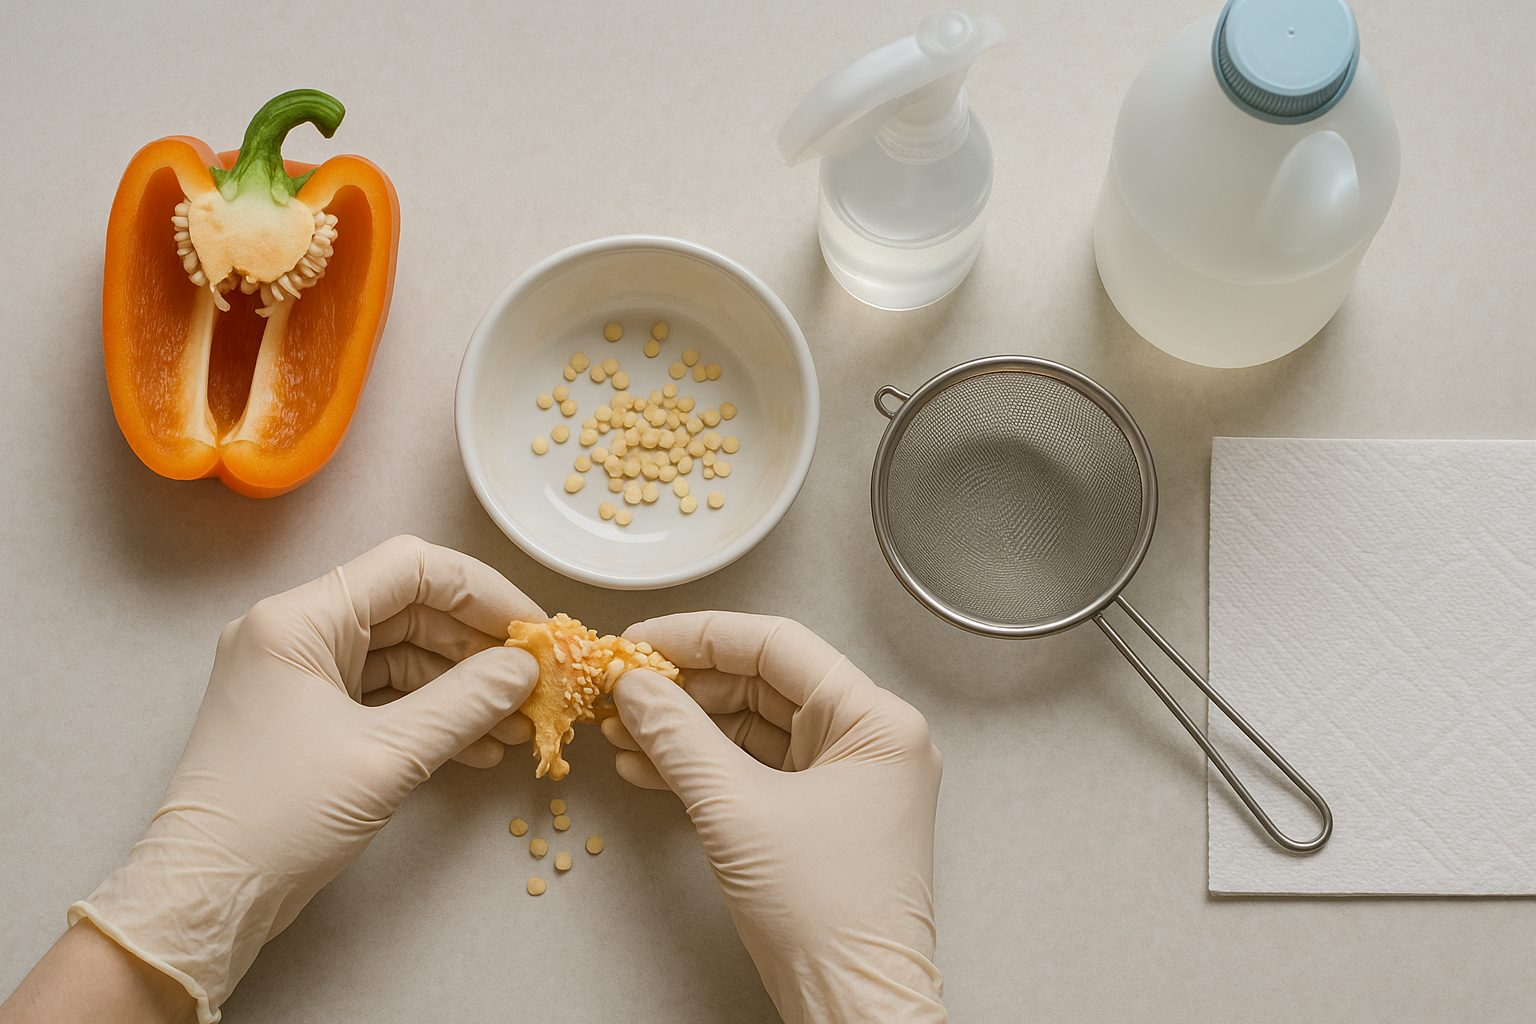
Cleaning and Drying the Seeds
Cleaning seeds thoroughly is one of the most important steps after harvesting them from fruits or vegetables. Any leftover pulp or sticky residue can hold moisture and encourage mold growth during storage, which could ruin an entire batch of seeds.
Start by gently rinsing the seeds in a fine-mesh strainer under cool running water, using your fingers to rub off any clinging fragments of fruit or gel. Once clean, it’s time to dry them properly—spread the seeds out in a single layer on a paper towel or a mesh screen, making sure they don’t overlap to promote even airflow.
Choose a location out of direct sunlight but with good air circulation; for example, a kitchen counter or spare room works well. Avoid using ovens or direct heat sources, as they can damage the seeds’ viability. Depending on the seed size and humidity in your home, seeds usually need anywhere from several days to a week to fully dry.
To check if the seeds are ready for storage, try snapping a few larger seeds between your fingers or pressing smaller seeds with your fingernail—fully dried seeds will be hard and brittle, not bend or feel damp at all.
Taking the time to clean and dry them thoroughly will protect next season’s crops and ensure healthy germination when you plant them.
Proper Storage for Maximum Seed Viability
Keeping your seeds in top condition starts with the right storage environment: aim for a spot that’s cool, dry, and dark—think of a basement, cellar, or even a closet away from direct sunlight and humidity. Too much moisture or heat can shorten a seed’s lifespan quickly, so avoid kitchens and laundry rooms where temperature and humidity often fluctuate.
For containers, paper envelopes work well for small seeds because they allow airflow and wick away excess moisture. But for longer-term storage or rare seeds, tightly sealing them in glass jars with a silica gel packet inside helps prevent mold and keeps seeds fresher.
Always label containers with the seed variety and collection date; a piece of masking tape and a permanent marker do the job, or try printable labels for a tidy look.
Before planting season, check a sample of your stored seeds for viability with a simple germination test:
- Place a few seeds on a damp paper towel.
- Fold it up and keep it warm for a few days.
- If most seeds sprout, you’re good to go.
- If not, it’s time to refresh your supply.
Remember, a little organization and care go a long way toward guaranteeing a successful growing season.
Tips for Successful Planting and Growing from Saved Seeds
Starting your garden with saved seeds is both rewarding and practical, but a little know-how can make all the difference.
Begin by checking the specific planting depths and spacing for each type of seed. Some—like lettuce—prefer light and are best sown on the soil surface, while others—such as beans—thrive when planted deeper.
Most seeds require soil that’s consistently moist but not soggy; use a spray bottle to avoid overwatering freshly planted seeds.
Once in the soil, germination timelines can vary: radishes often sprout within 3–5 days, while tomatoes might take up to two weeks, so patience is key.
If you notice seeds are slow to sprout, check that your soil temperature matches the seed’s preference (many fail if it’s too cold or hot), and try pre-soaking larger seeds like peas overnight to speed things up.
Mold or damping off (a fuzzy white fungus) is a common rookie challenge—improve air circulation and avoid waterlogged soil to combat this.
If seedlings look leggy or pale, they may need more sunlight; consider moving trays to a brighter spot or using a grow light.
Keep a notebook or use a garden journal app to jot down planting dates, weather conditions, and success rates for different seeds each season—tracking what works helps refine your process year after year.
By noting which seeds performed best and how you solved problems, you’ll gradually build up a resilient, thriving garden tailored to your local conditions, making each planting season more successful than the last.
Frequently Asked Questions About Saving Pepper Seeds
Many home gardeners wonder how long saved pepper seeds will last and whether those seeds will grow into plants like the original. Generally, properly dried and stored pepper seeds can remain viable for up to four years. To maximize their lifespan, keep seeds in a cool, dark, and dry place—an airtight container in the fridge works well.
Another common question is if your saved seeds will produce peppers true to the parent plant. If you’re saving seeds from hybrid varieties or from a garden with multiple kinds of peppers nearby, you might see surprises in size, shape, or flavor due to cross-pollination. For best results, choose open-pollinated or heirloom peppers and isolate the plants if you’re after consistency.
Many ask if grocery store pepper seeds can be saved. While it’s possible, store-bought peppers are often hybrids, which means their seeds likely won’t grow true to type. Plus, these peppers may be harvested before the seeds are fully mature, affecting viability. For reliable results, it’s best to save seeds from fully ripe, homegrown peppers you know the background of.
With a little planning, you’ll turn your favorite peppers into a lasting harvest year after year.