Why Preserve Chives?
Chives are a delicate, onion-flavored herb that adds a fresh burst of flavor to soups, salads, eggs, and potato dishes. They’re a kitchen staple for garnishing or adding subtle depth to recipes without overpowering other ingredients. However, chives are often only available fresh during spring and summer, making it challenging to enjoy their unique taste year-round.
That’s where preserving chives comes in handy. By drying or freezing chives at their peak, you can enjoy their vibrant flavor and color long after the growing season ends. This not only saves you from constantly buying new bunches and letting extras wilt in the fridge, but it also helps reduce food waste.
Preserved chives are incredibly convenient—you can simply reach into your pantry or freezer and sprinkle them into any dish, even in the middle of winter. Drying chives gently removes moisture while keeping their characteristic flavor, making them perfect for seasoning baked potatoes or casseroles. Freezing, on the other hand, locks in both the taste and the bright green color, maintaining that fresh-from-the-garden quality.
With a little effort, preserving chives ensures your favorite recipes always have that hint of freshness, no matter the season.
Harvesting and Prepping Chives for Storage
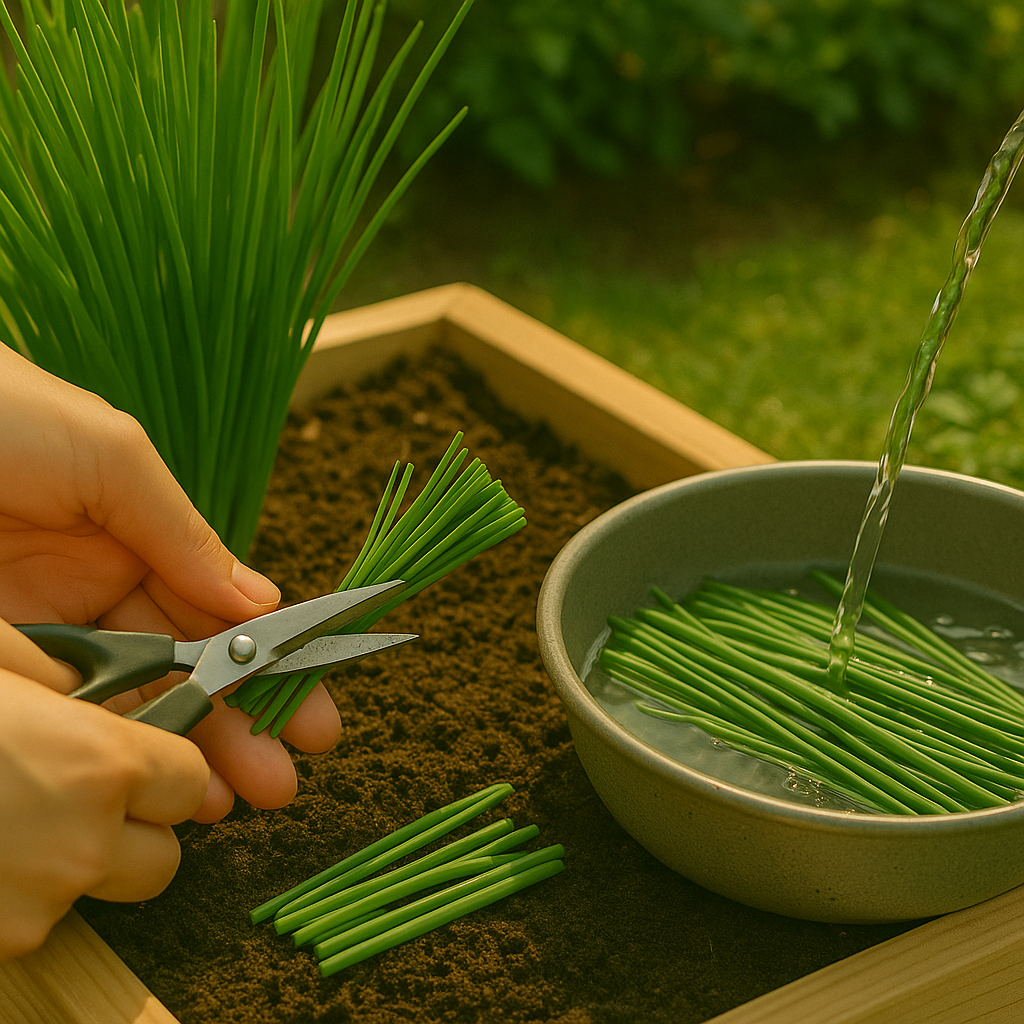
The best time to harvest chives is in the morning when the leaves are firm and full of flavor, typically once they reach about 6 inches tall. Choose a dry day, as wet conditions can spread disease. Always use clean, sharp scissors or garden shears to snip leaves about 1-2 inches above the soil—this helps the plant focus on healthy regrowth and prevents damage to the base.
For continued harvest, never cut more than one-third of the clump at once, allowing the plant to recover and flourish. Once picked, inspect chives carefully and discard any leaves that are yellow, limp, or show signs of pests. Rinse the stems gently under cool running water to remove dirt and insects, then pat them dry with a paper towel or let them air dry on a clean cloth, as excess moisture can cause spoilage.
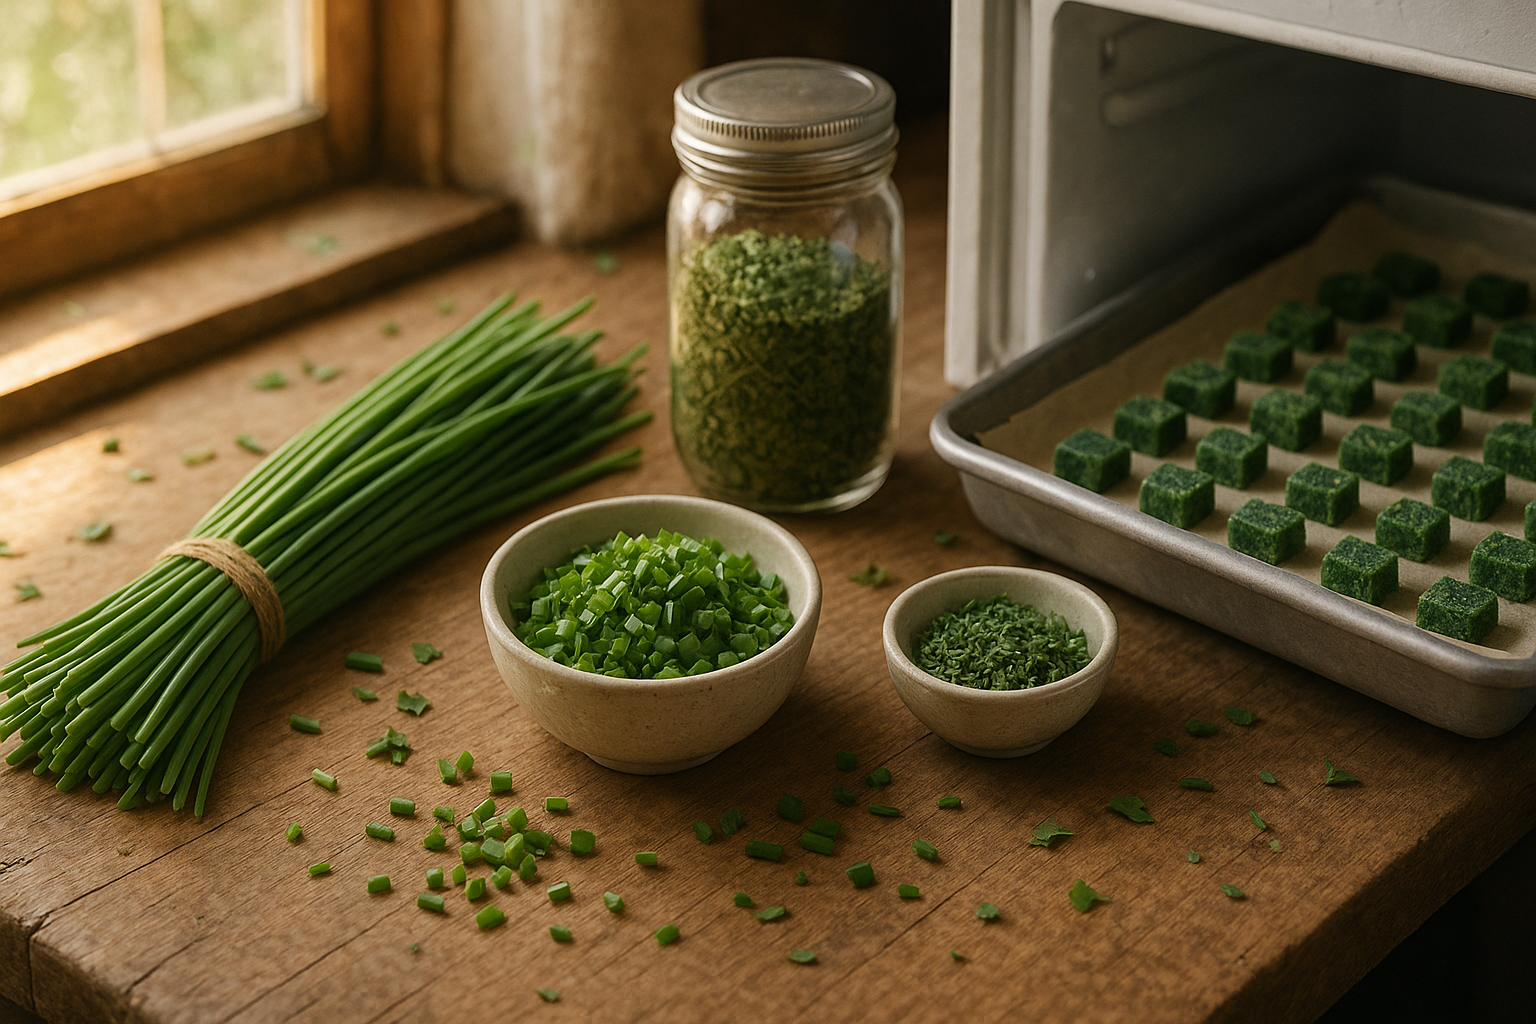
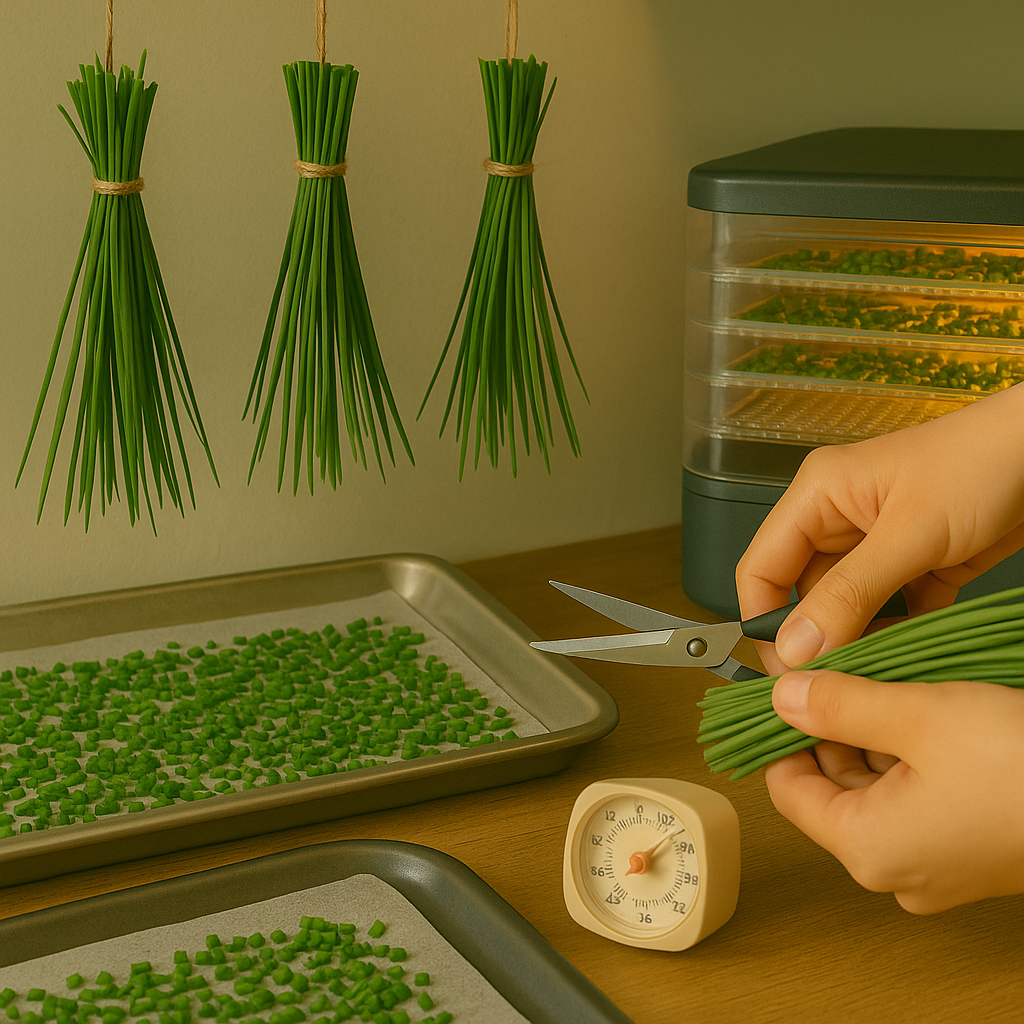
For storage, gather the dry chives into small bunches and chop them into your preferred size using a clean knife or kitchen scissors. If you plan to freeze them, spread the chopped chives on a baking sheet to pre-freeze before transferring to an airtight container—this prevents sticking and keeps flavors vibrant. Alternatively, you can air-dry or dehydrate chives for long-term pantry storage.
Regardless of the method, starting with clean, healthy chives is essential for the best taste and shelf life, so always inspect your harvest closely for pests or disease before preserving.
How to Dry Chives (Multiple Methods)
Drying chives is an easy way to keep their delicate onion flavor handy all year. Start with fresh, clean chives—make sure they’re dry, as excess moisture can cause mold.
Air-Drying
For air-drying, gather small bunches and tie them at the base with kitchen twine. Hang them upside-down in a well-ventilated, shaded place for one to two weeks. Check regularly to ensure they’re drying evenly, and avoid direct sunlight, which can bleach the vibrant green color.
Using a Dehydrator
If you prefer a faster method, use a dehydrator: spread chopped chives in a single layer on the trays, set the machine to 95°F (35°C), and let them dry for about 2–4 hours until crumbly.
Using an Oven
Oven drying is also effective. Lay chopped chives on a baking sheet lined with parchment and set your oven to its lowest temperature (ideally 170°F/75°C or lower). Dry them with the door slightly open for 1–2 hours—stir midway for even drying and watch closely to prevent browning.
Tips for Best Results
- Always dry chives at low temperatures to maintain flavor and bright color.
- Keep chives out of direct heat or sunlight during drying.
- Chives are fully dried when they feel crisp, crumble easily between your fingers, and show no sign of moisture.
Store dried chives in an airtight container away from light to preserve their flavor for months. Remember to label your jar with the date, and for the best taste, try to use dried chives within a year.
How to Freeze Chives for Long-Term Storage
Freezing chives is a great way to preserve their fresh flavor for months, and the process is simpler than you might think. Start by washing your chives thoroughly and patting them dry with a paper towel—removing any excess moisture helps prevent freezer burn.
Next, chop the chives into the desired size, whether you prefer fine rings or larger pieces depending on your usual recipes. Blanching is optional, but it can help preserve the chives’ vibrant green color: quickly dip them in boiling water for about 10 seconds, then immediately transfer to an ice bath to stop the cooking.
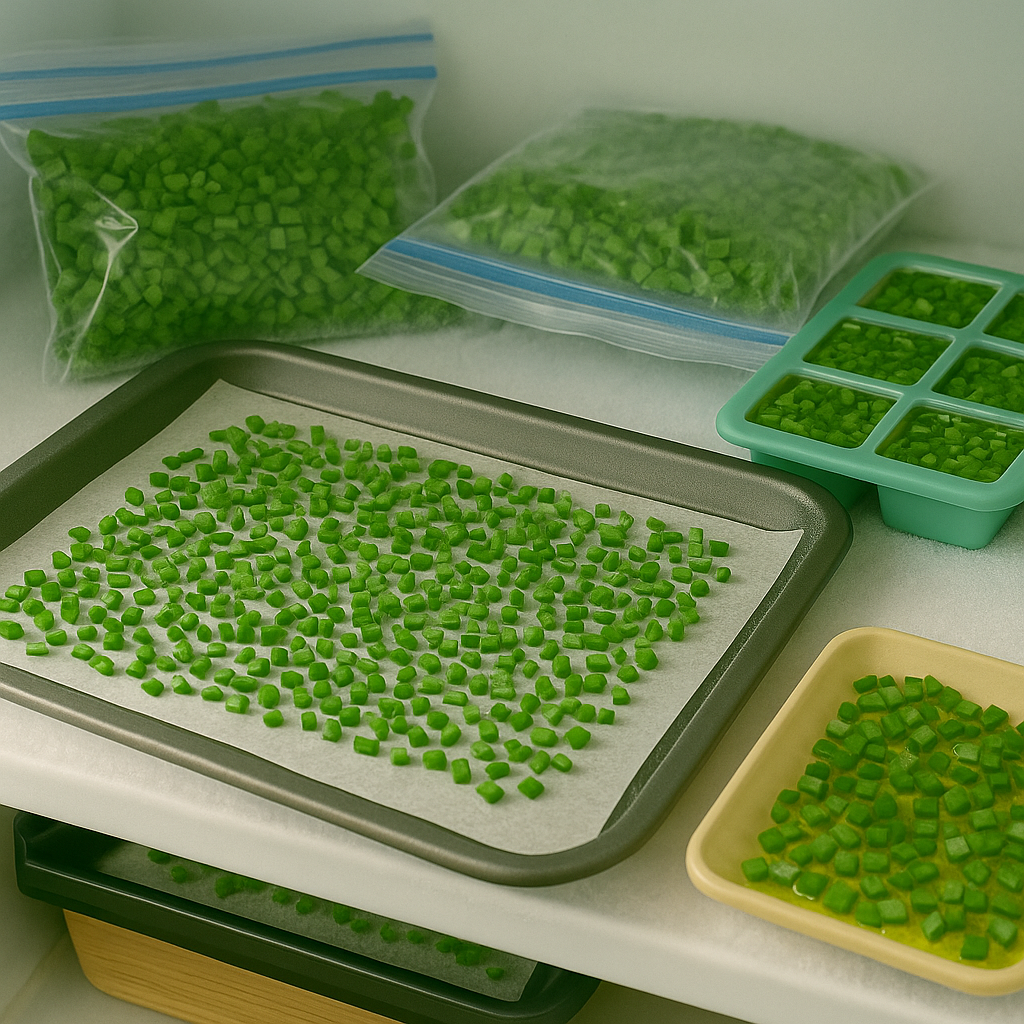
Once drained and dried again, spread the chopped chives in a single layer on a parchment-lined baking sheet and place them in the freezer for about an hour. This step, called flash freezing, keeps the chives from clumping together.
After they’re frozen, transfer the chives to airtight containers, freezer bags, or even ice cube trays. (Fill each compartment with chives and top with a bit of water or olive oil—perfect for tossing straight into soups or sautés.)
To avoid freezer burn, squeeze as much air as possible out of your bags and always label your containers with the date. For convenience, portion the chives into small batches—tablespoon or recipe-sized amounts—so you can grab just what you need without thawing a whole container.
This method retains flavor and makes it easy to add a burst of green to any meal, straight from the freezer.
Storing Dried and Frozen Chives
To keep your dried chives fresh and flavorful, store them in airtight containers like glass jars or sealed plastic tubs. Always keep them in a cool, dark cupboard away from heat and light. This setup helps preserve their color and taste, giving dried chives a shelf life of up to one year, though their flavor is strongest within the first six months.
Check your stash occasionally, and toss any chives that look pale, smell musty, or lose their punchy onion scent.
Frozen chives, on the other hand, are best chopped first, then frozen in airtight bags or even ice cube trays with a splash of water. They generally last three to six months in the freezer without significant quality loss.
Dried chives lose moisture during preservation, making them brittle and concentrated in flavor—perfect for seasoning baked potatoes, dips, or omelets, where a mild, oniony lift is all you need.
Frozen chives retain more of their fresh, grassy color and soft texture but can turn slightly limp after thawing, so they’re best stirred into soups, stews, or sauces near the end of cooking.
No matter which type you use, add chives just before serving to maximize their aroma and flavor.
Using Preserved Chives in Your Kitchen

Preserved chives—whether dried or frozen—are fantastic staples for adding a mild onion flavor to a variety of dishes year-round. Dried chives work best in cooked recipes like soups, sauces, or baked goods, as their flavor intensifies with heat and moisture. Try adding them to potato soup, egg muffins, or cheddar biscuits for a pop of color and a gentle zing.
Frozen chives retain more of their fresh, grassy undertones and can be sprinkled directly onto creamy dips, tossed into salads, or folded into softened butter for an instant herb spread—perfect for baked potatoes or warm bread. In contrast, fresh chives are more vibrant and delicate, ideal for finishing dishes like omelets or cold pasta salads where their texture and bright flavor really shine.
For a quick chive dip, mix Greek yogurt, minced garlic, and a handful of frozen chives for a chip-and-veggie-ready snack. Or stir dried chives into bread dough before baking for an herby upgrade. A creative tip: blend frozen chives with cream cheese and spread it on crackers for an easy appetizer.
No matter which form you use, preserved chives are a fast and flavorful way to bring garden-fresh taste to your kitchen, with each type offering its own unique twist.
Extra Tips & Troubleshooting
Drying, freezing, and storing chives at home is simple, but a few common pitfalls can affect your results. Avoid overdrying chives, which causes them to lose flavor—check that they’re crisp but still vibrant green.
When freezing, make sure chives are dry and spread out on a baking sheet first; if piled together, they may clump and turn mushy. For the best storage, keep dried chives in an airtight container away from light and heat to prevent color and flavor loss.
If you need to rehydrate dried chives, just soak them in warm water for 5–10 minutes before using; this helps restore some of their original texture.
Wondering if you can mix chives with other herbs? Absolutely—dried chives pair beautifully with parsley, dill, or tarragon in spice blends or dressings.
Chive blossoms are also edible; try sprinkling the purple flower heads on salads for a mild onion kick and a pretty presentation.
For preserving garlic chives, follow the same steps as regular chives—just remember their garlicky flavor becomes milder after drying.
Home herb preservation isn’t just easy; it saves money and lets you enjoy garden-fresh taste all year. So don’t be afraid to experiment and enjoy your harvest!