Introduction to Growing Peppers from Seed
Have you ever wondered if you can grow bell peppers from store-bought peppers? The answer is yes, and it’s easier than you might think. By choosing to grow bell peppers from store-bought fruit, you unlock a world of benefits—think fresher flavor straight from your garden, access to a wider variety of pepper types than what’s usually on supermarket shelves, and some serious savings on your grocery bill.
Whether you’re an absolute beginner or have lots of gardening experience, starting peppers from seed is both fun and rewarding. It’s a hands-on way to learn about plant life, watch your effort grow from a tiny seed to a full, fruiting plant, and even get your kids interested in gardening. To succeed, you’ll want warm temperatures, consistent moisture, good light, and some patience.
In this post, we’ll explain how to start peppers from store-bought fruit, what conditions they need, and how to care for your plants every step of the way.
Choosing and Preparing Pepper Seeds
When choosing pepper seeds for your garden, it’s helpful to understand the different types available. Sweet peppers, like bell or banana varieties, are perfect for salads and stir-fries, while hot peppers—think jalapeño, habanero, or Thai chili—add a spicy kick to dishes. Hybrid seeds are bred for traits like disease resistance and high yield, whereas heirloom varieties offer classic flavors and unique appearances, often passed down through generations.
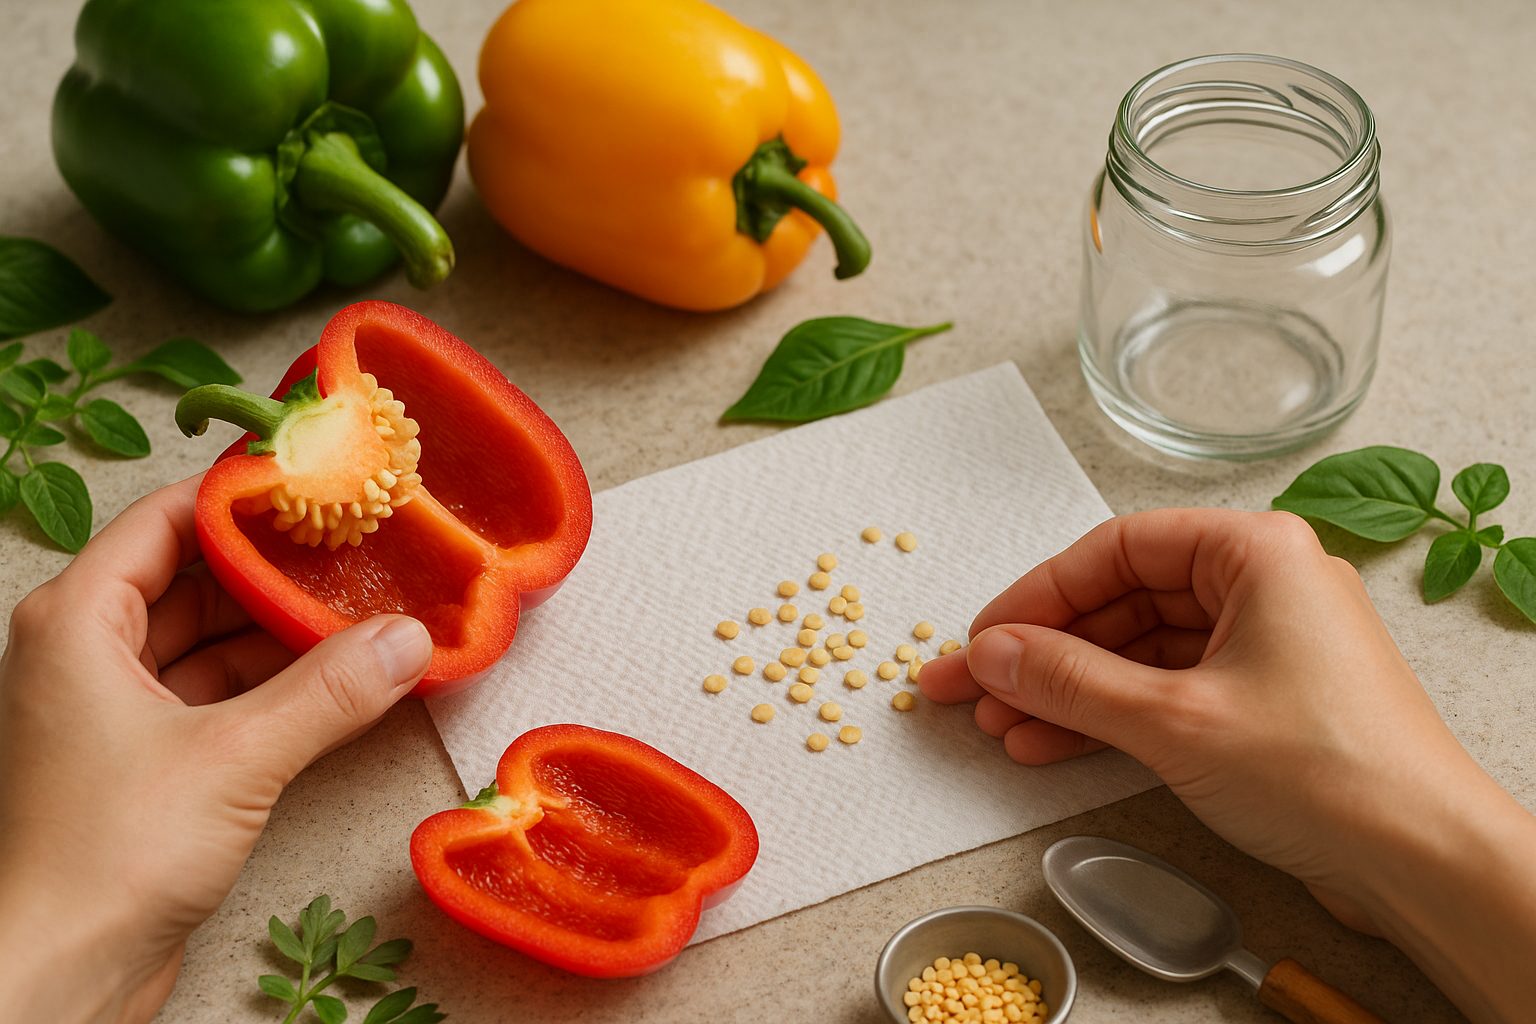
For the most reliable results, buy seeds from a reputable supplier and check the packet’s harvest date; fresher seeds have a higher germination rate. You can also extract seeds from store-bought or garden-grown peppers: simply cut the pepper open, scrape the seeds onto a paper towel, and let them air-dry for a few days in a cool, dark spot. Once dry, store them in an airtight container until planting.
To test seed viability before you sow, place a few seeds between moist paper towels, seal them in a plastic bag, and keep them warm for a week—if most sprout, your seeds are good to go. This simple step saves time and ensures your peppers get the best start possible.
Setting Up for Success: Materials & Seed-Starting Setup
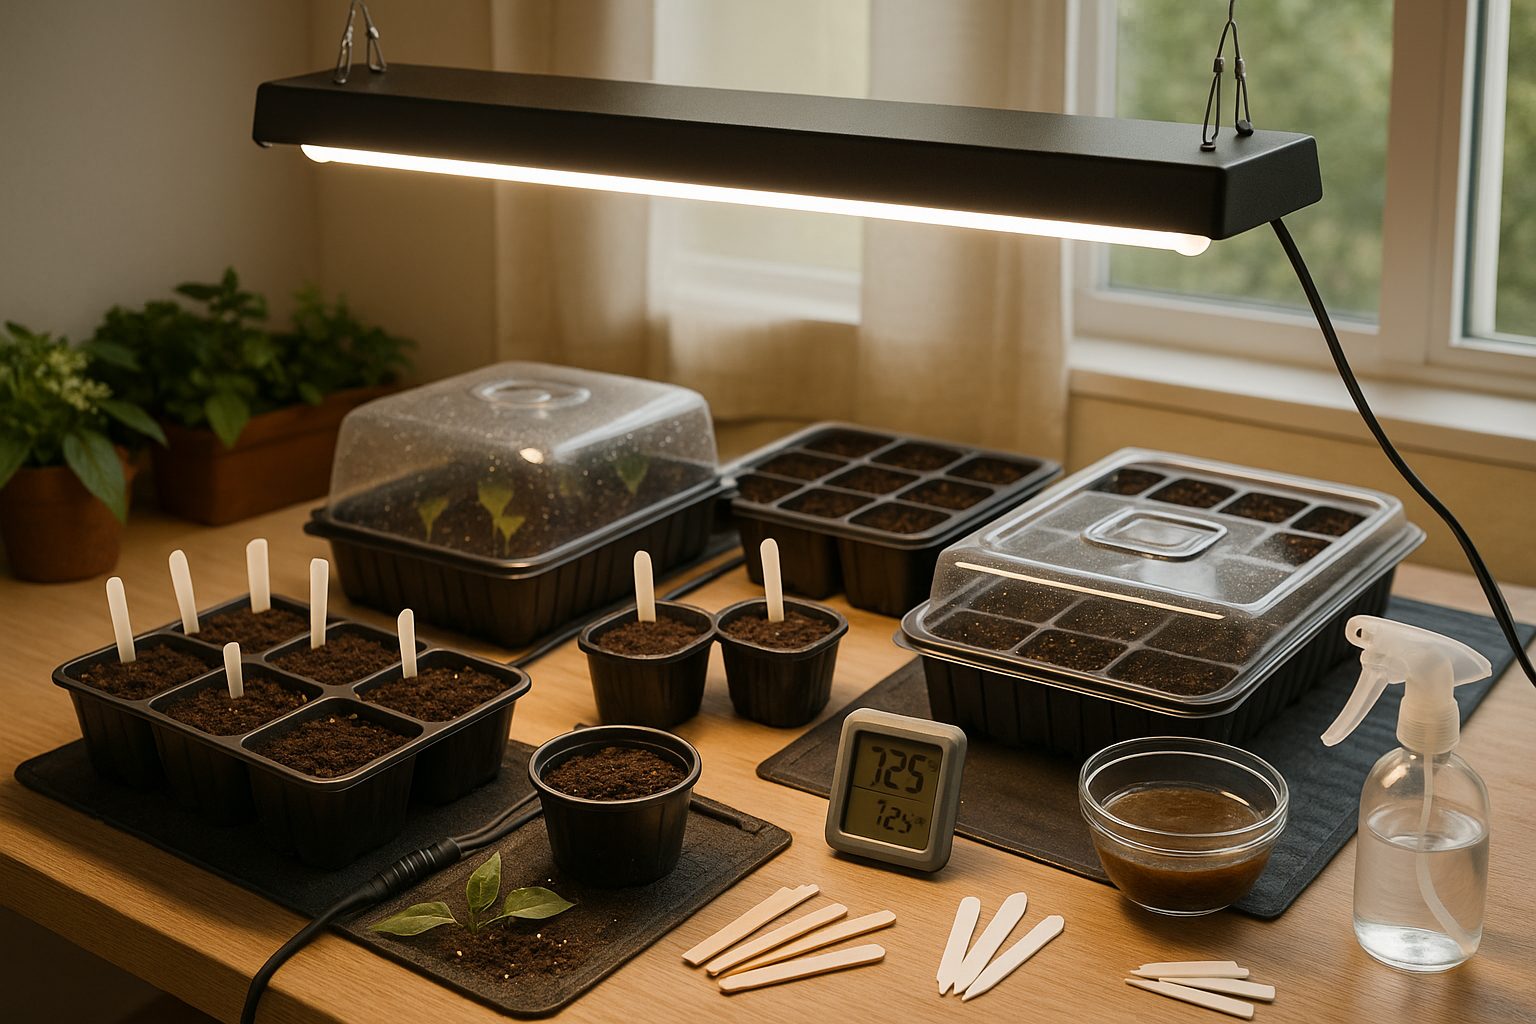
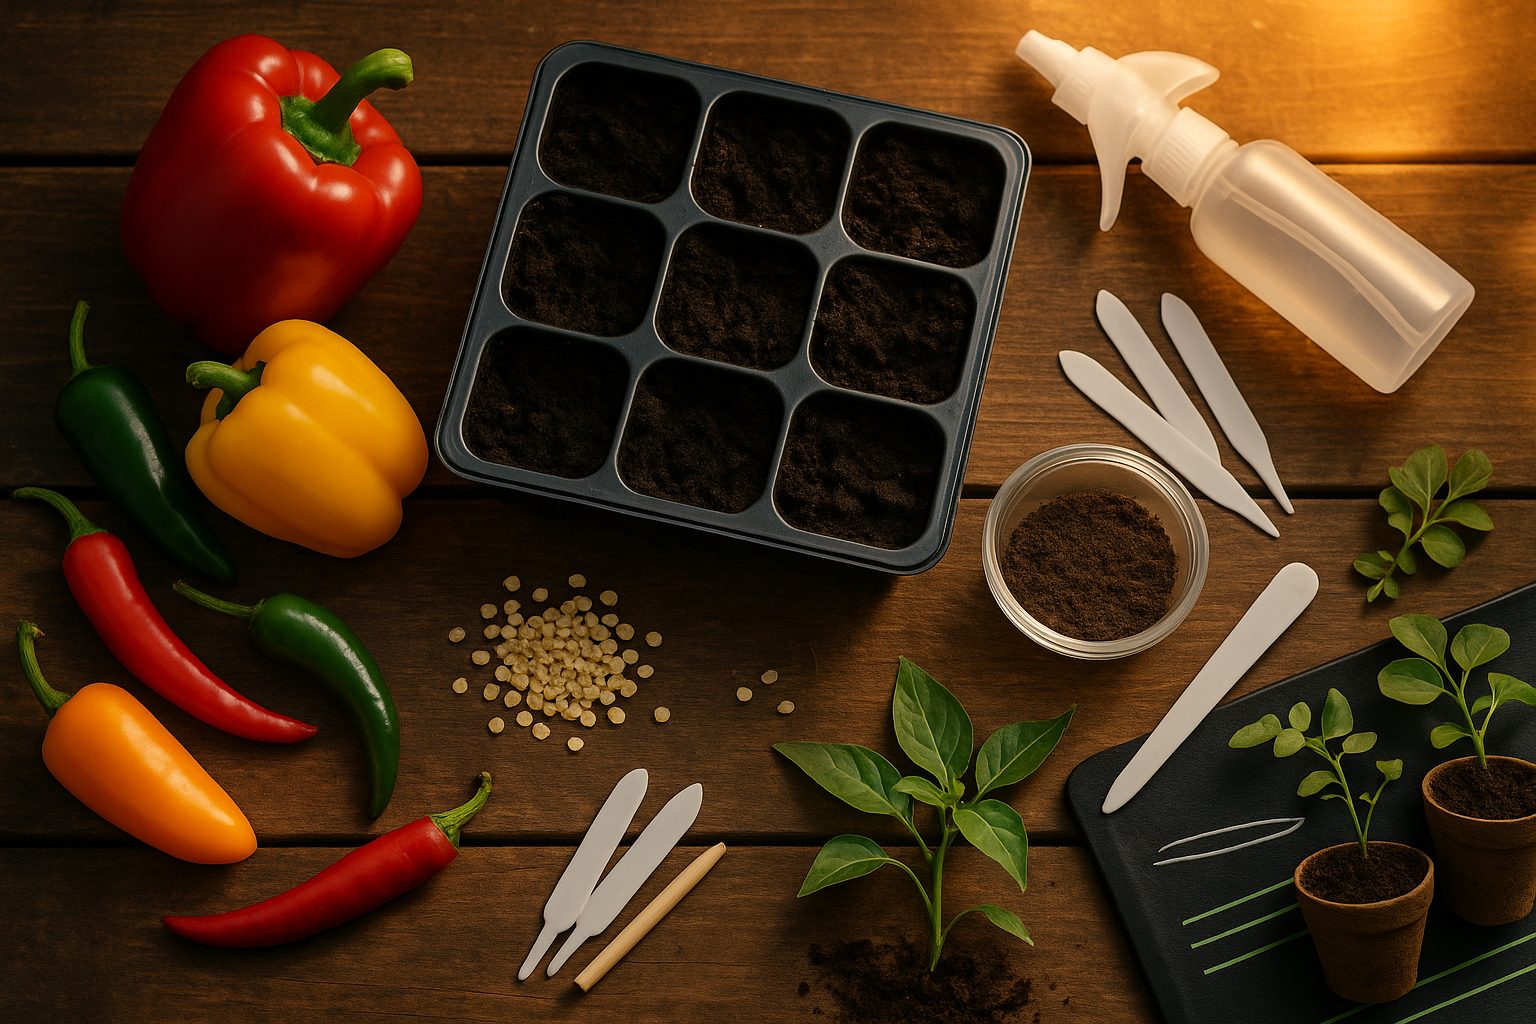
Starting pepper seeds indoors is a rewarding process, but having the right setup makes all the difference. Gather essential items like seed trays or small pots, a high-quality seed-starting mix (not garden soil), plant labels for tracking varieties, and clear humidity domes to keep moisture levels high.
For soil, choose a light, sterile seed-starting mix that drains well but holds moisture—pepper seeds hate soggy conditions, but they also can’t dry out. Moisten the mix before filling trays to create the perfect damp, not wet, environment for seeds.
Peppers need warmth to sprout, so aim for a cozy 75–85°F (24–29°C). You can place trays on a heat mat or on top of a refrigerator to hit the sweet spot.
Water gently and only when the surface dries, using a spray bottle to avoid disturbing the seeds. Use grow lights if you don’t have a sunny south-facing window—place lights just a few inches above the seedlings and set them for 14–16 hours daily to keep sprouts sturdy and prevent legginess.
With these tools and a bit of care, you’ll see healthy pepper seedlings ready for the garden in just a few weeks!
Planting and Germination
To start your pepper plants off right, use a seed-starting mix and 3–4 inch containers or seed trays with good drainage. Sow pepper seeds about 1/4 inch deep—any deeper, and they may struggle to sprout. Place two to three seeds per cell or container to ensure at least one strong seedling; later, you’ll thin them to one healthy plant per spot.
Space seeds about one inch apart if you’re sowing in flats, so their roots won’t tangle. Mist the soil thoroughly after planting, keeping it moist but not soggy; consistency is crucial, so check daily and add water if the surface begins to dry.
To maximize germination, use a humidity dome or cover trays with clear plastic wrap to trap warmth and moisture, and consider placing them on a seedling heat mat—peppers germinate best between 75–85°F. Be patient: some varieties take two weeks or longer to emerge.
When seedlings have two sets of true leaves, thin them by snipping the weaker ones at soil level rather than pulling, to avoid disturbing roots.
Common germination problems can include damping off—where seedlings suddenly collapse due to a fungus—so always use clean containers and avoid overwatering. Mold may appear if air circulation is poor or the surface stays too wet; lift the cover daily for a short airing out and ensure water doesn’t pool in trays.
If sprout rates are low, the culprit might be old seeds, cold temperatures, or planting too deep—try fresher seeds, warmer spots, and double-check your planting depth.
With gentle care, a little bottom heat, and close attention to moisture, you’ll give pepper seeds their best shot at a strong, healthy start.
Seedling Care: Thinning, Pruning, and Maintenance
Once your seedlings have developed their first set of true leaves, it’s time to thin them out. This means carefully snipping or pinching off extra seedlings so each plant has enough space to thrive. Overcrowded seedlings compete for light, nutrients, and water, leading to weak, spindly growth. Use clean scissors to clip the weaker seedlings at soil level, leaving the strongest one in each spot, and try to match the spacing recommendations on your seed packet.
Early seedling care is just as important. Place your seedlings under a bright grow light or in a sunny windowsill, keeping the lights just a few inches above the leaves to prevent stretching. Boost airflow with a small fan on a gentle setting; this strengthens stems and reduces the risk of fungal diseases like damping off.
If your seedlings start looking tall or floppy—what’s known as “leggy” seedlings—increase the light intensity or move them to a brighter location. When the plants have several sets of true leaves, you can encourage bushy growth by pinching or cutting back the main stem just above a leaf node. This signals the plant to produce new branches and, for fruiting crops like tomatoes or peppers, can result in healthier, more productive plants down the line.
Finally, be sure to regularly remove any yellowing leaves to keep your seedlings tidy and disease-free.
Transitioning Outdoors: Hardening Off and Transplanting
Hardening off seedlings is a crucial step to ensure your young pepper plants thrive when moved outdoors. Start the process about 7–10 days before transplanting by placing seedlings outside in a sheltered spot for a few hours each day, gradually increasing their exposure to sunlight, wind, and cooler temperatures. Bring them back inside at night, especially if temperatures dip below 55°F.
When it’s time to transplant, choose a warm, overcast day or plant in the late afternoon to reduce stress. Prepare garden beds or containers with well-draining, nutrient-rich soil, and mix in compost to promote healthy root growth. Space pepper plants 18–24 inches apart to allow air circulation and prevent disease.
For containers, pick pots at least 3 gallons in size—fabric grow bags or sturdy plastic pots work well—and position them where they’ll get 6–8 hours of sun daily. Raised beds are ideal for controlling soil quality and warmth, while greenhouses let you transplant a bit earlier in spring or grow peppers later into the fall.
Always water thoroughly after transplanting and keep soil consistently moist, but not soggy, during the first few weeks as the plants establish themselves in their new environment.
Pepper Growing Challenges & Pro Tips
Pepper plants can be a bit finicky, often dealing with pests like aphids and spider mites, or diseases such as powdery mildew and blossom end rot. To keep these issues under control, regularly inspect the leaves and remove pests by spraying them with a mix of water and mild soap. For tougher infestations, neem oil works well.
Ensuring good airflow and well-draining soil helps prevent fungal and root problems. Since peppers love warmth, be sure to protect them if nighttime temperatures dip below 55°F. Using row covers or moving potted plants indoors can really make a difference.
Gardeners in cooler climates can give peppers a head start by sowing seeds indoors 8-10 weeks before the last frost date and using heat mats to encourage sprouting. For overwintering, clip back healthy plants, reduce watering, and keep them in a sunny window so you can regrow them next year.
If space is tight or winters are harsh, compact varieties like ‘Jalapeño’ or ‘Mini Bell’ do well indoors under grow lights.