
Why Use a DIY Drip System for Lettuce Beds?
Adopting a DIY drip system for your lettuce beds offers a host of practical benefits that make it a smart choice for gardeners of all levels. First and foremost, drip irrigation delivers water directly to the root zones of each plant, making every drop count and minimizing waste—a crucial factor whether you’re battling drought or simply want to lower your utility bills.
Lettuce thrives with consistent moisture, but wet leaves can invite diseases like mildew or rot, common problems with overhead sprinklers or hand-watering. Drip lines and emitters keep the foliage drier, resulting in healthier crops and fewer lost plants.
Another major advantage is cost: building your own system is typically much cheaper than buying pre-made kits or investing in complex irrigation setups, and it will pay for itself over time as you conserve both water and money. Plus, adding a timer automates the process, ensuring your lettuce is cared for even when you’re busy or away.
Compared to soaker hoses or sprinklers, drip irrigation stands out for its precision and efficiency—soaker hoses can be hard to position in tight beds and often water paths between rows, while sprinklers lose water to evaporation and wind. If you’ve ever felt chained to a watering can or garden hose, you’ll appreciate the time gained and the lush, uniform beds you’ll enjoy.
By following the step-by-step guide in this post, you’ll learn exactly how to design, assemble, and install a drip system tailored to your growing space. The result? Vigorous, juicy lettuce with less effort, lower costs, and a more sustainable approach to gardening—no matter how small or large your salad patch may be.
What You Need
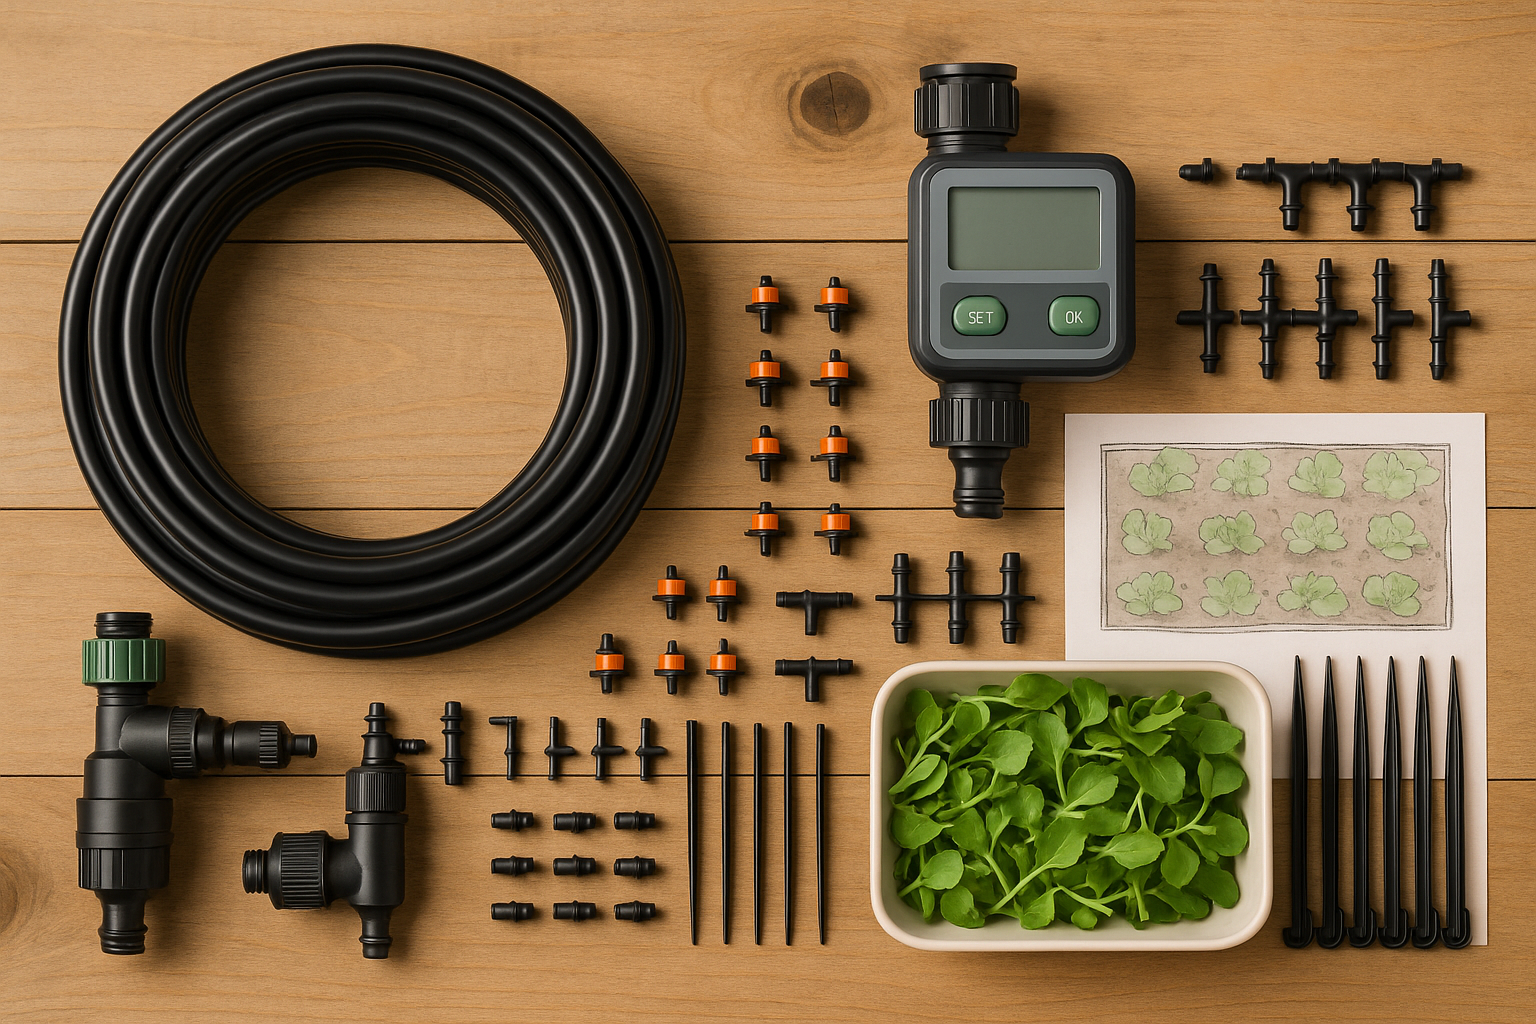
To set up a productive drip irrigation system for a small lettuce bed, you’ll need a few essential components:
- Flexible tubing (usually 1/4-inch for compact spaces)
- Compatible connectors and tees
- Drip emitters (1 or 2 gallons per hour)
- Sturdy stakes to hold lines in place
- A hose or faucet adapter
- A basic filter to prevent clogs from debris
For automation, consider an electronic timer to make watering hands-off and more consistent—these are widely available and surprisingly affordable.
While all-in-one irrigation kits offer a quick solution, you might prefer customizing your setup by selecting individual parts based on your bed size. Aim for shorter tubing runs and tighter spacing between emitters (6-12 inches apart is ideal for lettuce).
PVC pipe can also work for larger or more permanent beds, but for small, home-scale projects, flexible tubing is easier to handle and modify.
Most materials are available at local garden centers, big-box hardware stores like Home Depot or Lowe’s, and numerous online retailers, including Amazon and specialty drip irrigation suppliers. When shopping, double-check that connectors and tubing diameters match, and choose UV-resistant materials if your beds receive plenty of sun exposure.
Always follow instructions carefully, especially regarding water pressure. Small home systems typically work best under 25 PSI, so a pressure reducer might be necessary.
Optional upgrades like advanced water filters can extend your system’s lifespan, and sturdy stakes help prevent accidental tripping or hose kinks—a common safety hazard.
If you want extra flexibility, programmable timers or Bluetooth-enabled controllers allow you to manage watering even when you’re not home.
With the right tools and a bit of planning, your lettuce will thrive while you save time, water, and effort.
Planning Your System

Getting your lettuce bed ready for a drip irrigation system starts with a careful plan to ensure every plant gets just the right amount of water. First, accurately measure the length and width of your lettuce bed using a tape measure or even a long string for straight rows. Jot these numbers down and sketch a simple map, noting where you’ll place each drip line. This visual guide helps avoid guesswork and overcrowding when laying pipes.
Next, think about emitter spacing—lettuce roots are shallow and like consistent, even moisture. Spacing emitters every 6 to 8 inches along the drip line typically does the trick for uniform hydration and helps avoid dry spots. Space your lines about a foot apart for good coverage, but check your map to make sure all plants will have an emitter nearby.
A common misstep is running too many lines close together, which can waste water and lead to soggy patches, or placing lines too far apart, causing some plants to miss out entirely. Before installing anything, thoroughly clear your bed of old roots, rocks, and plant debris—clogged emitters often start with dirty beds. Use a rake to level the soil surface, as uneven beds can cause water to pool or run off before reaching your plants’ roots.
Finally, choose a reliable water source nearby; a garden spigot with a filter and pressure regulator ensures your system runs smoothly given the low flow needs of drip irrigation. Having everything prepared before you begin—tools, tubing, connectors, and a basic map—saves you time and prevents frustrating do-overs.
With careful layout and bed prep, your lettuce will thrive, and you’ll enjoy a tidy, efficient watering system from the very first use.
Installation

Getting your drip irrigation system up and running is straightforward if you follow a few simple steps and handle your young lettuce seedlings gently. Start by attaching the mainline tubing to your garden spigot—use a sturdy hose connector to ensure a watertight fit.
Next, if you want more control, add a timer and a pressure regulator between the spigot and tubing. These tools save water and help prevent your seedlings from being stressed by too much pressure.
With the mainline connected, roll out the tubing along your lettuce rows. Make sure to lay the tubing on the soil’s surface and secure it with landscape staples every three feet or so, especially around corners.
When it’s time to install emitters, use a sharp pair of scissors or tubing cutters to make clean, straight cuts where you want water delivered. Insert drip emitters or micro-sprayers directly into the tubing—they often snap right in. Position them a few inches from each lettuce plant to avoid disturbing the fragile roots.
As you work, keep seedlings safe by gently moving leaves aside and never pressing down on the soil near their base. For sharp bends, use elbow connectors to prevent tubing from kinking—this ensures consistent water flow.
Once assembled, run the system briefly to check for leaks and confirm all emitters are working. If you spot a leak, double-check that connectors are pushed in fully and that the tubing isn’t split. If an emitter’s flow looks weak, clean out any debris or run water at a slightly higher pressure.
Trouble spots often appear where the tubing isn’t cut cleanly or connections are loose, so take a moment to inspect each joint carefully. Above all, patience pays off: a careful install means your lettuce gets the gentle, consistent watering it needs to thrive, giving you peace of mind every time your timer clicks on.
Testing & Adjusting Your Drip System
Once your drip irrigation system is installed, it’s essential to test it thoroughly to ensure every lettuce plant receives adequate water. Begin by turning on the system and observing the entire garden bed while it runs for at least ten minutes.
Walk around and check for dry spots—areas where the soil remains noticeably dusty or doesn’t darken like the surrounding dirt—indicating that emitters might be clogged or positioned incorrectly. You should also look for puddling or running water, which signals over-saturation and possible leaks.
Adjust emitters by gently twisting them to control the flow rate or by repositioning tubing to direct water closer to the plant bases. A useful test is to place small cups or tuna cans near various plants; after 30 minutes, the water levels should be nearly the same in each, revealing even coverage.
For young lettuce, daily short waterings (10-15 minutes) help establish shallow roots without flooding tender seedlings. As lettuce matures, switch to deeper, less frequent sessions—perhaps every 2-3 days—adjusting based on rainfall and temperature.
Watch for warning signs:
- Yellowing leaves and limp stems: Often mean overwatering, so reduce duration or frequency and improve soil drainage if needed.
- Wilting, dry edges, or stunted growth: Signal underwatering; check emitter flow and increase watering time until soil remains moist but not soggy.
Regular, attentive adjustments and quick troubleshooting will keep your lettuce healthy and thriving throughout the growing season.
Maintenance Tips & Harvest-Time Advice

Keeping your drip irrigation system in top shape ensures your lettuce beds stay healthy and productive throughout the season. Start by cleaning the system’s filters every couple of weeks to prevent sediment buildup that can clog emitters; just unscrew and rinse them with water.
After watering, walk your rows to spot leaks or dry patches. Uneven watering is often caused by clogged emitters or pinched tubing—simply clear blockages with a toothpick or replace faulty parts as needed.
As the weather shifts, adjust the timer accordingly: water more frequently during hot spells and less during rainy periods to avoid overwatering, which can cause lettuce roots to rot. For example, on hot summer days, a 10-minute drip every morning may be perfect, but during a cool, cloudy week, switch to watering every other day.
Different lettuce varieties have varying moisture needs: butterhead types prefer more consistent moisture, while romaines can tolerate the soil drying slightly between waterings.
To keep maintenance minimal at harvest time, ensure emitter placement lines up with your lettuce rows and keep tubing loosely secured—it’ll make it easier to reach mature heads. Trim any overgrown leaves touching tubing to prevent rot and maintain airflow.
Finally, before peak harvest—usually 55 to 65 days after planting—do a thorough system check for leaks or clogs so your lettuce is crisp and disease-free. Staying consistent with these simple tips sets you up for a hassle-free harvest and robust, healthy lettuce crops all season long.