Introduction
Braiding garlic has been a cherished tradition for generations, blending practicality with a touch of rustic charm. When you learn the simple art of braiding garlic, you’re not just creating an eye-catching accent for your kitchen—you’re also taking advantage of one of the best methods for preserving and storing this flavorful staple.
Braided garlic keeps bulbs off damp surfaces, promotes airflow around each clove, and helps extend shelf life, reducing spoilage and saving you trips to the store. For anyone who loves both cooking and homesteading crafts, braiding garlic offers a satisfying way to maximize your harvest while adding a decorative touch that’s right at home in farmhouse or modern kitchens alike.
Beyond storage, a braid of garlic is steeped in tradition, symbolizing abundance and health in many cultures—a lovely bonus if you’re gifting your handiwork or celebrating a bountiful season.
In this article, you’ll discover step-by-step instructions for braiding garlic, learn tips for choosing and preparing your bulbs, and find creative ways to display or gift your finished braid. Whether you’re looking to save space, keep garlic fresh for longer, or simply add charm to your home, this guide has everything you need to get started.
Step 1: Harvesting, Drying, and Curing Garlic
Knowing when to harvest garlic is essential for getting the best flavor and longest shelf life from your crop. The key sign that garlic is ready to harvest is when the lower leaves turn brown and dry, while the upper leaves are still mostly green—usually in early to midsummer, depending on your climate. Avoid waiting until all the leaves have died back; overripe bulbs can split and won’t store well.
Once you spot the right time, use a garden fork to gently lift the bulbs, taking care not to bruise or nick them, as any damage can shorten their storage potential. After harvesting, resist the urge to wash your garlic—just gently brush off excess soil.
Drying and curing are critical steps that allow garlic bulbs to develop their signature flavor and stay mold-free. Hang your garlic in bunches or spread them out in a single layer on drying racks in a well-ventilated, shaded area—never in direct sunlight, which can cause sunscald. Garages, sheds, or covered patios with good airflow work well. Ideal curing conditions are around 60-70°F with low humidity; too much moisture can lead to rot.
Let the garlic cure for two to four weeks, checking that the outer skins feel papery and the necks are completely dry. During this process, avoid handling the garlic too much, as the skins are still delicate at first. Once cured, trim away the roots and cut the stems to about an inch above the bulb, unless you plan to braid softneck varieties.
Store your finished garlic in a cool, dry place using mesh bags or baskets to encourage air circulation. Taking the time to harvest, dry, and cure your garlic properly ensures you’ll have delicious, homegrown bulbs to enjoy for months to come.
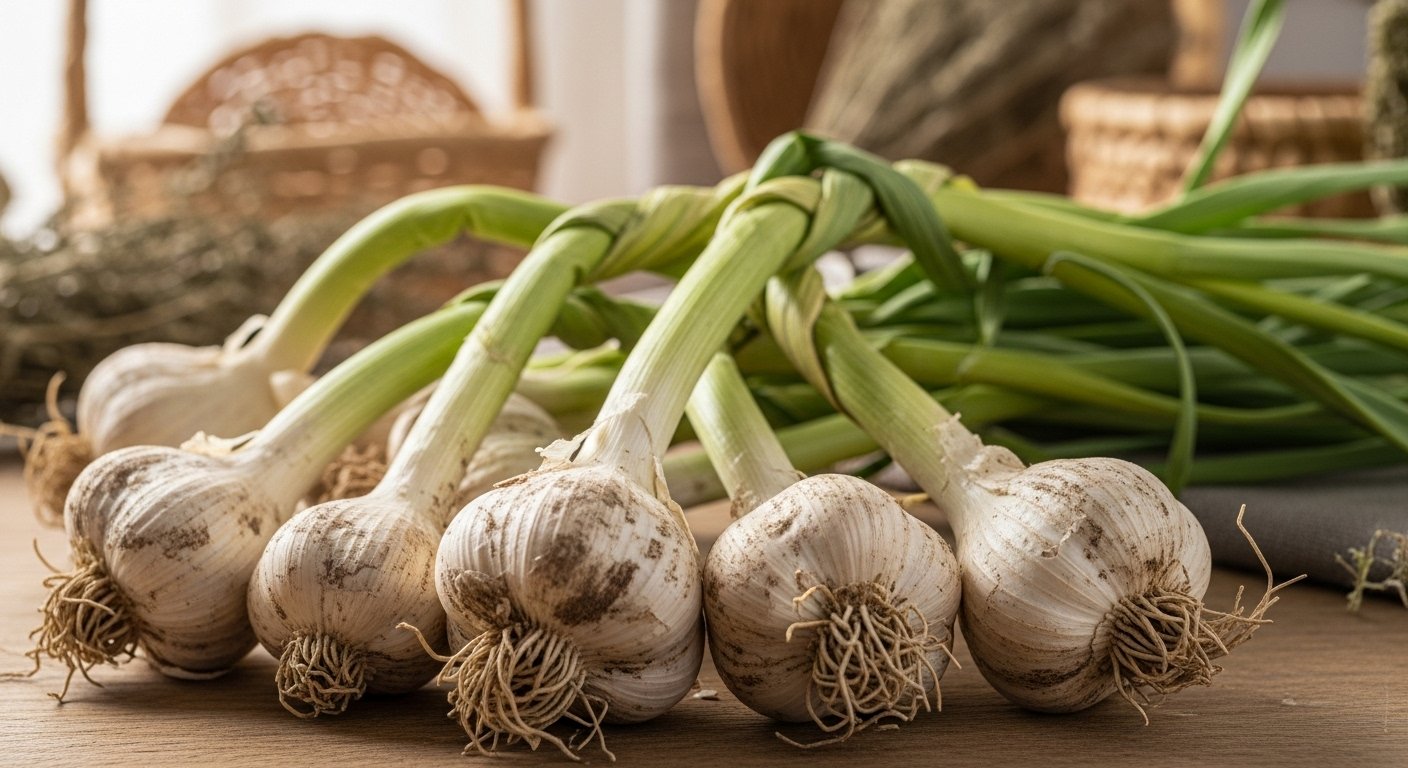
Step 2: Cleaning and Preparing Garlic for Braiding
Cleaning garlic bulbs before braiding is an important step, but it’s crucial to be gentle so you don’t damage their protective skins—these layers help the bulbs store longer. Start by brushing off any large chunks of soil with your hands or a soft brush, avoiding scrubbing or peeling away the outermost wrappers. Resist the urge to wash the bulbs with water, as moisture can encourage mold and shorten shelf life.
Next, use garden shears or sharp scissors to trim the roots, but leave about a quarter inch at the base. This helps keep the cloves in place while still keeping things tidy.
Pay attention to the stalks: for braiding, you’ll want to preserve the entire length of the stem. Cut off any flower heads, but keep at least 8-10 inches of the stalk attached to each bulb. The stalks are the backbone of your braid—they provide flexibility and strength, holding the bulbs together as you weave.
If the outer stalks feel too stiff from curing, mist them lightly with water or wrap them in a damp towel for an hour before braiding—they should be pliable but not wet.
When choosing which garlic to braid, softneck varieties (like Silverskin or Artichoke garlic) are your best bet; their flexible stems make them perfect for braiding. Hardneck garlic, on the other hand, has rigid, woody stalks that are too stiff for traditional braiding, though they can be tied in bundles instead.
By taking time with this step, you’ll set yourself up for a beautiful, functional braid that stores well and makes for a rustic kitchen display.
Step 3: How to Braid Garlic – Step-By-Step Guide
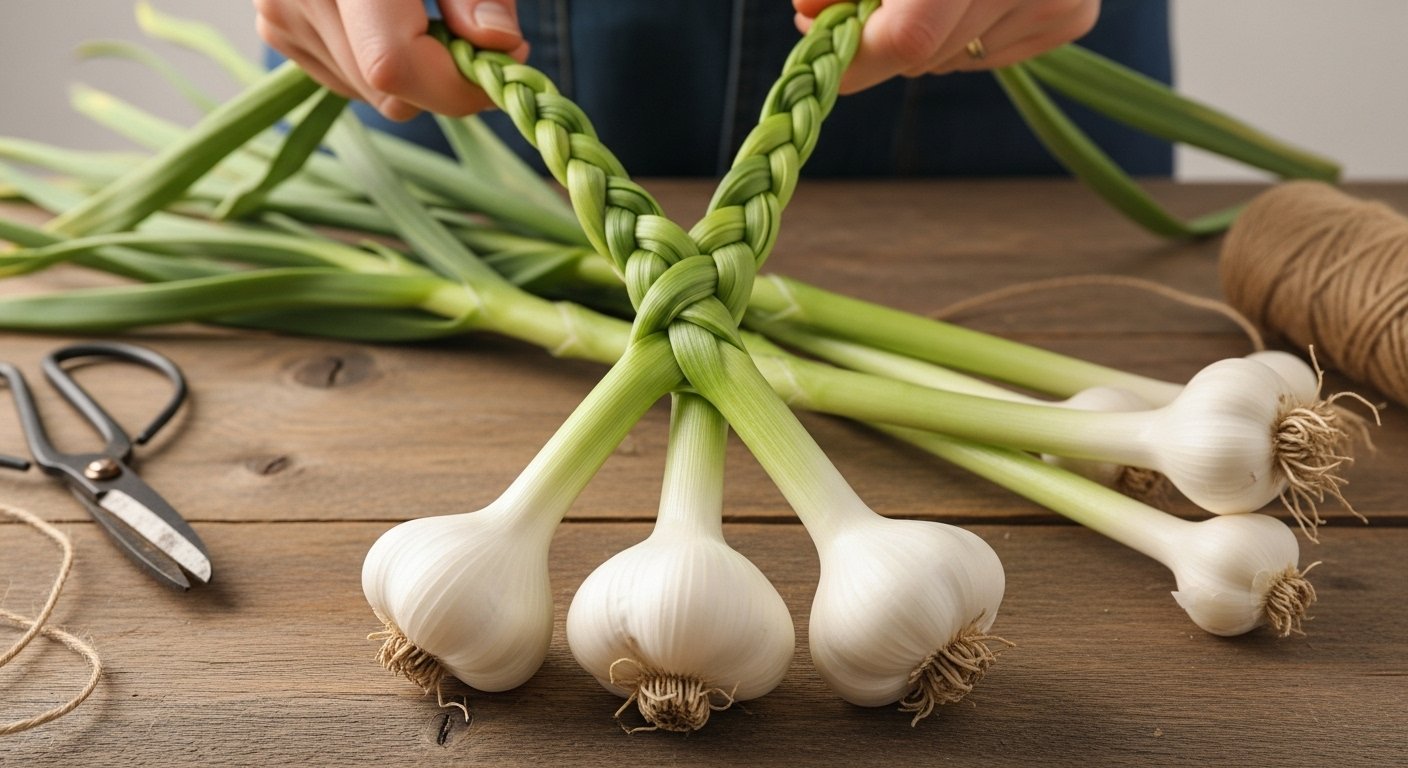
To braid garlic the traditional way, start by selecting softneck garlic, which is more pliable and ideal for braiding. Gather about a dozen cleaned, dried bulbs with long, flexible stems.
Arrange three bulbs side by side, holding their stems together in one hand—this forms your base. Treat the stems like three long strands: left, center, and right. Cross the right strand over the center, then the left over the new center, just like a classic hair braid.
After your first full cross, add another garlic bulb by tucking its stem alongside one of the outer strands before crossing it over the center. Repeat this process, alternating which side you add a bulb to and always folding its stem in with the outermost strand before crossing—this ensures the braid grows evenly and securely holds all the bulbs.
As you add more garlic, keep the braid tight by gently pulling the stems snug after every twist. Be careful not to overload the braid all at once or the bulbs might slip out; add them gradually to keep the braid neat and balanced.
One common mistake is letting the stems dry too much before braiding, which makes them brittle and prone to snapping. So, start braiding within a few days of harvest when they’re still pliable.
To make a thicker braid or add more bulbs, simply increase the number of bulbs you add with each cross and overlap the stems carefully to avoid gaps. For a smaller kitchen braid, stop after 8–10 bulbs and tie the end securely with twine.
For a larger statement braid, continue until you’ve used up to 20 bulbs, always finishing with a strong knot at the top so you can hang it easily. Throughout, check the braid’s shape and tightness, adjusting the stems as needed to keep everything uniform.
With a bit of patience and practice, you’ll have a beautiful, traditional garlic braid ready for storage and cooking.
Step 4: Enhancing Your Garlic Braid (Optional Decorative Touches)
Adding optional decorative touches to your garlic braid is a fun way to showcase your creativity while turning a practical kitchen item into a charming display. Consider weaving in sprigs of dried herbs like rosemary, thyme, or lavender—these not only look beautiful but can also add a pleasant fragrance to your kitchen.
For a splash of color, tuck in a few dried flowers such as marigolds, statice, or small bunches of decorative wheat. To ensure your decorations do not affect the shelf life or quality of the garlic, only use fully dried elements; moisture can encourage mold growth or spoilage.
Secure the herbs or flowers by gently entwining their stems alongside the garlic as you braid or by tying them in with natural twine at the braid’s top or bottom. Avoid using adhesives, sprays, or synthetic ribbons that might come in contact with the garlic bulbs themselves.
When it’s time to display your garlic braid, think about areas that are cool, dry, and well-ventilated, such as hanging it from a sturdy hook on your kitchen wall, suspending it from a pot rack, or draping it over a pantry door. Not only does this keep your garlic within easy reach while cooking, but it also adds an authentic and homey touch to your space.
If you want to go one step further, coordinate the color of your herbal or floral additions with your kitchen décor for a custom look. Ultimately, enhancing your garlic braid with simple, natural decorations lets you infuse personality into your kitchen without compromising the garlic’s freshness or quality.
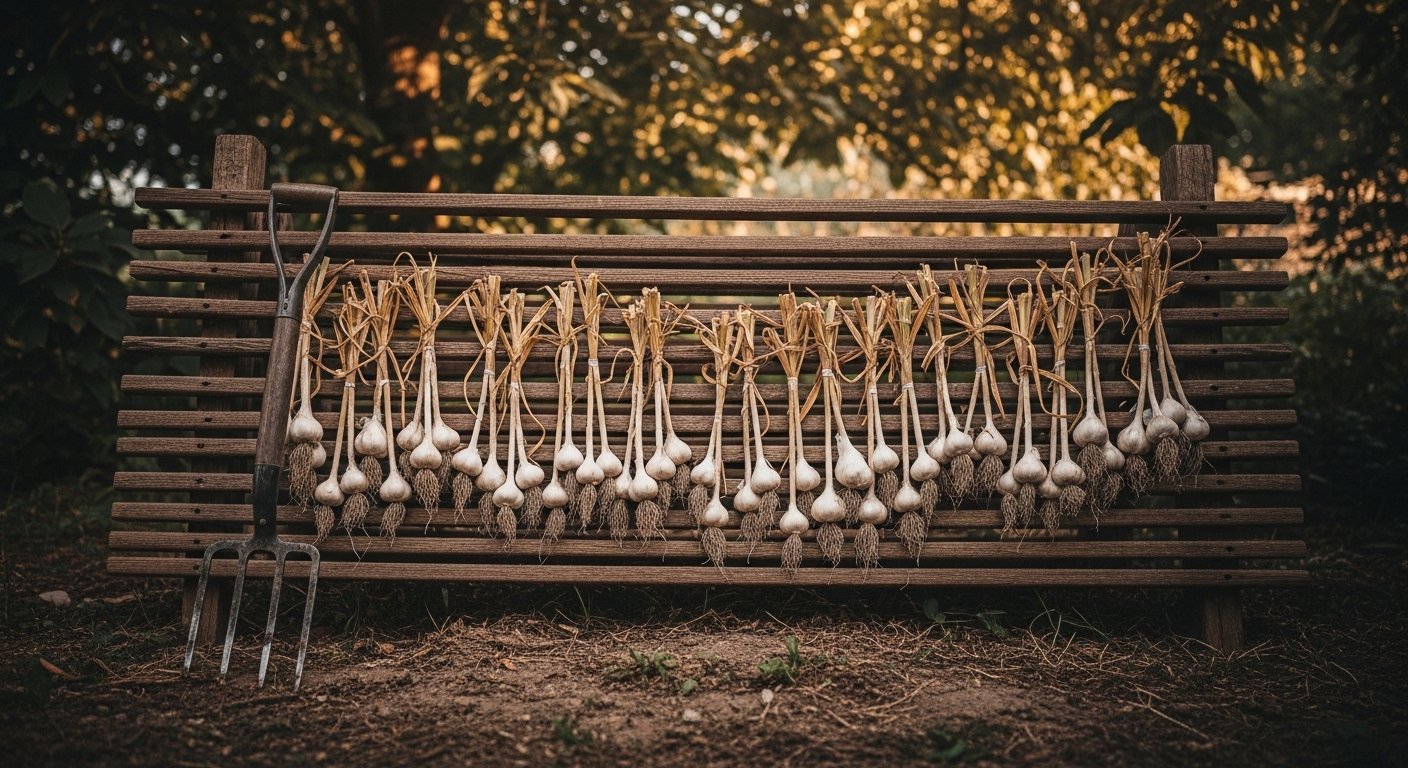
Step 5: Storing and Displaying Braided Garlic
After you’ve finished braiding your garlic, it’s important to find the right spot to hang it for both long-term storage and an attractive display. The ideal location is indoors, away from direct sunlight and moisture—think a cool pantry, a shaded corner of the kitchen, or even a mudroom.
Good air circulation is key; humidity can cause mold and sprouting, so avoid hanging braids near windows or appliances that generate heat or steam. If you want a rustic kitchen display, try hanging the braid from a hook on a wall or ceiling beam, as long as it’s out of the sun and away from frequent splashes or temperature changes.
To extend shelf life, check each bulb occasionally for signs of softness or mold, and gently remove any compromised ones before issues spread. For even longer freshness, some people mist garlic braids with a little water every few weeks to keep the stems from becoming brittle—but use this sparingly.
When you’re ready to cook, don’t untwist the whole braid—simply snip off the lowest bulb with scissors or garden shears. Try to keep the braid as intact as possible, supporting it gently as you cut so it doesn’t unravel.
With these simple steps, you’ll enjoy beautiful, usable garlic all season long while adding a touch of farmhouse charm to your space.
Step 6: Using Garlic from Your Braid & Troubleshooting
When you’re ready to use garlic from your braid, simply snip off a bulb closest to the end—avoid pulling, which can unravel the whole braid. Use a sharp pair of kitchen scissors or garden shears and leave the rest hanging in a cool, dry spot. It’s normal for a few papery skins to drop off, but always check each bulb before using.
Look out for signs of spoilage like soft spots, shriveling, green shoots, or a musty smell; white fuzz or colored spots on the garlic indicate mold, and those bulbs should be discarded immediately to prevent it from spreading.
If your braid starts loosening, reinforce it with kitchen twine or jute—just tie a simple knot around the drooping section, making sure the remaining bulbs are secure but not crushed. For slipped bulbs, you can tie them back into the braid or store them separately in a mesh bag for continued airflow.
Keep your braid in a spot with good ventilation, and avoid humid kitchens which can speed up spoilage. If you notice many bulbs going soft at once, double-check your storage area for excess moisture and consider moving the braid to a drier location like a pantry or cellar.
With these tips, you’ll enjoy flavorful, fresh garlic bulbs from your braid for months while minimizing waste.
Frequently Asked Questions About Braiding Garlic
Can all types of garlic be braided? Softneck garlic is best for braiding because its flexible stems bend easily. Hardneck varieties have a stiff central stalk, making braiding difficult, though some gardeners succeed by trimming and tying the bulb tops together instead.
How long do braided garlic bulbs keep? If stored in a cool, dry place with good airflow, braided garlic can last up to six months or more—softneck varieties generally keep longer than hardneck types.
What if some bulbs start sprouting? Remove sprouting bulbs promptly to prevent spoilage and use them first. Check your braid regularly for any soft spots or mold, and discard affected bulbs immediately.
How do I prevent the braid from unraveling? Tie the top of the braid tightly with twine, create a loop for hanging, and secure loose ends. Braiding while the stems are still slightly pliable helps maintain a strong structure.
What if my braids look messy or uneven? Don’t worry—practice improves results, and even imperfect braids store garlic just as well.
Expert Tip
Cure garlic for at least two weeks after harvest before braiding to ensure a long shelf life and sturdy stems. A little patience and care go a long way toward enjoying beautiful, functional garlic braids in your kitchen.