Why Start Lettuce Indoors?
Starting lettuce seeds indoors offers gardeners several key advantages that can make a big difference in your harvest. First, it lets you kick off the growing season earlier than you could outdoors, since you’re not at the mercy of unpredictable spring weather.
Lettuce seeds germinate best at consistent temperatures around 60–70°F, which can be easily maintained inside your home, so you can get a head start even while it’s still chilly outside. This early start often leads to a faster harvest—you’ll be picking fresh greens weeks before outdoor-sown lettuce is ready.
By growing indoors, you also protect tender seedlings from early-season cold snaps, heavy rainfall, or hungry pests like slugs and cutworms, which are common problems in garden beds. Plus, extending your lettuce season means you can enjoy multiple harvests throughout the year, not just in the peak months.
Lettuce is especially well-suited for indoor seed starting because it doesn’t require deep soil or strong sunlight to germinate, and its shallow roots make it adaptable to trays or small containers on a sunny windowsill. By starting indoors, you set up your lettuce for success and make the most of your gardening space and time.
Choosing The Right Lettuce Varieties
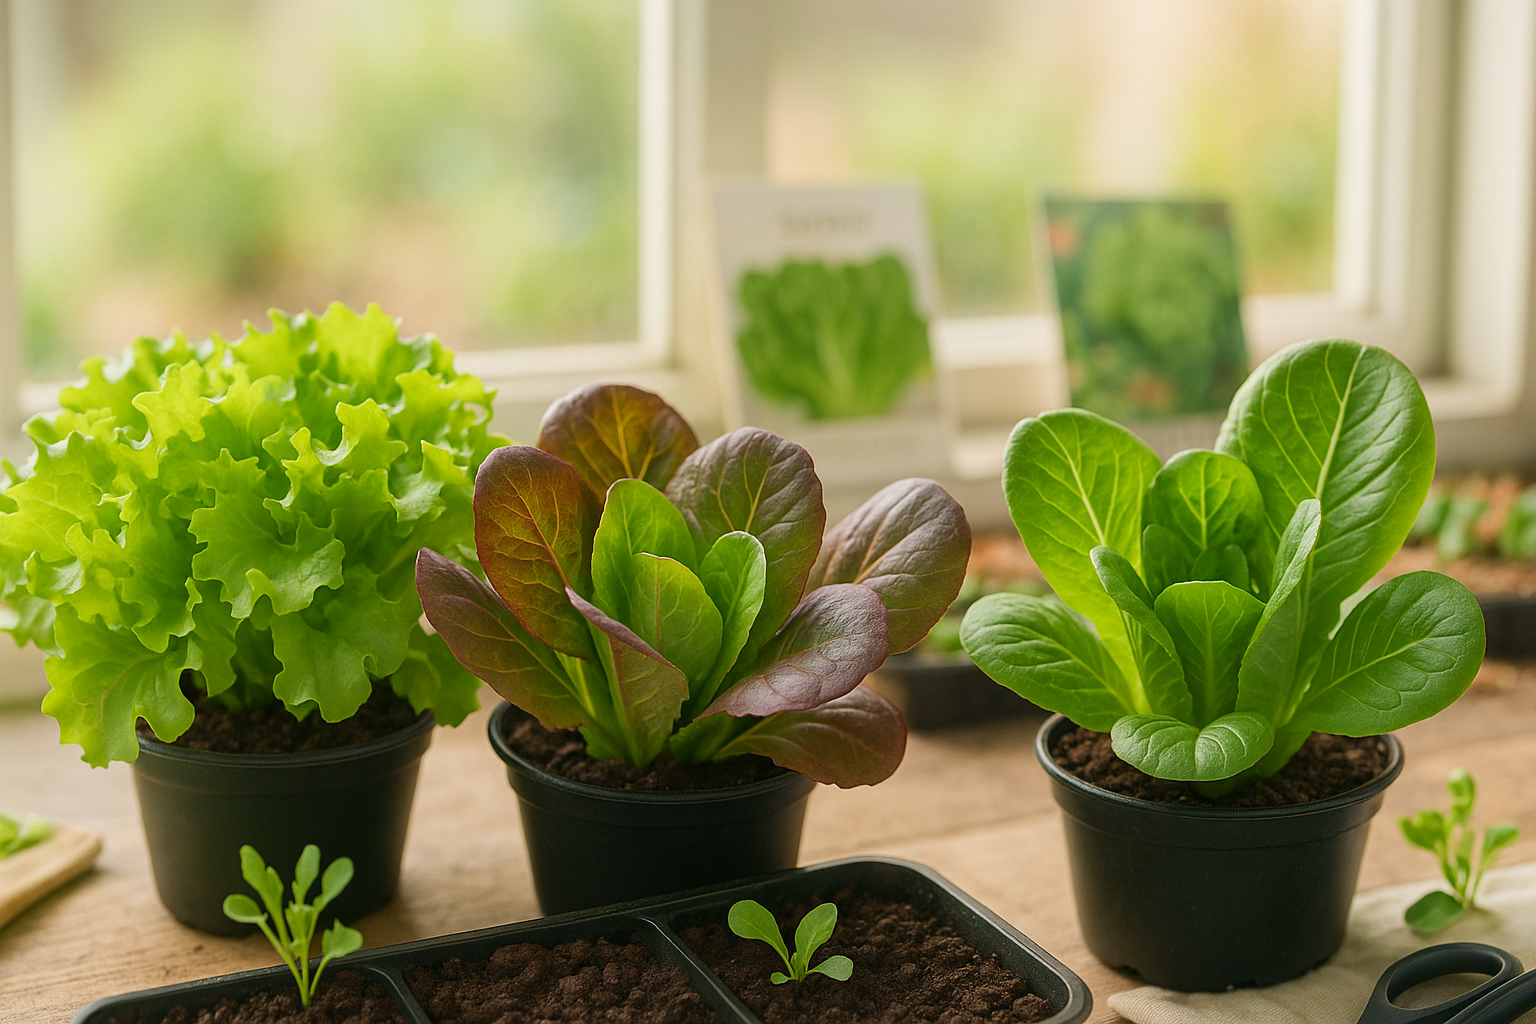
When it comes to growing lettuce indoors, choosing the right variety can make all the difference in your gardening success. Loose-leaf lettuces, like ‘Black Seeded Simpson’ and ‘Salad Bowl,’ are top picks for beginners because they grow quickly, don’t require much space, and allow you to harvest leaves as needed.
Butterhead types such as ‘Buttercrunch’ are also well-suited for containers, offering tender, flavorful leaves without demanding deep soil. Romaine, while a bit more upright and space-hungry, can still thrive indoors—especially dwarf varieties like ‘Little Gem’ that pack a lot of growth into a compact form.
Think about the light in your space: if you only have a sunny windowsill (four to six hours of light), loose-leaf and butterhead lettuces do best. With supplemental grow lights, you can experiment with nearly any type.
When in doubt, check the seed packet or catalog for days-to-maturity and size recommendations. For those short on space, look for labels like “baby,” “mini,” or “space saver.” These varieties are bred specifically for small containers and tight environments.
It’s also helpful to start with seeds labeled as “easy” or “container-friendly,” which are often more forgiving of common beginner mistakes—look for cultivars such as ‘Little Gem,’ ‘Buttercrunch,’ and ‘Salad Bowl’ for a reliable harvest.
Trying a couple of types not only adds variety to your salads but also helps you discover which lettuces thrive best in your unique indoor setup.
Prepping Supplies & Indoor Setup
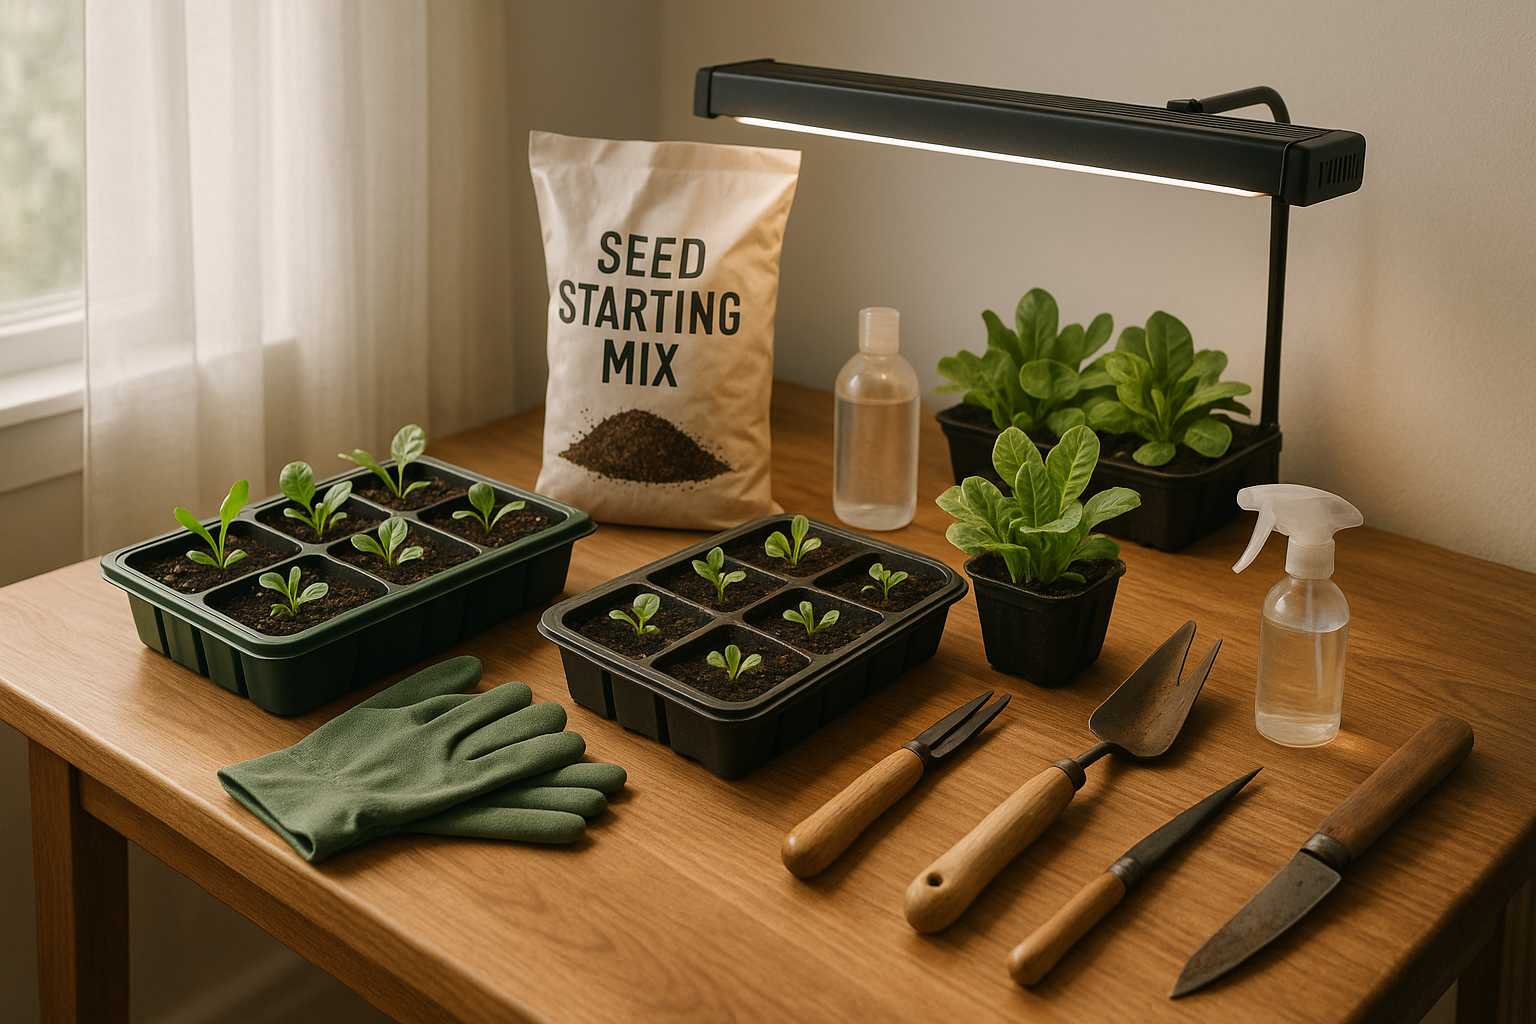
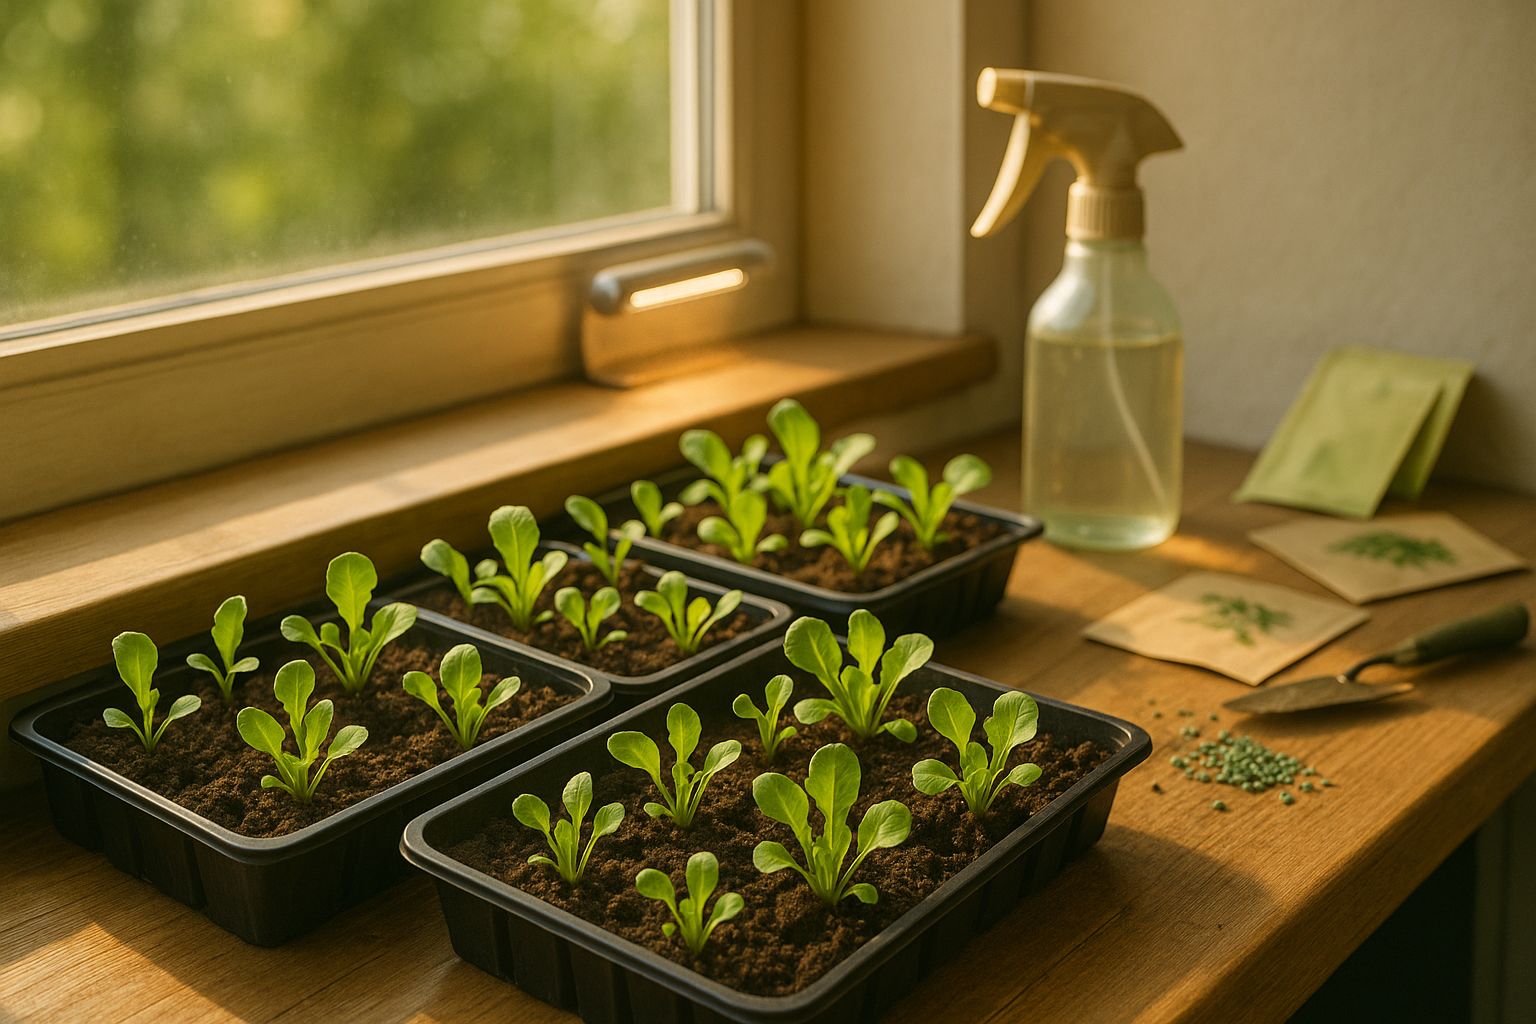
Getting your indoor seed starting setup right makes all the difference in growing strong, healthy plants. Start by gathering your essential supplies: seed trays or recycled containers with drainage holes, a high-quality seed starting mix (not just garden soil), good grow lights for consistent brightness, and a spray bottle for gentle watering.
Choose an inside spot that stays between 65-75°F, away from drafty windows or heating vents—consistent temperature is key for quick germination. Place your setup where you can easily adjust light—windowsills can work, but a small grow light on a timer is best to guarantee your seedlings get 14-16 hours of light daily.
Humidity domes or a clear plastic cover can help seeds sprout if your home is dry, but remember to remove them as soon as seedlings emerge to prevent fungal issues. Cleanliness is crucial: always wash seed trays and tools with hot, soapy water before use, and use only fresh, high-quality seeds. Old seeds or dirty containers are leading culprits for common seedling diseases like damping off.
For the best results, moisten your starting mix before planting, sow seeds at the recommended depth, and mist gently until seedlings appear. With the right prep and a bit of care, you’ll turn even a corner of your home into a productive mini-greenhouse.
4. Step-by-Step Guide to Sowing Lettuce Seeds Indoors
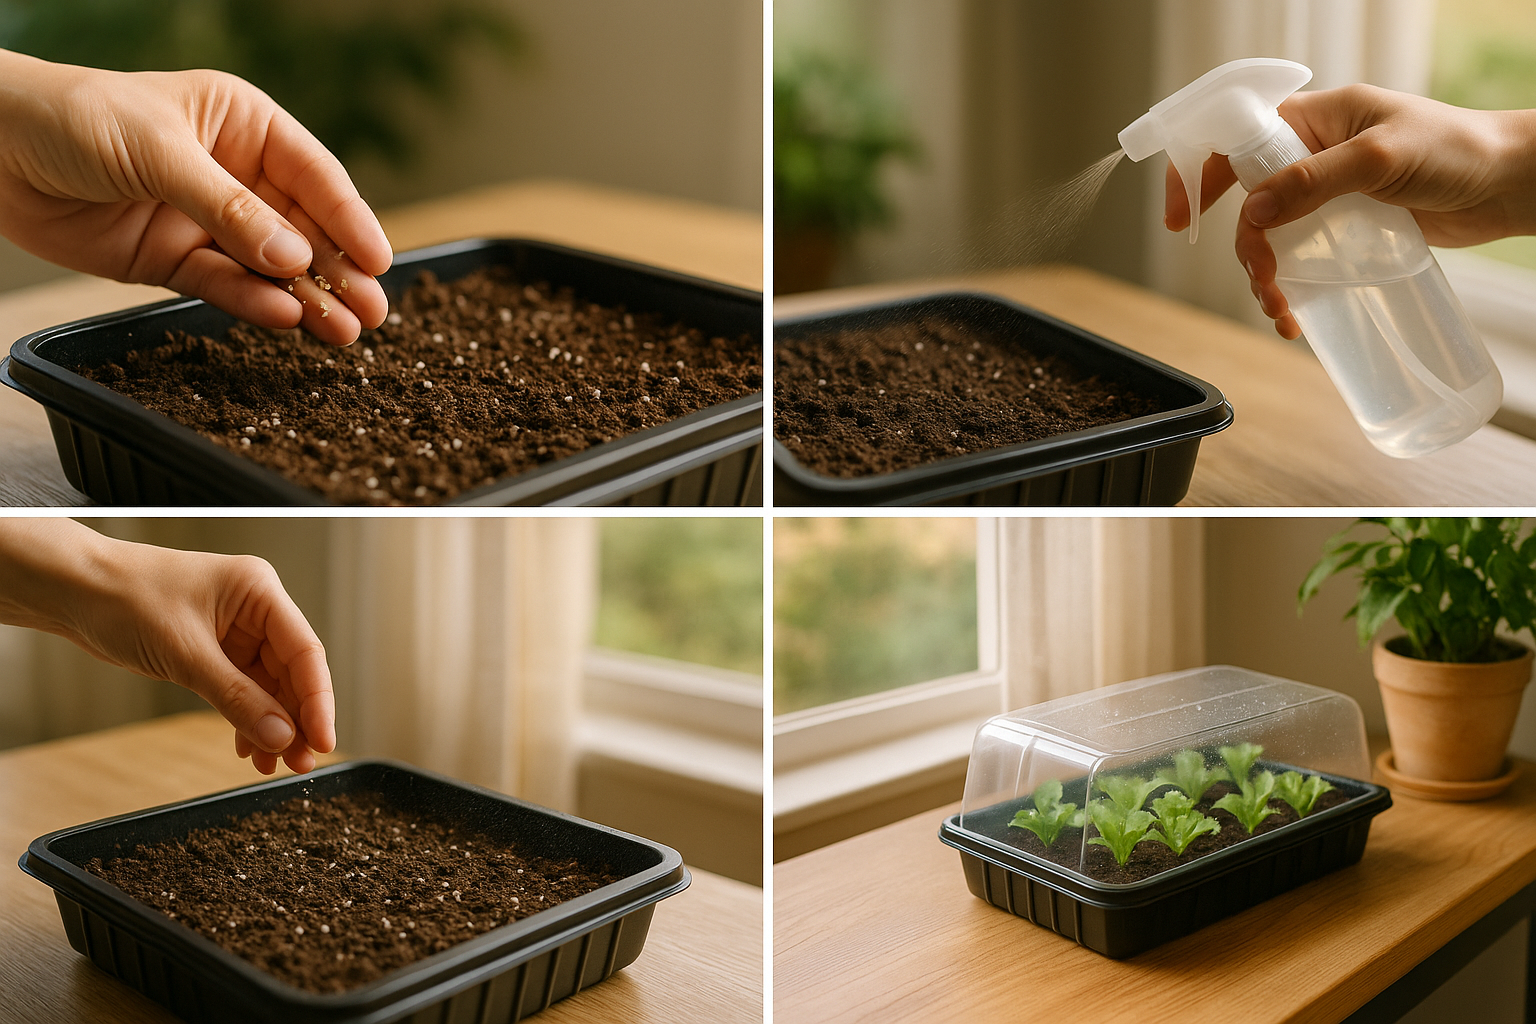
Start by filling a clean seed tray or small pots with a pre-moistened seed starting mix; you want the mix damp like a wrung-out sponge, not soggy. Gently press the seed mix to remove large air pockets, but avoid compacting it too much.
Scatter lettuce seeds thinly over the surface, keeping in mind their tiny size—aim for about 1-inch spacing if possible, or thin them later. Because lettuce seeds need light to germinate well, just press them lightly into the surface or cover with a barely-there dusting of mix, no more than 1/8 inch deep.
After sowing, use a spray bottle to mist the surface gently, ensuring the seeds aren’t washed away or buried too deeply. Consistent moisture is key, but never soak the soil; check daily and mist as needed to keep the mix moist but not wet.
Cover the tray with a clear humidity dome or a loose sheet of plastic wrap, which helps trap warmth and maintain moisture—creating the perfect mini greenhouse for germination. Set the tray in a bright, warm spot, ideally around 65–70°F; placing it atop a fridge or using a seedling heat mat can help if your home is cooler.
Typically, lettuce seeds germinate quickly, often within 3–7 days. You’ll first notice tiny, pale green looped sprouts poking through the surface. As these first cotyledons, or “seed leaves,” unfold, keep the cover slightly ajar to reduce humidity gradually, helping prevent fungal issues.
Once seedlings develop their first set of true leaves—a second pair distinct from the initial rounded seed leaves—they’re ready for careful transplanting or continued indoor growth. Regularly check that the soil stays just moist for healthy growth; letting it dry out or become muddy can halt progress or cause disease.
Following these steps ensures your lettuce seedlings start strong and healthy right from your windowsill.
Caring for Lettuce Seedlings

As your lettuce seedlings begin to emerge, it’s time to remove any dome or plastic cover to allow better airflow and reduce the risk of fungal diseases like damping-off. Gradually introduce the seedlings to open air by lifting the cover for a few hours each day before removing it completely.
Good lighting is critical for strong, healthy growth—place seedlings under full-spectrum grow lights for 12 to 16 hours daily, keeping the lights about 2 to 3 inches above the plants. If you’re growing on a windowsill, rotate the trays every day to prevent the seedlings from leaning toward the light, ensuring even, compact growth.
Watering needs special attention; aim to keep the soil consistently moist but not soggy. Use a spray bottle or bottom-watering method so the surface stays drier, minimizing the chances of damping-off. Let the top layer of soil dry slightly before the next watering to encourage deep root growth.
As seedlings develop their first set of true leaves, it’s important to thin them out—snip the weaker seedlings at the soil level, leaving one healthy plant per cell or a few inches apart in trays. This prevents overcrowding, which can lead to poor air circulation, leggy plants, and competition for nutrients.
Being attentive to these care steps will help your lettuce seedlings transition smoothly into robust, transplant-ready plants.
Transplanting and Hardening Off
Knowing when and how to transplant your seedlings can make a big difference in their success. Typically, it’s best to move seedlings when they have at least two sets of true leaves and strong, healthy roots, but before they become rootbound. Gently loosen the soil around each seedling and handle them by the leaves, not the stems, to avoid damaging these delicate plants.
If transplanting outside, hardening off is crucial: start by placing seedlings outside in partial shade for a few hours each day, then gradually increase both the light intensity and duration over a week to ten days. This helps them adjust to sunlight, wind, and temperature changes and reduces the risk of transplant shock.
If you’re keeping seedlings indoors—say, for houseplants or extended cool seasons—transplant them into bigger pots as they outgrow their containers, and ensure they get plenty of light, either from a bright window or grow lights.
For both indoor and outdoor transplants, water seedlings right after moving them and monitor for signs of stress, like wilting or yellowing. Taking these steps gives your young plants the best chance to thrive in their new home.
7. Common Issues & Troubleshooting
Starting microgreens at home can be rewarding, but even seasoned growers run into a few common issues. Poor germination is often caused by using old seeds or inconsistent moisture—always start with fresh, high-quality seeds and keep your growing medium evenly damp, but not soggy.
Legginess, when microgreens grow tall and spindly, usually results from insufficient light. Try moving your trays to a brighter window or invest in an inexpensive grow light to keep the plants compact and sturdy.
Fungal infections, like damping-off, appear as fuzzy mold on stems or soil and thrive in overwatered, poorly ventilated environments. To reduce risk, use clean trays, sterilized soil, and ensure plenty of airflow around your plants.
Pests such as aphids or fungus gnats can be controlled with sticky traps and by allowing the soil to dry somewhat between waterings.