Introduction to Growing Carrots
Transplanting carrots may seem tricky, but it’s a topic that intrigues many home gardeners eager for success in the vegetable patch. Carrots are one of the most rewarding crops you can grow — crisp, sweet, and packed with vitamin A, fiber, and antioxidants, straight from the soil to your table.
Growing carrots at home means you get to enjoy a healthier, fresher alternative to store-bought produce, plus the satisfaction of unearthing a hidden harvest. Yet, as any seasoned gardener knows, carrots can be a finicky crop. Their delicate roots don’t always appreciate a lot of disturbance, which is why transplanting carrots has a reputation for being challenging. Issues like misshapen roots and stunted growth often deter beginners.
Despite these potential pitfalls, many gardeners are curious to find out if they can start carrots indoors or thin them into new spots in the garden. In this post, we’ll break down the realities of transplanting carrots, share real-world tips for achieving straight, healthy roots, and discuss alternative methods to give your homegrown carrots the best chance to thrive. Whether you’re a novice or a carrot connoisseur, you’ll discover practical advice to boost your harvest and confidence.
Choosing the Best Method: Direct Sowing vs. Transplanting

When deciding how to start your carrot crop, you’ll need to choose between direct sowing seeds into the garden or transplanting seedlings started indoors. Direct sowing means planting carrot seeds straight into the prepared soil outdoors, which is generally best for root vegetables like carrots because their long taproots don’t like to be disturbed.
This method allows carrots to grow straight down into the earth, leading to smoother, well-shaped roots and a bigger yield. However, direct sowing can be trickier in heavy clay soils, which may crust over and hinder early sprouting, or in very cold or hot climates that delay germination.
Transplanting, on the other hand, involves starting seeds in containers indoors, then moving the young plants outside once conditions are right. While this gives you a head start in short-season areas, it often leads to carrots with forked or stunted roots because the delicate taproot is easily damaged during the move.
If you must transplant—say, to extend the season in a cool climate—use biodegradable pots that can be planted right into the ground to minimize root disturbance. Ultimately, for sandy or loose soils and most climates, direct sowing is typically more successful and produces healthier roots.
Novice gardeners are usually better off direct seeding, as transplanting carrots takes extra care and practice.
Pro tip: For heavy or compacted soils, add plenty of compost and rake the bed smooth before sowing to help seeds get started.
Preparing the Ideal Carrot Bed
Healthy, flavorful carrots start with the right soil, so preparing your garden bed is key. Carrots grow best in deep, loose, and fertile soil that allows their roots to stretch straight down.
Begin by clearing all rocks, sticks, and clumps—carrots are notorious for splitting or growing crooked if they hit an obstacle. Dig down at least 12 inches and break up any compacted soil to make it easier for those long roots to develop.
If your soil is heavy clay or tends to stay soggy, amend it by mixing in sand or fine compost to improve drainage; soggy roots can lead to rot. Mixing in plenty of well-rotted compost or aged manure also enriches the soil, giving carrots the nutrients they need without harsh chemical fertilizers.
Aim for a soil texture that feels soft and crumbly in your hand. After amending, rake the surface smooth and level.
Finally, consider planting carrots in raised beds if your native soil is particularly dense—this simple step ensures proper drainage and makes it easier to maintain a rock-free, loose environment.
By taking these steps before you plant, you’ll set your carrots up for crisp, straight, and sweet success.
Sowing and Spacing Techniques for Better Carrots
Proper sowing is key to growing uniform, straight carrots. Start by choosing a sunny spot and preparing loose, stone-free soil—carrot roots need room to stretch without hitting obstacles.
When it comes to sowing, sprinkle the tiny seeds as thinly as possible in shallow rows about half an inch deep, spacing the rows at least 12 inches apart. Overcrowding is a common mistake that leads to stubby or misshapen carrots, as plants compete for space.
To make spacing easier and boost your success rate, consider using seed tapes. You can buy them pre-made, but it’s also simple to make your own:
- Lay out strips of toilet paper.
- Dab small drops of flour paste every two inches.
- Stick one seed per drop.
- Once dry, lay the tape in your row and cover lightly with soil.
Seed tapes keep seeds evenly spaced, reduce thinning work later, and give each carrot the room it needs to form straight, healthy roots.
If you’re not using tapes, be extra mindful to thin the seedlings after they sprout so each plant is about 2 inches apart. Careful sowing and spacing make a big difference in the quality of your carrot harvest.
Caring for Carrot Seedlings Without Root Disturbance
When caring for carrot seedlings, minimizing root disturbance is crucial to ensure healthy growth, as their roots are delicate and easily damaged. When thinning your seedlings—ideally when they reach about two inches tall—snip the extra plants at soil level with sharp scissors instead of pulling them. This method avoids disrupting the roots of the seedlings you want to keep.
For watering, use a gentle spray or a watering can with a fine rose to prevent soil from washing away and exposing the roots. Mulching lightly with a layer of straw or compost also helps maintain even soil moisture and temperature, protecting young roots from stress.
To further boost your carrot patch, especially if you’re using older seeds, consider priming the seeds before planting: soak them in warm water for 24 hours, then dry them off and sow immediately. This pre-soaking technique stimulates germination and leads to more uniform sprouting, increasing your chances of a successful crop.
By following these steps, you’ll encourage robust, deeply rooted carrot seedlings with minimal setbacks.
Protecting Carrot Crops from Pests and Animals
Carrot crops can attract a range of unwelcome visitors, with the carrot rust fly being one of the most notorious pests. This small insect lays eggs at the base of carrot plants, and its larvae tunnel into the roots, causing damage that ruins quality and leads to rot.
To prevent infestations, consider using floating row covers as soon as you plant your seeds—these physical barriers block the adult flies from reaching your plants. For added protection, companion plant strong-smelling herbs like onions or garlic nearby to help mask the scent of carrots.
Besides insects, animals like rabbits and deer can also munch on carrot tops and roots. Erecting low fencing (about two feet high and buried a few inches underground) works well for keeping out rabbits. For deer or birds, draping lightweight netting over your crop is a non-toxic and effective deterrent.
For long-term pest control and soil health, practice crop rotation: avoid planting carrots (or other root crops) in the same spot year after year to break pest life cycles. Planting cover crops such as clover or rye in the off-season enriches soil nutrients and supports beneficial insects, making your carrot patch more naturally resilient.
Harvesting and Enjoying Your Carrots
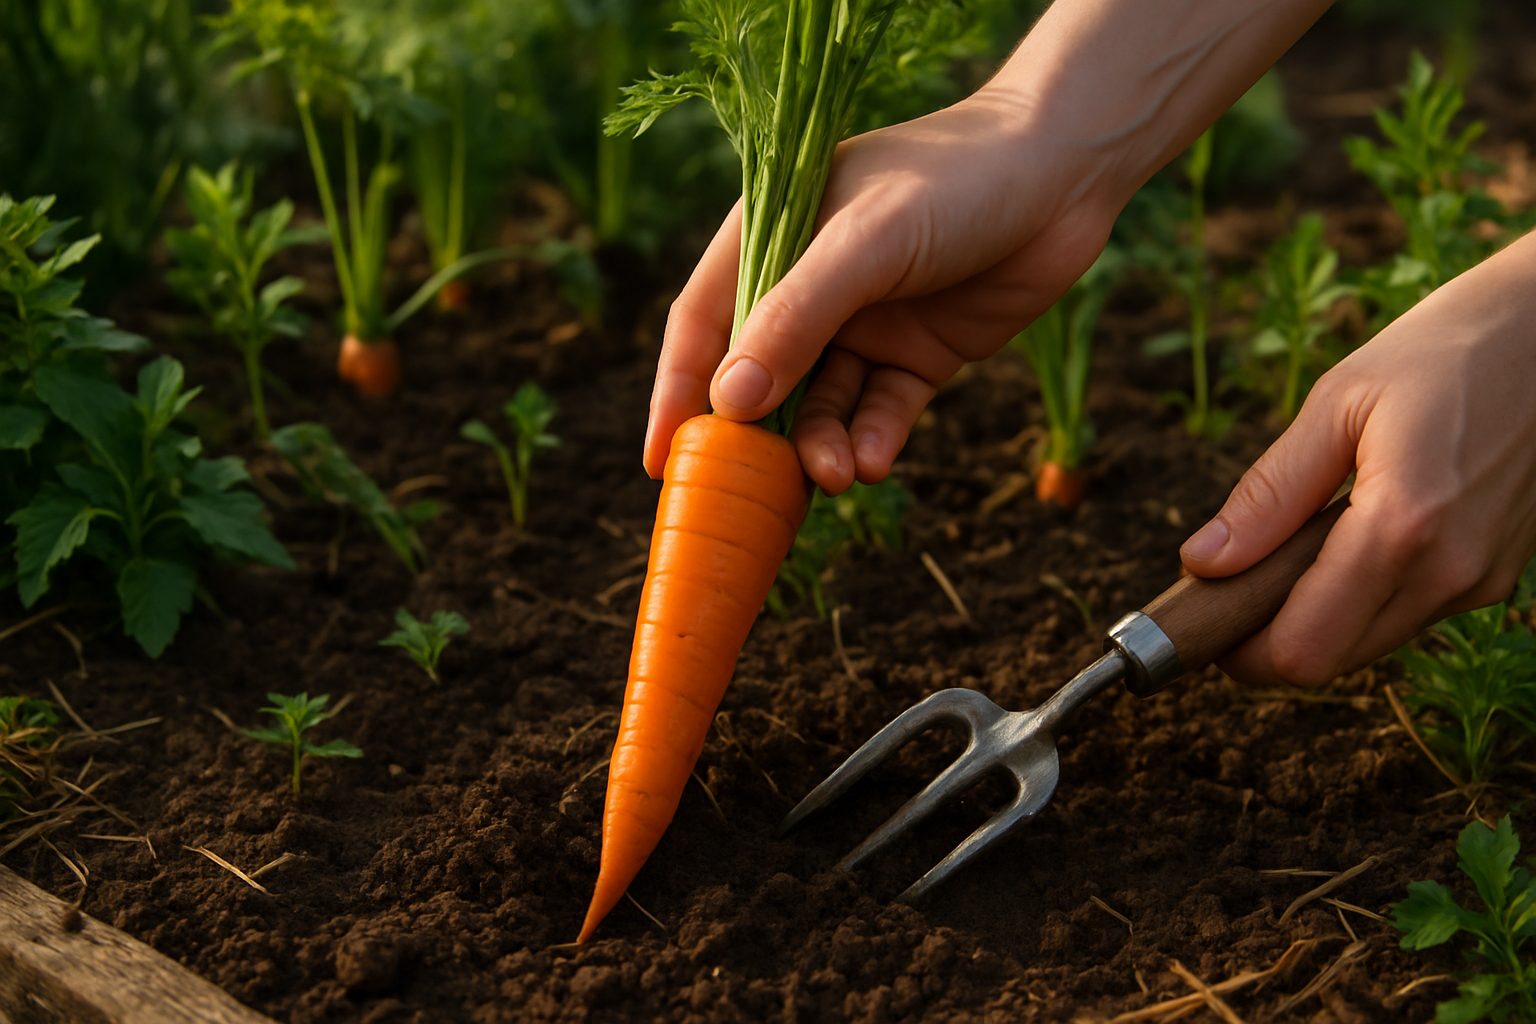
Harvesting carrots at the right time makes all the difference in flavor and texture. Look for bright orange shoulders just peeking through the soil, usually 60–80 days after planting, when the roots are about ½ to 1 inch in diameter. Gently loosen the soil with a garden fork before pulling to avoid snapping the roots.
For the sweetest, crunchiest carrots, harvest in the early morning when sugars are most concentrated. Don’t toss those leafy tops! Carrot greens are edible and great for making pesto, adding to salads, or using as a garnish.
The roots themselves are delicious fresh, roasted, or blended into soups and smoothies. To keep your carrots crisp after harvesting, cut off the greens right away—leaving them attached causes the roots to lose moisture quickly.
Store the roots in the fridge inside a perforated plastic bag or a container of damp sand for several weeks. If you have a root cellar, carrots can last for months packed in layers of sand or sawdust.
For the greens, wrap them in a damp paper towel and store them in a sealed bag in the refrigerator, but use within a few days for the best flavor. With these tips, you’ll enjoy garden-fresh carrots long after harvest day.