Introduction to Roasted Brussels Sprouts
Vertical brussels sprouts gardens are changing the way food lovers grow and enjoy this underrated veggie—but before you plant your own, let’s talk about why Brussels sprouts have earned a place at so many tables.
Once dismissed as a bland or bitter side, Brussels sprouts have made a major comeback in kitchens around the world. They’re not only packed with vitamins and minerals, but also offer a surprisingly complex, nutty flavor when cooked right. In fact, their unfair reputation often comes from being overboiled or underseasoned during childhood dinners.
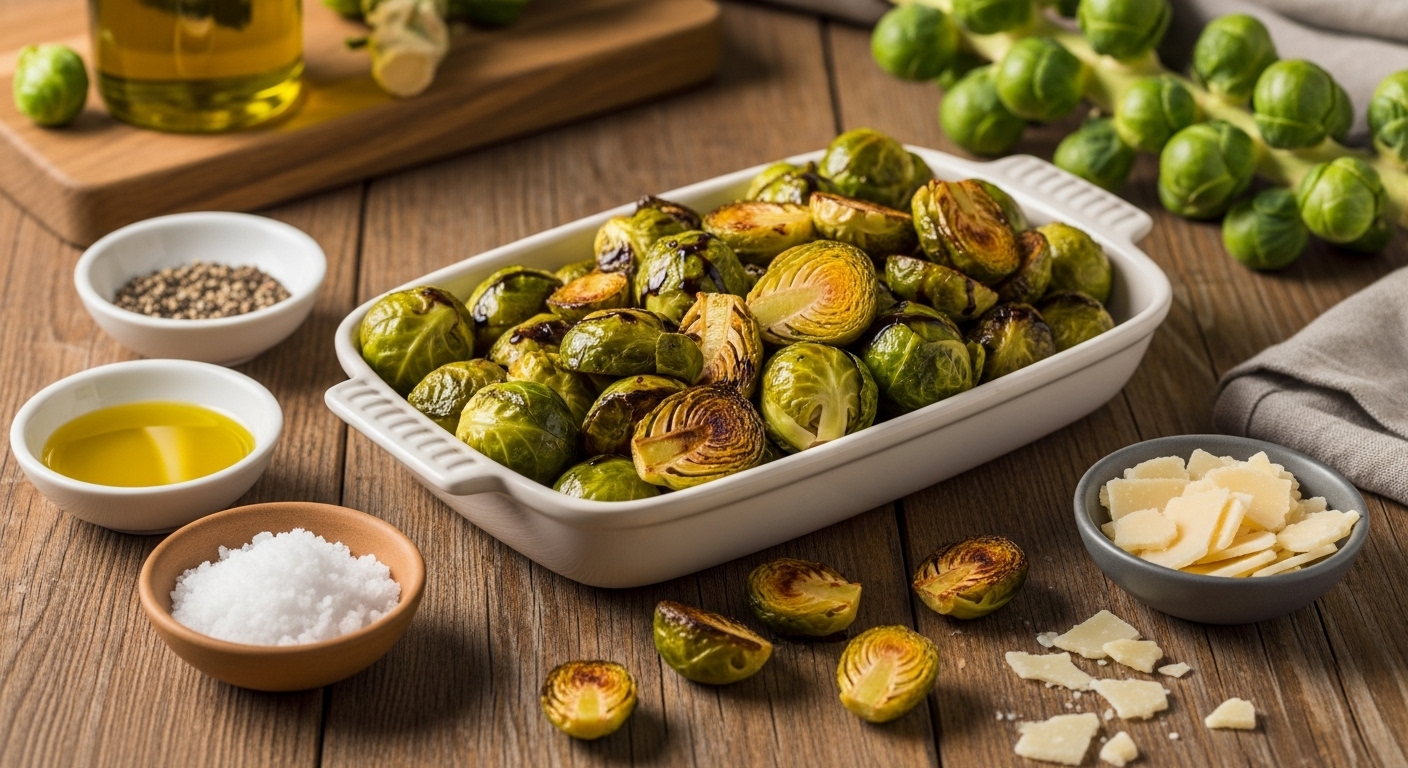
Fast forward to today, and the most popular way to cook them is roasting—a method that quickly puts their critics to rest. Roasting Brussels sprouts unlocks their sweetness and softens their texture, creating crispy caramelized edges and a deep, savory taste that pairs well with just about anything.
Toss them with olive oil, salt, and pepper (or get creative with balsamic vinegar and a sprinkle of parmesan), and you’ll be amazed at the transformation. Whether you’re planning to harvest your own from a vertical garden or pick them up at the farmers market, roasted Brussels sprouts are a delicious, healthy addition to any meal—and proof that a little technique goes a long way.
Choosing and Prepping Brussels Sprouts
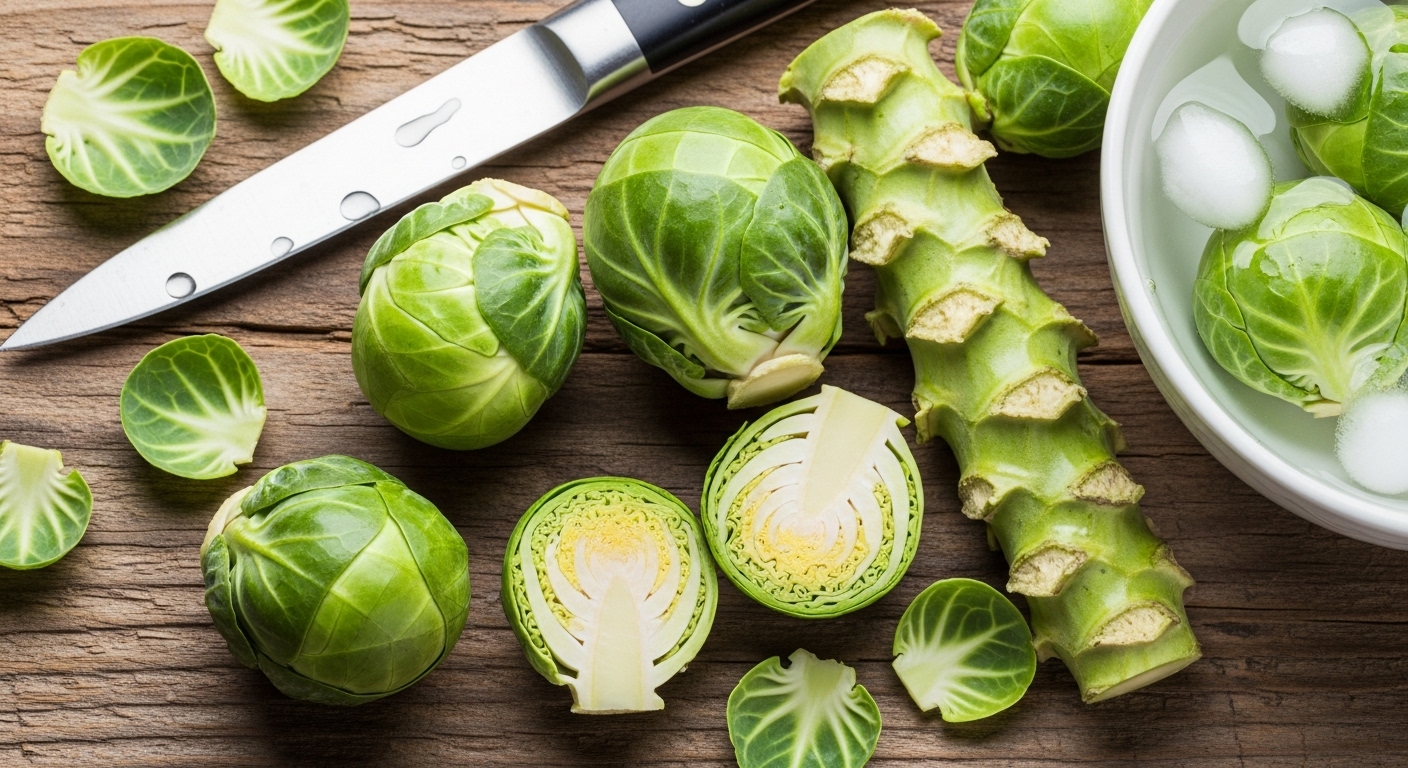
When picking Brussels sprouts at the store or farmers market, look for compact, tightly closed heads that feel firm and heavy for their size. The best sprouts have vibrant green leaves with no yellowing, browning, or black spots—these are signs they’re past their prime. Smaller sprouts are often sweeter and more tender than larger ones.
Before cooking, rinse your Brussels sprouts well under cold water to wash away dirt and debris. Trim off the tough stem ends, but try not to remove too many outer leaves, as they help seal in flavor. For even roasting or sautéing, slice each sprout in half from top to bottom; if you have extra-large ones, quarter them so everything cooks at the same rate.
Sometimes, especially at farmers markets, you’ll find Brussels sprouts still attached to their original stalk. In this case, snap or cut each sprout off individually before washing—sprouts on the stalk tend to stay fresher and hold their flavor longer but require a bit more prep work. For whole stalks, store them in a cool place or refrigerate; when ready to use, simply twist or snip sprouts off as needed.
With these steps, you’ll unlock maximum flavor and texture for any Brussels sprouts recipe.
The Science and Secret to Perfect Caramelization
Roasting brings out the best in vegetables like Brussels sprouts thanks to two delicious chemical processes: the Maillard reaction and caramelization. When you roast at a high oven temperature—think 425°F or higher—natural sugars in the sprouts start to brown (caramelize), and amino acids interact with those sugars (Maillard reaction), creating rich, complex flavors you just can’t get from steaming or boiling.
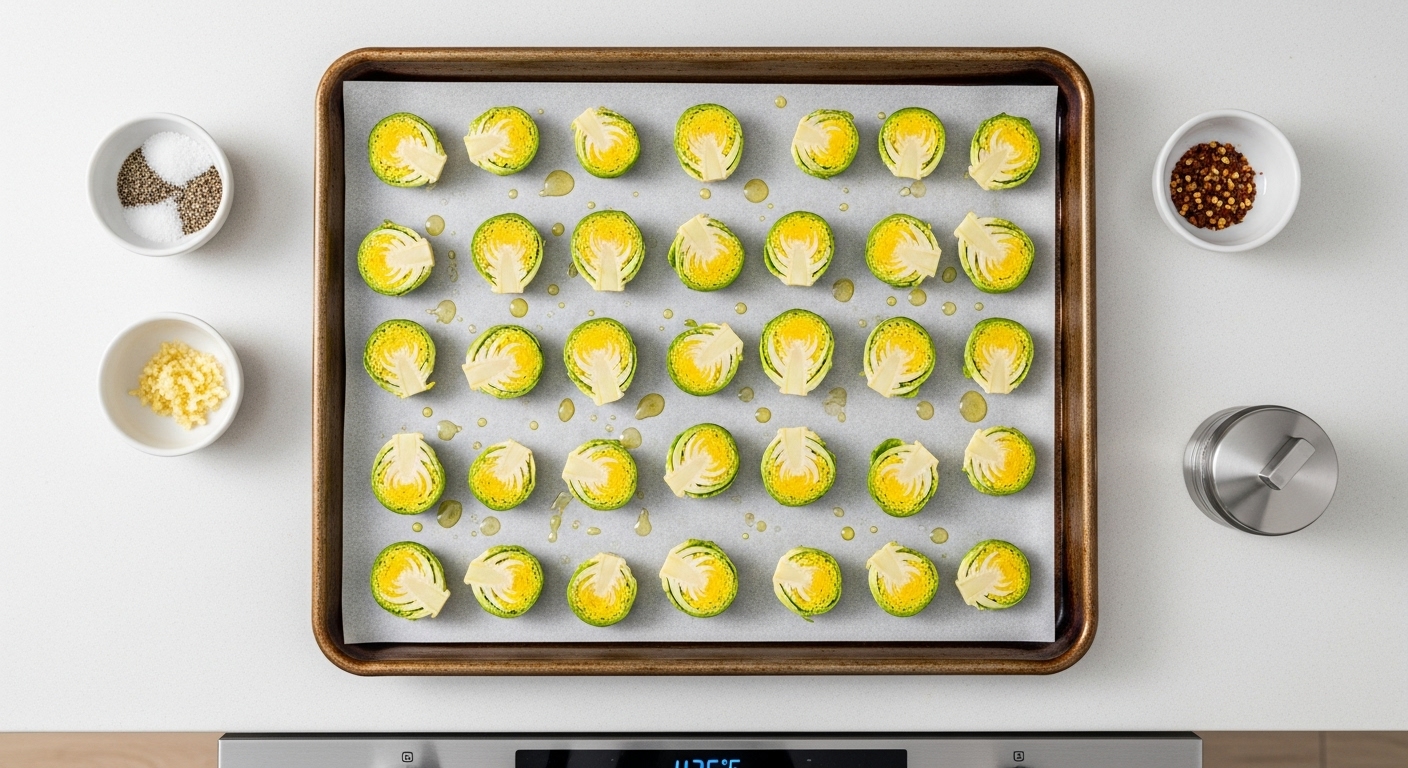
For perfect caramelization, it’s critical to toss your sprouts generously in oil; this not only helps them crisp up but also promotes even browning. Spread them out in a single layer on your baking sheet, cut side down with space between each piece, so they roast instead of steam. Even spacing is the secret to that irresistible golden crust.
Season right after oiling: a simple sprinkle of salt and pepper does wonders, but don’t be afraid to experiment. Add minced garlic for extra depth, red pepper flakes for heat, or finish with a grating of parmesan for savory complexity. The science is there to help you, but the art is in how you season and serve—experiment a little to find your favorite twist.
Step-By-Step Roasting Process
To roast Brussels sprouts to golden, crispy perfection, start by preheating your oven to 425°F (220°C). This high heat is key to caramelizing the sprouts and creating those deliciously crisp edges. Begin by trimming the stem ends and halving the sprouts, especially the larger ones, to help them cook evenly.
Rinse them thoroughly, then pat completely dry with a clean towel—excess moisture is the main culprit for mushy sprouts. Toss the dry sprouts in olive oil, salt, and pepper, ensuring an even, glossy coating.
Next, arrange them cut-side down in a single layer on a large baking sheet, leaving space between each piece; overcrowding causes steaming instead of roasting and will prevent crispy results. Roast for 20–25 minutes, flipping halfway through, until the edges are deep brown and the centers are tender.
If you have smaller sprouts or a very hot oven, start checking at 18 minutes; larger sprouts or convection ovens may need closer to 30 minutes. For a flavor boost, drizzle with balsamic vinegar or a touch of honey during the last five minutes, or sprinkle shaved parmesan or crumbled feta on top right after roasting.
Add red pepper flakes for a touch of heat or lemon zest for freshness. Remember, every oven is a little different, so watch the color and texture as better indicators than just the timer. With these steps, you’ll achieve perfectly roasted Brussels sprouts that are anything but boring.
Serving Suggestions and Meal Pairings
Roasted Brussels sprouts are incredibly versatile and shine in a variety of settings beyond just a simple side dish. Toss them onto a mixed greens salad with crumbled feta, toasted walnuts, and dried cranberries for a crunchy, tangy twist that livens up lunch.
As a snack, try eating roasted Brussels sprouts straight from the sheet pan, sprinkled with flaky sea salt or drizzled with a touch of balsamic glaze—great for healthy grazing during movie night.
These sprouts are the perfect partner for main courses, too: they pair beautifully with roast chicken, grilled salmon, or a festive holiday ham. For weeknight dinners, serve them alongside baked potatoes and seared steak, or mix into a grain bowl with quinoa and roasted sweet potatoes for a nutritious, plant-based meal.
Get creative with toppings and flavors by adding crispy bacon, shaved Parmesan, or toasted almonds for extra richness and crunch. A sprinkle of pomegranate seeds or a handful of golden raisins can offer a sweet pop, while a squeeze of fresh lemon brightens it all up.
With so many possibilities, roasted Brussels sprouts can easily adapt to any meal or occasion, making them a reliable staple for both quick suppers and special gatherings.
Troubleshooting & FAQ
If your Brussels sprouts turn out bitter, try slicing them in half and roasting them with a drizzle of olive oil—high heat caramelizes their natural sugars, cutting the bitterness.
For mushiness, avoid overcrowding your pan; give the sprouts space so they roast instead of steam. If you prefer extra crispiness, toss them with a tablespoon of cornstarch before baking, or finish roasted sprouts under the broiler for two to three minutes.
Customize the flavor with a sprinkle of smoked paprika, garlic powder, or a dash of lemon juice after cooking for brightness. Brussels sprouts also lend themselves well to prepping ahead: you can trim and halve them a day early, storing them in the fridge until you’re ready to cook.
Cooking Methods
While roasting is the classic choice for deep flavor and crispy edges, stovetop sautéing works great for quick dinners (add a splash of balsamic for a tangy finish). Steaming preserves nutrients with a more delicate texture, and grilling gives a smoky char that’s perfect for summer gatherings.
Choose your method based on available time, desired texture, and flavor:
- Roast or grill for crisp, caramelized sprouts
- Steam or sauté for tenderness and speed
With these easy fixes and tips, you can enjoy perfectly cooked Brussels sprouts every time.
Storing Leftovers & Making Brussels Sprouts Ahead
Storing cooked Brussels sprouts properly helps preserve their flavor and texture. Let them cool before transferring to an airtight container, and refrigerate within two hours. They’ll stay fresh for up to four days in the fridge.
If you want to keep them longer, spread the cooled sprouts on a baking sheet to freeze individually before transferring to a freezer bag. This method ensures they won’t stick together, and they’ll last for up to three months.
When it’s time to reheat, skip the microwave if you want to preserve that delicious outer crisp. Instead, try tossing them onto a preheated baking sheet in the oven at 400°F for about 10 minutes, or warm them up in a hot skillet with a splash of oil for extra crunch.
Leftover Brussels sprouts are incredibly versatile. Here are some tasty ideas:
- Slice and add them to a breakfast omelet.
- Toss them into a stir-fry with your favorite veggies and sauce.
- Mix into cooked pasta with a sprinkle of Parmesan and olive oil for an easy dinner upgrade.
These simple tricks let you enjoy every last sprout without sacrificing taste or texture.
Conclusion & Inspiration to Try (or Retry) Brussels Sprouts
Don’t let past bland experiences with Brussels sprouts hold you back—roasting transforms these little veggies into crispy, caramelized bites bursting with flavor. Whether you toss them with balsamic glaze, sprinkle on some parmesan, or add a dash of chili flakes, there’s a world of ways to play with flavors until you find your favorite.
Their versatility makes Brussels sprouts just as welcome at weeknight dinners as at special gatherings. Ready to give them another shot? Try the recipe, experiment with your own twists, and share your creations or discoveries—you might just convert a few skeptics along the way!