
How to Grow Beets
Growing beets in pots is the perfect solution if you love fresh veggies but don’t have much garden space. Whether you’re an apartment dweller with a sunny balcony or just want to keep your kitchen stocked with homegrown produce, cultivating beets in pots is both simple and rewarding.
From choosing the right pot size to ensuring your beets get plenty of water and light, you’ll be surprised at how easily this root crop can thrive in a small space. With a few practical tips and a bit of patience, even beginners can harvest sweet, tender beets right from their own container garden.
Getting Started: Why Grow Beets?
Beets are one of those underrated garden gems that pack a surprising punch, both for your plate and your health. Rich in fiber, vitamin C, potassium, iron, and antioxidants, beets offer a natural way to boost your energy and support heart health.
Both the root and leafy tops are edible—roast the sweet, earthy roots for salads, blend them into smoothies, or pickle them for a tangy snack, while the beet greens can be sautéed just like spinach or kale.
For home gardeners, beets are a dream crop because they’re low-maintenance and adaptable. They don’t require a lot of space, making them perfect for garden beds or containers on patios and balconies. Their shallow roots mean you only need a pot about 8 inches deep, and since beets mature quickly—typically in 50 to 70 days from seed—you can enjoy multiple harvests throughout the year in many areas.
When it comes to climate, beets thrive in cool weather, preferring daytime temperatures between 50°F and 70°F, so they’re ideal for planting in early spring and late summer or fall. In mild winter regions, you might even grow them almost year-round.
These qualities make beets a great choice for beginners and seasoned growers alike. To get the best results, choose a sunny spot, keep the soil moist but not soggy, and thin seedlings early to give them room to plump up.
Whether you’re looking to eat healthier or just want a colorful, rewarding addition to your garden, beets make it easy to grow fresh, nutritious food at home.
Choosing the Right Beet Varieties & Containers
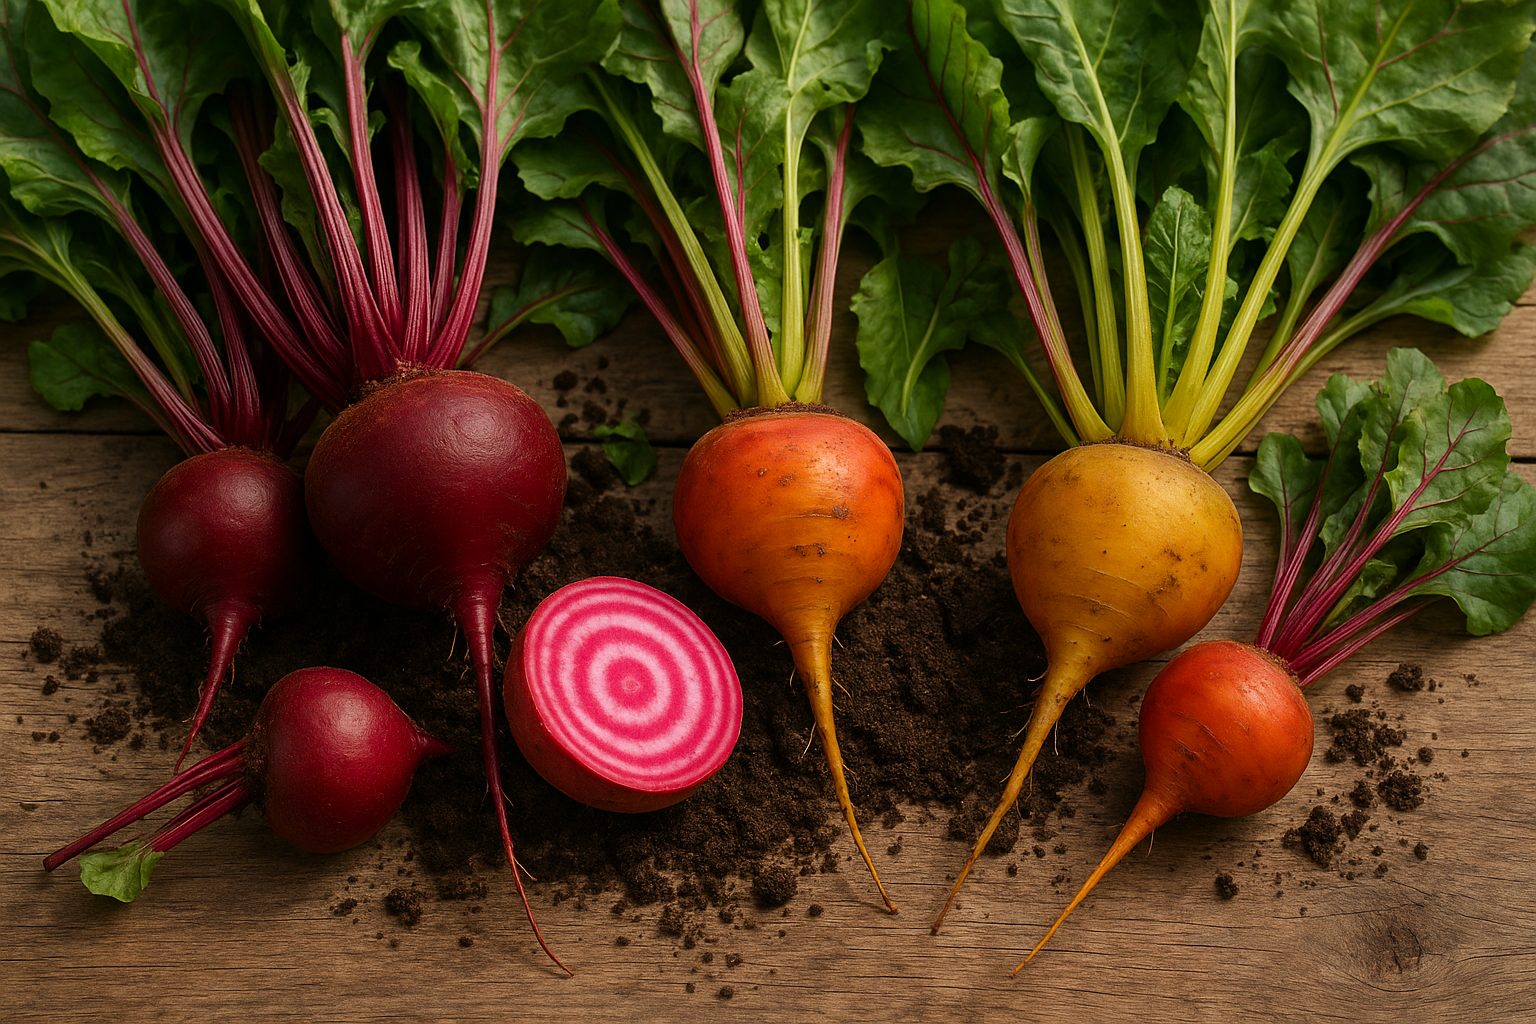
If you’re just getting started with growing beets, choosing the right variety and container can make all the difference in your harvest and kitchen enjoyment. For beginners, tried-and-true beet varieties like Detroit Dark Red and Red Ace are reliable, forgiving, and quick to mature. These are excellent for salads, roasting, or pickling.
Looking for beets ideal for salads? Try Boltardy or Chioggia—the latter boasts eye-catching pink and white rings and a sweet, mild flavor that stands out raw. If roasting is your go-to, Golden Beet and Touchstone Gold offer a mild, earthy sweetness, and their gorgeous yellow hues won’t stain fingers or countertops. For longer-term storage or winter enjoyment, Lutz Green Leaf (also known as Winterkeeper) produces large, flavorful roots that keep well in cool conditions. If you like novelty and variety, specialty types like Albino (white beets), Cylindra (long, slender roots easy to slice), and Burpee’s Golden add visual interest and unique flavors to your meals or salad plates.
Seeds or Transplants?
When deciding between seeds or transplants, most gardeners find direct seeding the simplest route for beets. Beet seeds germinate best in cool soils, and direct sowing eliminates the risk of disturbing their sensitive roots—transplants can sometimes lead to misshapen beets. If you want a head start, you can start beets indoors and transplant the seedlings into containers, but do so while they’re small and be gentle to avoid transplant shock. Either way, always thin your seedlings to allow each beet about 2–3 inches of space to form round, healthy roots.
Container Choices
Container choice is another key to beet-growing success. Beets have modest root systems but still require enough depth to properly expand. Choose a container that’s at least 10–12 inches deep and offers good drainage—fabric grow bags, plastic pots, and deep window boxes all work well. For compact spaces, a 12- to 14-inch diameter pot can grow 4–6 beets comfortably, while a larger trough or planter box lets you stagger rows for a continuous harvest. Avoid shallow containers, as beets need ample soil depth to prevent stunting and ensure they grow round and robust.
With so many varieties and easy-to-manage container options, it’s easy to create a colorful, flavorful beet harvest, whether you’re working with a patio, balcony, or a sunny windowsill.
Preparing the Soil (or Container Mix)
Getting your soil or container mix just right is crucial for healthy plants and a successful harvest. Ideally, your soil should have a loose, crumbly texture to allow roots to breathe and water to drain properly. Heavy clay can get waterlogged, while sandy soils might drain too fast and leave plants thirsty, so strike a balance.
Aim for a slightly acidic to neutral pH—between 6.0 and 7.0 is usually perfect for most veggies—since extreme pH levels can lock up important nutrients.
A well-prepared garden bed starts with removing rocks, old roots, and debris—these can block roots or harbor pests—then work in plenty of organic matter like homemade compost or well-rotted manure. Compost boosts nutrient content and adds micro-life that helps plants access what they need to grow.
For container mixes, skip ordinary garden soil and opt for a blend specifically formulated for vegetables, or mix your own: start with one part good quality potting mix, one part compost, and a handful of perlite or sand for drainage. Even in containers, it pays to mix in a slow-release organic fertilizer, since nutrients wash out more quickly with frequent watering.
Avoid using soil from areas where other beet family crops like chard or spinach grew last season—rotating crops helps prevent a buildup of soil-borne pests and diseases that beet relatives share, like leaf miners. Ideally, rotate to a new location each year, and if you’re tight on space, consider swapping soil in containers completely.
Lastly, don’t forget to mulch your beds or top off containers with a thin layer of straw, bark, or shredded leaves—this keeps moisture in, deters weeds, and gradually adds more organic matter as it breaks down.
By paying close attention to your soil before planting, you’ll set the stage for strong growth and fewer pest or nutrient troubles down the road.
Sowing & Planting: Step-by-Step

Getting started with sowing and planting is all about giving your garden the best possible start, whether you’re direct sowing seeds outdoors or transplanting young seedlings.
For direct sowing, read the packet to check each crop’s ideal spacing and depth—a general rule is to plant seeds two to three times as deep as their diameter. Smaller seeds like lettuce should be barely covered by soil, while beans or peas go a little deeper. Space seeds according to their mature size; for example, carrots should be scattered about a half-inch apart, while sunflowers need up to two feet.
After seedlings pop up, thinning is crucial: gently remove extra plants to prevent overcrowding, leaving only the strongest at the specified intervals. If you want a steady harvest, use succession planting—sow small amounts every couple of weeks, making sure your chosen variety will beat the heat or frost based on your region’s last frost date and seed packet advice.
Successful germination depends on soil warmth and moisture, so aim to sow when soil is consistently above 50°F for most vegetables and keep it evenly moist (not soggy) by misting gently until seeds sprout. Mulch or floating row covers can help retain soil moisture and regulate temperature, especially in unpredictable spring weather.
When transplanting seedlings, handle roots carefully, plant them at the same depth as in their original container, and firm the soil to avoid air pockets. Water thoroughly right after planting to settle the soil and help roots establish.
For early fertilizing, mix in a balanced, slow-release fertilizer at planting or use diluted fish emulsion a week after germination for a boost, but avoid heavy feeds early on, which can burn tender roots.
If you’re growing in containers, adjust spacing and depth: containers dry out quickly, so seeds may need shallower sowing (since soil heats up and cools off faster) and should be spaced a little farther apart than in beds to allow room for roots in a confined space. Always select a container at least 6–12 inches deep, depending on crop size, and ensure drainage holes to prevent soggy soil.
These steps give your seeds and seedlings a strong start, leading to healthier, more productive plants all season long.
Growing Healthy Beets: Care, Watering, and Problem Solving
Growing healthy beets starts with establishing a reliable care routine—these root veggies thrive on consistency. Water your beets regularly, aiming for about one inch of water per week, and use mulch to help the soil retain moisture and minimize weed growth. Early morning is the best time to water, reducing evaporation and supporting strong root development.
A balanced, slow-release fertilizer can be applied before planting, with a light side dressing of compost or organic fertilizer halfway through the season; avoid high-nitrogen formulas, which promote leaves over roots.
Pest Management
Watch for pests like leaf miners and aphids—floating row covers can keep insects away, while a simple spray of water or a neem oil solution will handle infestations.
Disease Prevention
Common beet diseases include downy mildew and Cercospora leaf spot; good airflow between plants and crop rotation help prevent these.
Identifying and Solving Problems
- Yellowing or wilting leaves: Check for underwatering or waterlogged soil, as both extremes stress roots. Improving drainage or adjusting your watering habits usually solves the problem.
- Forked roots: Often caused by rocky or compact soil. Work the ground deeply and remove stones before planting.
- Stunted growth: May signal poor soil nutrition or overcrowding. Thin seedlings to two or three inches apart and amend soil with compost if needed.
Growing Conditions
Beets prefer full sun but will tolerate partial shade, though growth may slow a bit—just allow a longer harvest window in shadier spots. In hot climates, use shade cloth during the hottest part of the day to prevent heat stress. In cooler areas, early planting under a row cover jumpstarts the season.
Weeding Tips
Always weed carefully by hand, being mindful not to disturb beet roots. Shallow, gentle weeding is key, as deep cultivation can easily harm developing bulbs.
With attention to routine care, pest management, and responsive problem-solving, you’ll be rewarded with robust, sweet beets from garden to table.
Harvesting, Storing & Using Beets
Beets are at their sweetest and most tender when harvested at the right time. For the best flavor, pick beet roots when they’re about the size of a golf ball up to two inches across—larger beets can become tough and woody. Grasp the base of the greens firmly and gently pull, or loosen the soil with a fork to prevent damage.
Don’t forget the greens: harvest them when young, bright, and tender, cutting a few leaves from each plant to promote new growth.
To keep beets fresh, trim the greens to an inch above the root (leaving more can draw moisture from the beet), then store roots loosely in the refrigerator crisper drawer with high humidity for up to two weeks. For longer-term storage, a cool, dark root cellar with high humidity can keep beets for several months—try packing them in damp sand or sawdust to prevent shriveling.
Freezing is an option after cooking and peeling the beets, while pickling brings out their tangy flavor and stores them safely for months. Beet greens don’t store as well, so plan to use them quickly in salads, sautés, or soups.
In the kitchen, roasted beets shine in salads, grain bowls, and dips, while the greens work like spinach or chard.
Don’t overlook the value of saving seeds—if you leave some beets in the ground to bolt and flower, you can collect seeds for next season, supporting self-sufficiency and hardier plants.
Misshapen or woody beets are often caused by overcrowding, inconsistent watering, or letting them sit in the ground too long. Prevent these issues by thinning seedlings so roots have enough space, maintaining even moisture, and checking regularly for mature size.
With these steps, you’ll enjoy flavorful beets and greens long after harvest.
Conclusion
Growing and enjoying your own beets is not only satisfying but also brings fresher flavors and more nutrients to your table. Homegrown beets are easy to cultivate, often thriving with minimal care, and can be roasted, pickled, or added raw to salads. Starting a beet garden means gaining healthier meals and a rewarding gardening experience—so why not give it a try this season and see the benefits firsthand?