Introduction
Starting your garden from scratch can be incredibly rewarding, but if you’ve ever struggled with leggy broccoli seedlings, you’re not alone. Growing broccoli from seed indoors gives gardeners a head start on the season, letting you control growing conditions and potentially enjoy bigger, healthier harvests. You can dodge unpredictable spring weather, guarantee higher germination rates, and even experiment with more broccoli varieties than your local nursery carries.
However, many beginners run into common hiccups: weak, spindly seedlings that flop over, poor germination results, and confusion about light and watering needs—all of which can rob you of that early-garden excitement. For example, you might notice your broccoli shoots stretching skyward, pale and thin, searching for more light. Or maybe your tray’s soil dries out too quickly, and seedlings never get past the first leaves.
The good news? With a few simple adjustments, you can dramatically improve your seed-starting success. In this post, we’ll break down why broccoli seedlings become leggy, show you exactly how to fix the problem, and share easy, actionable strategies to make sure your next batch grows strong.
From setting up the right lighting to fine-tuning your watering routine and choosing the best seed-starting mix, we’ll help you troubleshoot every step. Whether you’re new to gardening or just want a healthier crop this year, these practical tips will put you on the path to thriving transplants and bigger broccoli heads at harvest time.
The Importance of Light for Seedlings
Natural window light often seems like a convenient option for raising seedlings, but it rarely provides the intensity and duration needed for healthy growth. Most windows, even south-facing ones, let in only a fraction of the light intensity that young plants need—especially during late winter or early spring when daylight hours are short.
As a result, seedlings grown solely in window light tend to stretch toward the source, desperately reaching for more energy. This “leggy” growth leads to tall, spindly stems that are weak and unable to support normal development, making them prone to tipping over or breaking once transplanted.
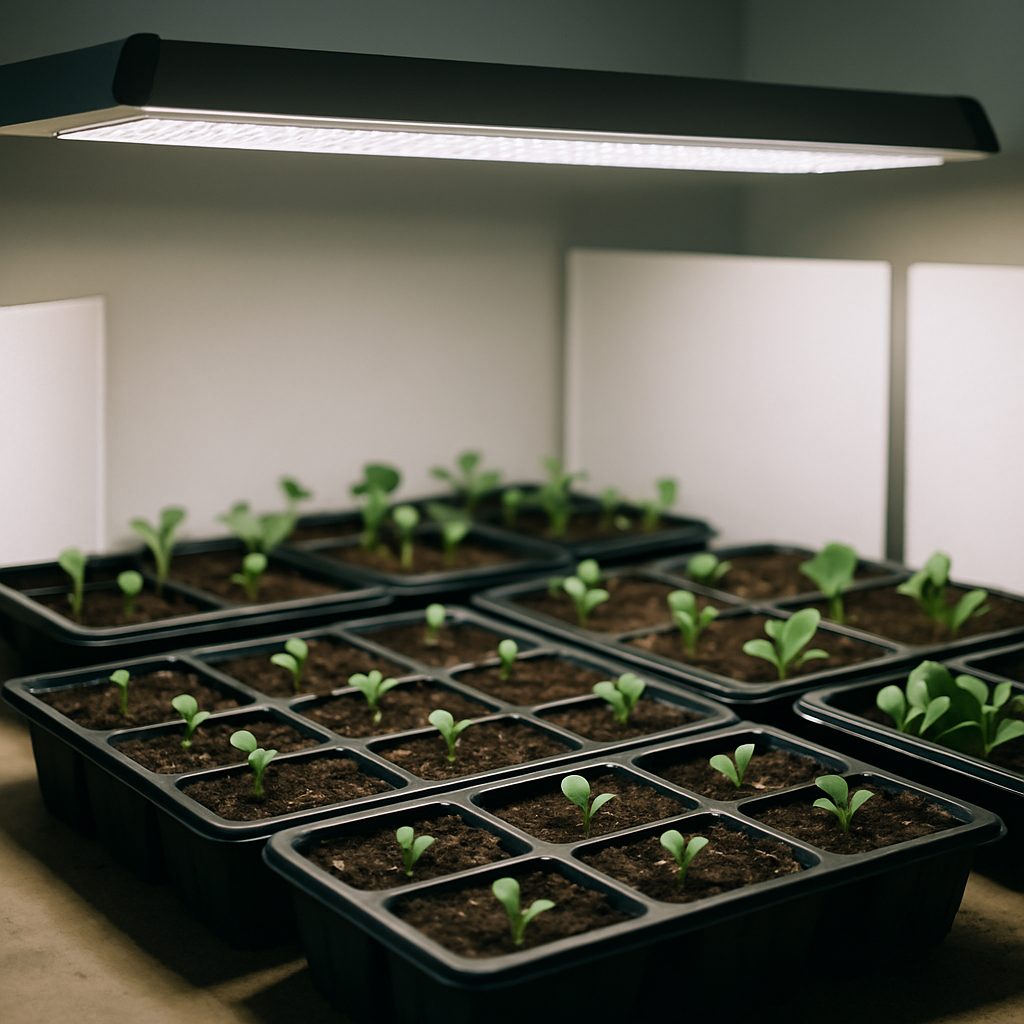
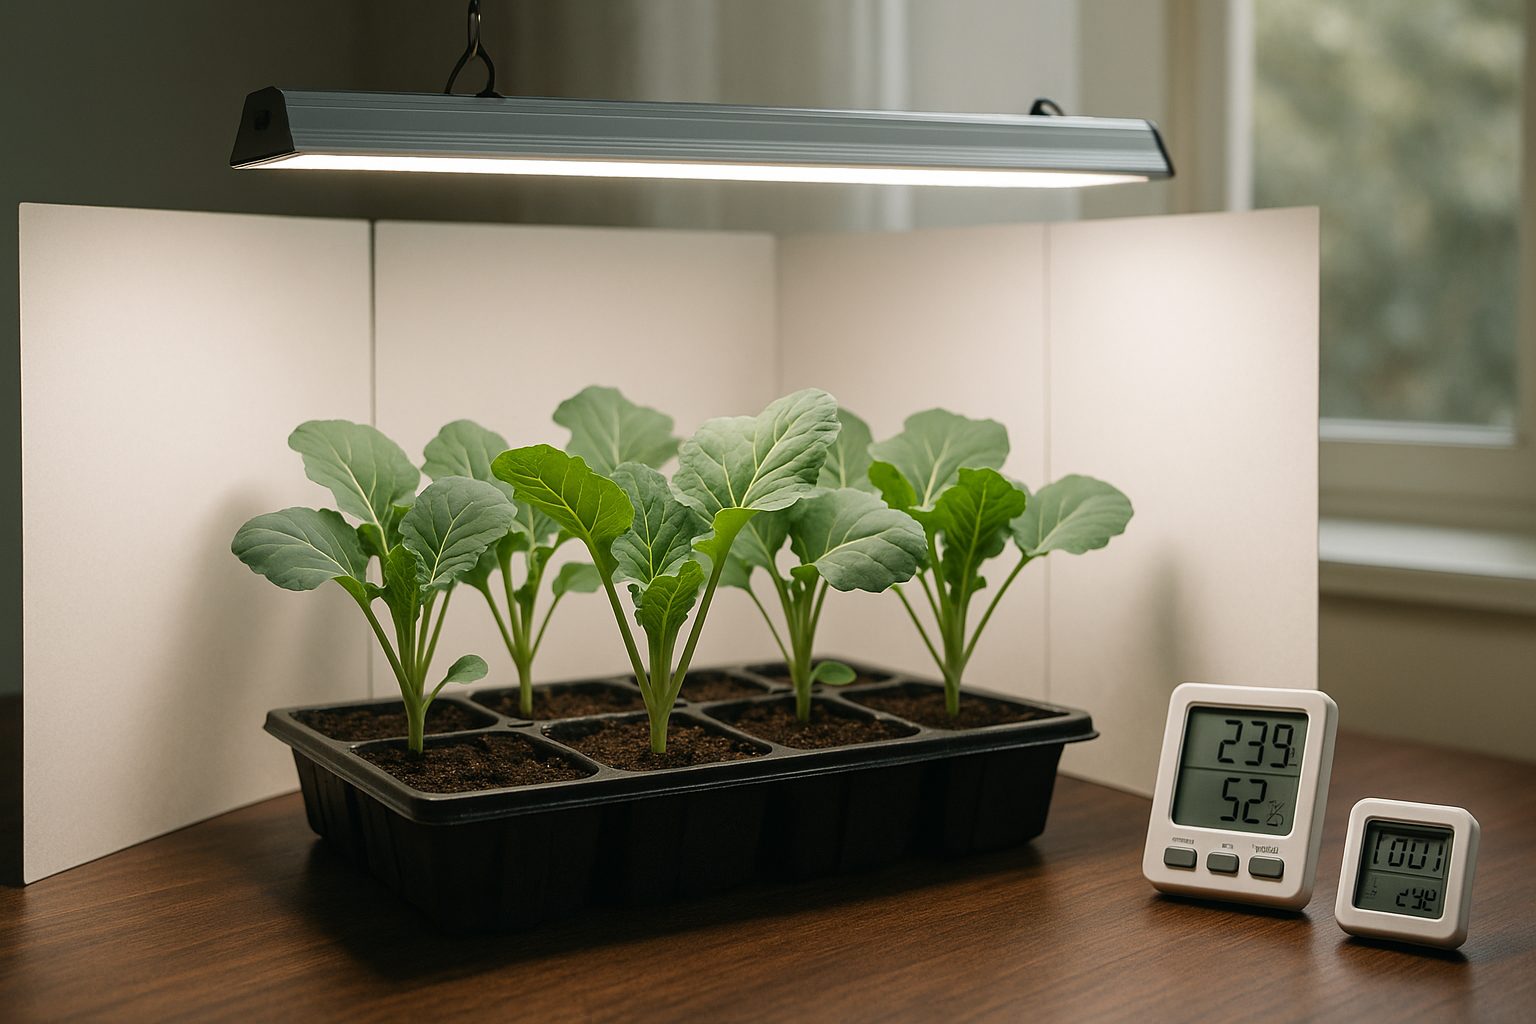
To ensure strong and compact seedlings, supplemental lighting is key. LED grow lights are popular due to their energy efficiency and customizable light spectrum, but fluorescent fixtures can also work well and are widely available.
Here are some tips for using artificial light effectively:
- Position your lights just two to four inches above the tops of seedlings, raising the lights as the plants grow to maintain that close distance.
- Aim for 14–16 hours of light per day—using a simple timer removes the guesswork and ensures consistency.
- Use reflective materials like white poster board or aluminum foil around your growing area to bounce light onto the plants’ sides for even distribution.
- Rotate trays every few days if light coverage seems uneven.
Starting with strong, direct artificial light from day one gives your seedlings the best chance for thick, sturdy stems and robust green leaves, setting them up for success when it’s time to move outdoors.
Temperature and Humidity: Key Factors for Growth
Getting the temperature and humidity right is crucial when starting seeds, as both play a big role in whether your seeds sprout successfully and grow into healthy seedlings. Most vegetable seeds germinate best when soil temperatures are between 65°F and 75°F (18°C to 24°C), while some varieties like peppers or tomatoes prefer it even warmer, around 80°F (27°C).
Air should ideally stay between 65°F and 75°F to prevent seedlings from getting leggy or stunted. When soil is too cold, seeds might rot instead of sprout, and if it’s too warm, germination can be spotty or seedlings may become weak.
Humidity is another key player—high humidity encourages seeds to sprout and helps prevent seedlings from drying out, but excessive moisture can also lead to mold or diseases.
Managing Temperature and Humidity Indoors
To manage this balance indoors:
- Use a seed-starting heat mat for consistent soil warmth.
- Place a clear humidity dome or plastic cover over your trays to keep moisture in during the early germination stages.
- Remove the dome once most seeds have sprouted to avoid damping-off disease.
- A small digital thermometer and hygrometer can help you monitor conditions closely.
- If the air is too dry (below 40% humidity), try misting the seedlings or placing a shallow tray of water nearby to add gentle moisture.
Making small, regular adjustments will help you create the ideal microclimate for strong, healthy seedlings ready for transplanting.
Watering Wisely: Avoiding Over- and Under-Watering
Getting your watering routine right is crucial for healthy seedlings, as both overwatering and underwatering can cause real headaches. When you overwater, the soil becomes soggy and airless, setting the stage for issues like “damping off”—a fungal disease that causes young stems to collapse and kills seedlings almost overnight. Overly wet conditions can also suffocate roots, encouraging root rot and mold.
On the flip side, underwatering deprives seedlings of the steady moisture they need for growth, resulting in stunted, wilted, or even crispy brown leaves.
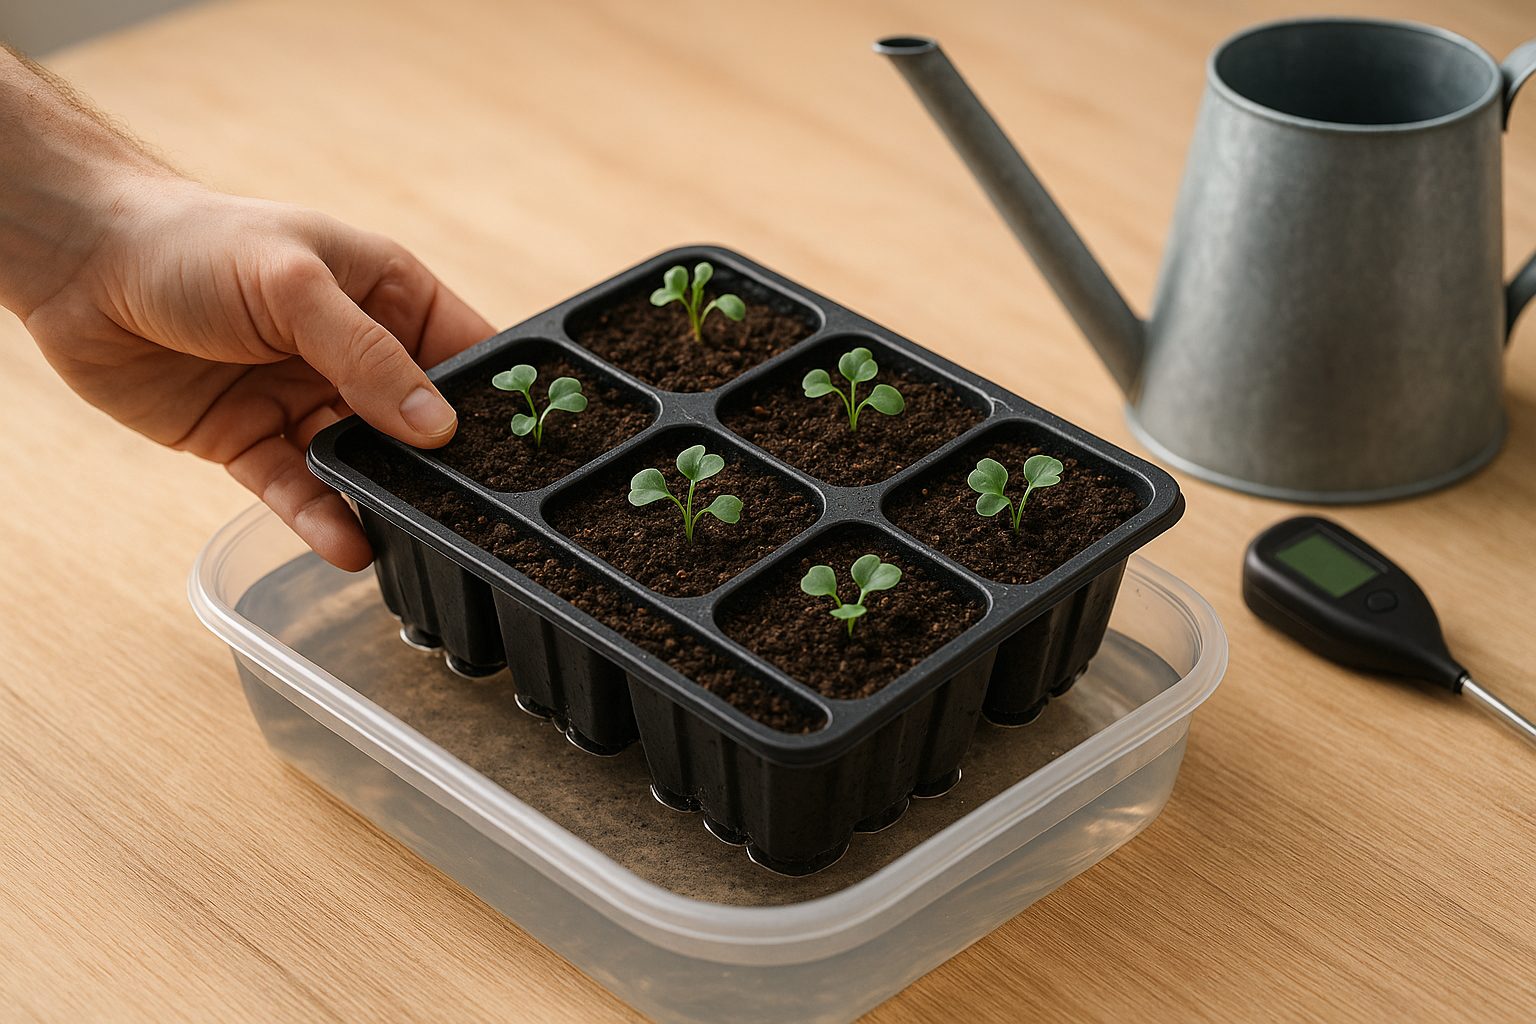
One of the best ways to strike the perfect balance is by bottom-watering: place your seedling trays in a shallow container of water and let moisture soak up through the drainage holes. This gives roots consistent access to water without soaking foliage or compacting the topsoil.
To check if your soil really needs more moisture, stick your finger about half an inch into the surface—if it feels dry at that level, it’s time to add water; if it’s still slightly damp, you can wait another day. Alternatively, the heft test works well: gently lift your tray, and if it feels unexpectedly light, your seedlings are likely thirsty.
And don’t overlook water temperature—aim for tepid or room-temperature water, as ice-cold water can shock delicate roots, slowing seedling growth.
By tuning in to your soil’s moisture needs and watering from the bottom, you’ll encourage deep, healthy root systems and cut down dramatically on common seed-starting problems.
Giving Seedlings Room to Thrive: Spacing and Airflow
Overcrowding your seedlings might seem like a smart way to maximize space, but it often causes more harm than good. When young plants are packed too tightly, they compete for essential resources like light, water, and nutrients, which can stunt their growth and lead to weak, leggy stems.
Crowded conditions also create a humid microclimate that’s perfect for diseases like damping-off, a common fungal problem that can wipe out entire trays of seedlings overnight. To give your plants the best start, sow seeds according to the recommended spacing on the packet, and don’t be afraid to thin them once they’ve developed their first true leaves.
This often means gently removing the weaker seedlings so the strongest ones have space to thrive—typically about an inch apart for most vegetables and flowers.
After thinning, make sure there’s plenty of airflow around your seedlings. This not only helps dry out excess moisture and keeps diseases at bay, but also encourages sturdier growth as the gentle movement simulates outdoor breezes.
You can improve airflow by arranging trays with gaps between them and even running a small fan nearby on a low setting for a few hours each day. These simple steps make a world of difference, ensuring your young plants develop strong roots and resilient stems, setting them up for success once it’s time to transplant them outdoors.
Strengthening Seedlings for Transplant
Building strong seedlings is key for successful transplanting, and one surprisingly effective way to toughen up young plants is by “brushing” or gently agitating them. When you lightly run your hand, a clean stick, or even a soft paintbrush over the tops of your seedlings once or twice a day, you’re actually mimicking the movement caused by wind. This brief, gentle disturbance triggers the plant’s natural response, signaling them to develop thicker, sturdier stems.
Studies and home gardeners alike have noted that seedlings regularly brushed or gently shaken are less prone to flopping over and tend to handle the transition outside much better. If you want hands-off options, you can position a small oscillating fan nearby—just make sure it produces a gentle breeze rather than a gale, keeping it on for an hour or two daily as the seedlings grow. This airflow not only simulates outdoor breezes but also reduces the risk of diseases like damping off by improving air circulation.
When it’s finally time to move your seedlings outdoors, gradual acclimation—or “hardening off”—is essential to prevent shock. Start by placing seedlings outside in a sheltered, shady spot for just an hour or two each day, then slowly increase their exposure to direct sun, wind, and cooler temperatures over the next week or ten days. Make sure to bring them in if frost or strong winds are expected.
By the end of this hardening-off process, your seedlings will be much more resilient, better prepared to thrive in the garden, and less likely to suffer from transplant stress. This steady build-up mirrors what plants experience naturally, ensuring you give your seedlings the strongest possible start.
Transplanting Seedlings Outdoors Successfully
Transplanting seedlings outdoors is a delicate process, but knowing when and how to do it can make all the difference. First, check that your seedlings are ready—look for sturdy growth about 2-4 inches tall, several true leaves (not just the first baby leaves), and healthy roots beginning to fill their starter cells without circling or crowding.
Timing matters, too; transplant only when nighttime outdoor temperatures stay above 50°F (10°C) for warm-season crops and the threat of frost has passed.
To set the stage, spend a week “hardening off” your seedlings by gradually exposing them to outdoor sunlight and breezes, starting with a couple of hours a day and increasing to full days. Meanwhile, prep your garden beds by loosening the soil, mixing in compost for nutrients, and making sure the planting area is well-drained and weed-free.
On transplant day:
- Water your seedlings thoroughly about an hour before planting to keep roots moist.
- Dig holes wide enough to accommodate each root ball without bending or bunching the roots.
- Plant in the late afternoon or on a cloudy day to help avoid sun stress.
- Water gently but deeply after planting.
- Consider adding a thin layer of mulch to regulate moisture and soil temperature.
To minimize transplant shock:
- Avoid disturbing the roots.
- Handle seedlings by their leaves or root ball, not their stems.
- Use a diluted seaweed solution or transplant fertilizer to encourage root growth.
Watch for common issues such as:
- Wilting (which could be caused by too much sun, insufficient water, or damaged roots).
- Stunted growth (often from cool soil or lack of nutrients).
- Yellowing leaves (a sign of transplant shock or stress).
If you encounter problems, temporarily shade the plants, water consistently but avoid waterlogging, and remove any damaged foliage so the plant can focus its energy on recovery.
With a little care and patience, your seedlings will adapt quickly and reward you with strong, healthy growth.
Conclusion
Starting seeds indoors is a rewarding way to get a jump on your growing season, but success depends on a few key tips. Begin with high-quality seeds and fresh seed-starting mix to give your plants the best chance.
Pay close attention to lighting; most seedlings need 12–16 hours of bright light each day, so supplement with grow lights if natural sunlight is limited. Keep the soil consistently moist but not soggy, as overwatering can cause rot—consider misting or bottom watering for gentle moisture.
Maintain a warm environment, ideally between 65°F and 75°F, since a steady temperature helps seeds germinate evenly. As your seedlings grow, observe them daily and watch for signs like stretching, which means they need more light, or yellowing, which could signal overwatering or nutrient deficiency.
Don’t rush to move them outdoors; instead, gradually “harden off” your seedlings by introducing them to outdoor conditions a little each day. Remember, gardening is all about learning as you go—each season brings new lessons and opportunities.
If you have tried starting seeds indoors or have questions as you get started, please share your thoughts and experiences in the comments!