Introduction to Marjoram
Wondering how to grow marjoram and why so many home gardeners love this fragrant herb? Marjoram (Origanum majorana) is a versatile, aromatic plant that’s a favorite among cooks and herbalists alike. Known for its delicate, slightly sweet flavor, marjoram adds a subtle touch to roasted vegetables, salads, soups, and meat dishes—making it a staple in Mediterranean and Middle Eastern kitchens.
But marjoram isn’t just for cooking. For centuries, it’s been valued in traditional medicine for its potential to ease digestive discomfort, support relaxation, and even boost respiratory health thanks to its antioxidant and anti-inflammatory properties.
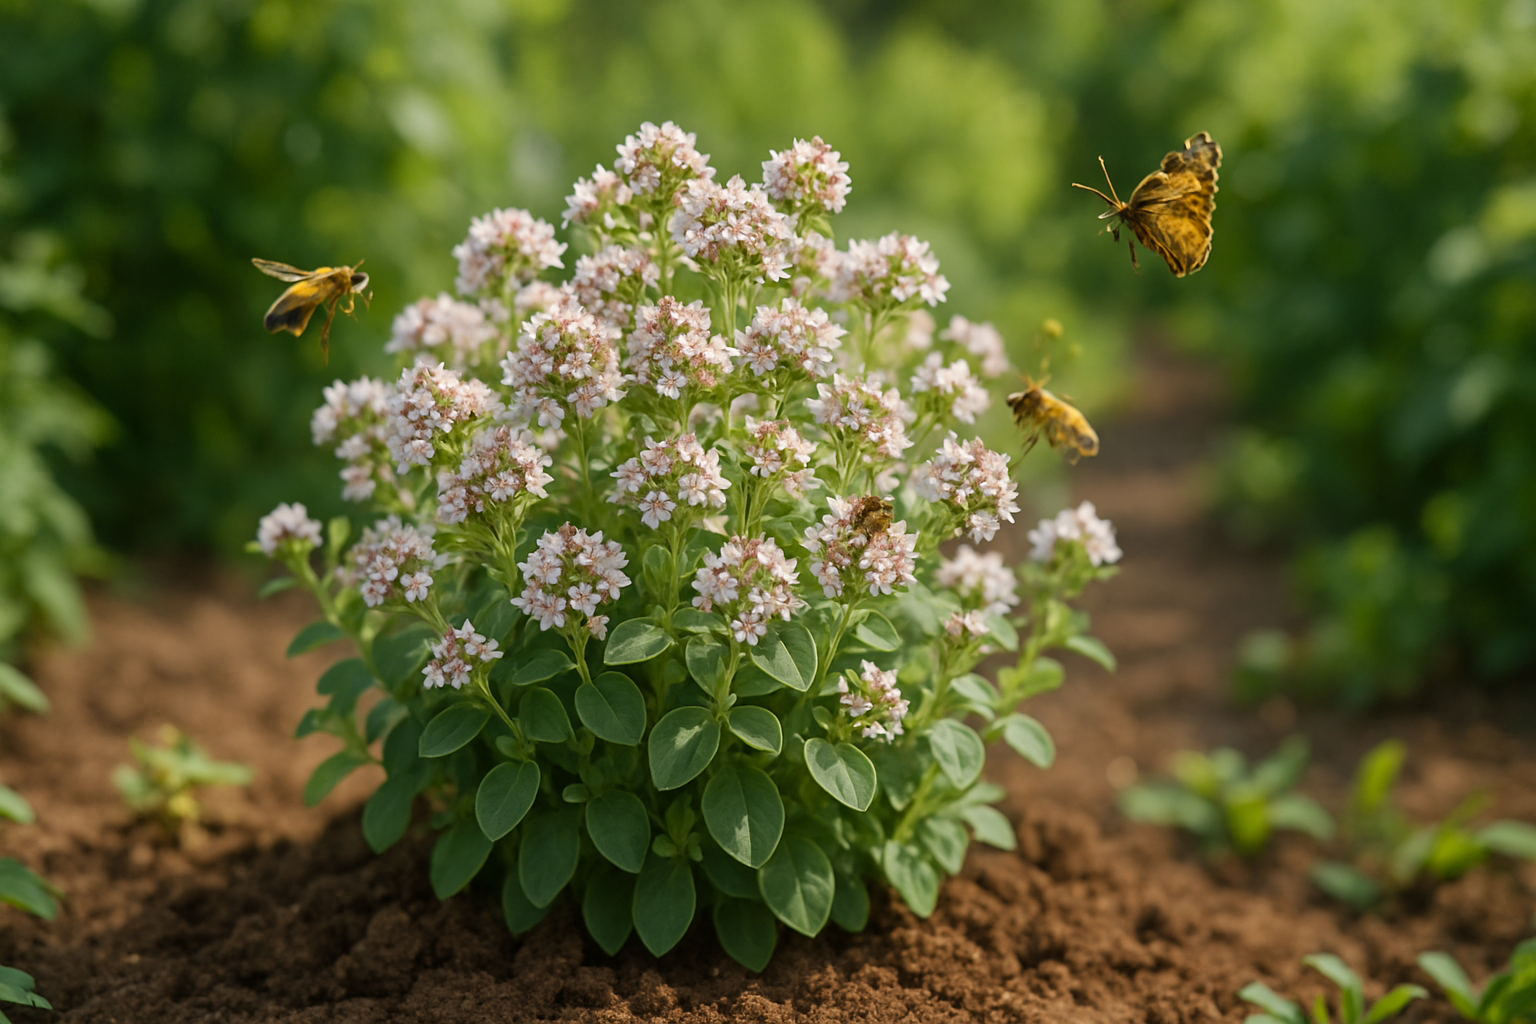
The appeal of growing marjoram at home goes far beyond its culinary and wellness benefits. Even beginners find it rewarding: marjoram is remarkably easy to grow, thriving in containers or garden beds with only a little care. Its clusters of tiny white or pink flowers also attract friendly pollinators like bees and butterflies, supporting a healthy, productive garden ecosystem.
If you’re seeking a resilient, drought-tolerant herb that enhances your dishes, supports your well-being, and invites life into your garden, marjoram is an excellent choice. With a few simple tips and some sunshine, you’ll soon discover how easy—and rewarding—it is to grow your own supply of this classic herb right at home.
Choosing the Right Marjoram Variety
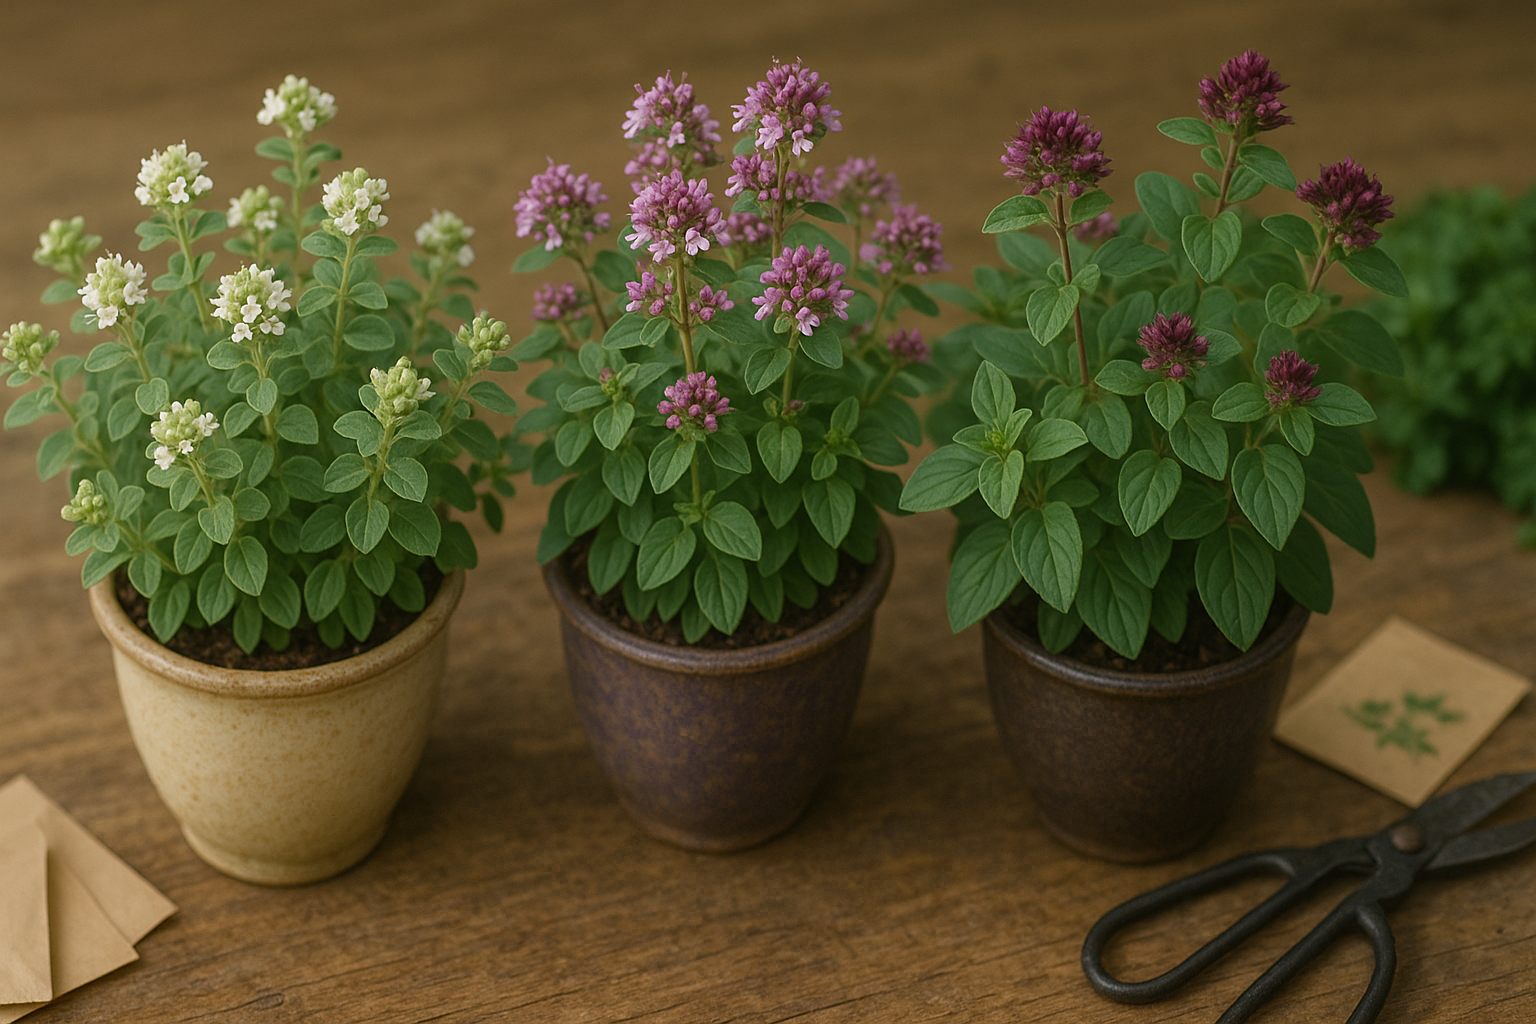
When it comes to marjoram, knowing your varieties helps you get the best results for your kitchen, medicine cabinet, or garden. Sweet marjoram (Origanum majorana) is the classic choice for cooks—it offers a warm, delicate flavor that’s perfect for soups, salad dressings, and Mediterranean dishes. It thrives in both pots and gardens, making it a top pick for culinary use.
Pot marjoram (Origanum onites) is a bit more robust with a spicier note and is often chosen for both cooking and as a charming ornamental due to its lovely lilac flowers and bushier form. Then there’s wild marjoram, better known as oregano (Origanum vulgare), which is a hardier, more pungent herb often sprinkled on pizzas and roasted vegetables.
It also provides great ground cover and beautiful blooms that attract pollinators, making it a smart pick if you want double-duty—culinary and ornamental value. For medicinal uses, sweet marjoram is traditionally favored for calming teas and aromatic oils.
Climate matters too: sweet marjoram does best in warmer climates or indoors, while oregano tolerates colder zones and poor soils, thriving where other varieties might struggle. If space is limited, opt for sweet or pot marjoram in containers; for larger outdoor plots, wild marjoram can naturalize beautifully.
When choosing your marjoram, think about both your end use and your growing conditions—matching the right variety ensures your herbs deliver the best fragrance, flavor, and flourish in your space.
How to Grow Marjoram: From Seed or Cuttings
Growing marjoram from seed is simple, whether you start indoors or sow directly outside—just time it right. Indoors, start seeds 6-8 weeks before the last expected frost. Fill a seed tray with lightweight potting mix, sprinkle seeds on the surface (don’t bury them, as light helps germination), and mist gently. Cover with a clear lid to keep humidity up and place in a warm, bright spot—marjoram likes 65-70°F and as much indirect sunlight as you can provide.
Once seedlings have a few leaves and night temperatures stay above 50°F, harden them off by moving trays outside for a few hours each day, gradually increasing their outdoor time.
Outdoors, wait until frost has passed, then scatter seeds over finely raked soil and press them down lightly. Water gently to keep soil moist but not soggy. For both methods, thin seedlings to stand 8-10 inches apart once they’re a couple inches tall to ensure good airflow and strong growth.
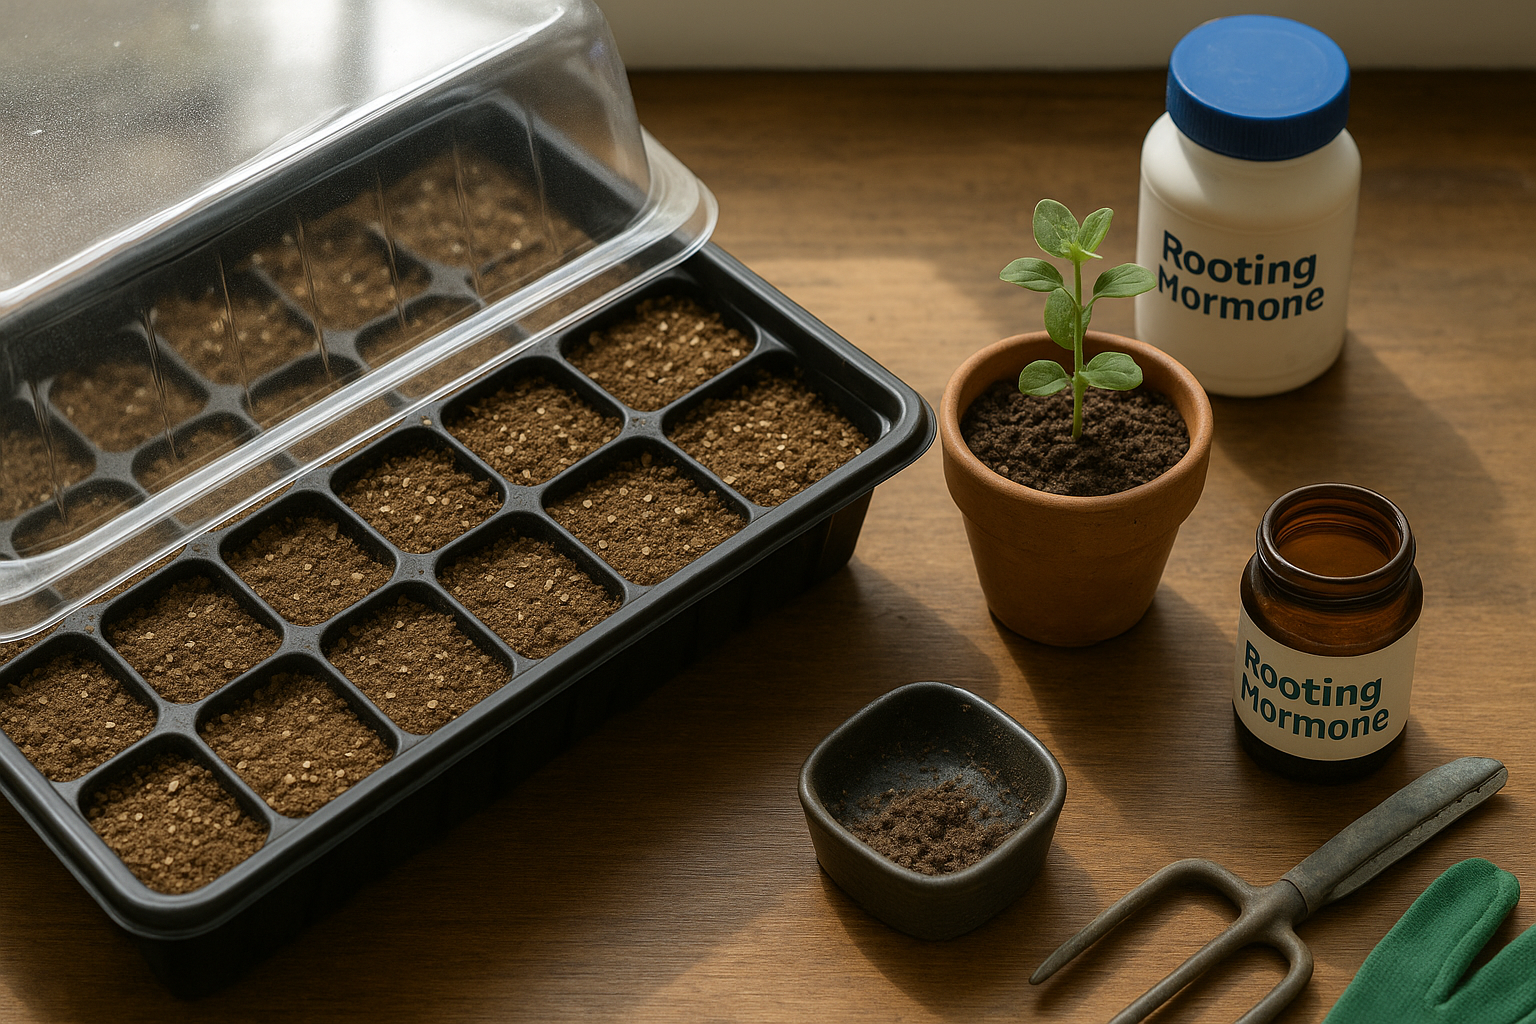
Propagating Marjoram from Cuttings
For an even quicker start, try propagating marjoram from cuttings. In late spring or early summer, snip a 4-inch non-flowering stem, strip the lower leaves, and dip the end in rooting hormone if you have it (this step is optional but increases your chances).
Place the cutting in moist potting mix and cover loosely with a plastic bag to keep humidity high—just make sure it’s not touching the leaves. Keep the pot in bright, indirect light and check moisture daily. Roots should form in 2-3 weeks.
Once new growth appears, transplant your marjoram cuttings or seedlings to their final spot in full sun, ensuring 8-10 inches between plants.
Care Tips for Growing Marjoram
Whether starting from seed or cuttings, marjoram thrives with lots of light, good air movement, and regular but moderate watering—overwatering is a common cause of failure, so let the soil surface dry slightly between drinks.
With these steps, you’ll have aromatic marjoram filling your garden or containers in no time.
Planting and Basic Marjoram Care
Marjoram thrives best in well-draining, moderately fertile soil with a neutral to slightly alkaline pH. Before planting, amend heavy clay or very acidic soils with compost or lime as needed. Choose a sunny location—marjoram craves at least six hours of direct sunlight per day, making it perfect for south-facing beds or bright balconies.
When starting marjoram from seedlings or cuttings, plant them after the last frost, spacing each about 8-10 inches apart to allow for airflow and healthy growth. If you’re using containers, pick pots with drainage holes and use a standard potting mix blended with a little coarse sand or perlite to prevent waterlogging.
Water young marjoram plants regularly to help establish roots, but avoid overwatering—let the top inch of soil dry out between waterings to keep the roots happy and prevent rot. Once the plants are settled, they’re quite drought-tolerant and need only infrequent deep watering, especially if rain is scarce.
For ongoing care, apply a balanced, diluted fertilizer every 4-6 weeks during the growing season, but don’t overfeed, as too much nitrogen can reduce the herb’s robust flavor. A thin mulch layer keeps the soil moist and deters weeds, but keep it away from the plant stems to prevent rot. Regularly remove weeds by hand to minimize competition for nutrients.
As marjoram grows, pinch back tips every couple of weeks to encourage bushiness and delay flowering, which also extends harvest time. With these simple steps, your marjoram will flourish whether it’s in a kitchen pot or a backyard patch, offering fragrant leaves for months of cooking inspiration.
Pruning, Training, and Troubleshooting Common Issues
Regular pruning is key to growing healthier, bushier plants with a higher yield. Start by pinching off the growing tips when your plant is about 6–8 inches tall—this encourages it to branch out, rather than grow tall and leggy. Throughout the season, remove yellowing leaves and any suckers or side shoots that crowd the plant’s center.
For tomatoes, for example, pruning away lower leaves improves airflow and keeps diseases at bay.
When it comes to training, use stakes, cages, or trellises for tall plants in garden beds to keep fruit off the ground and prevent rot. If you’re working with pots, consider tying soft garden ties or twine to guide stems along a balcony railing or small bamboo stakes; this supports growth without damaging delicate stems.
Keep an eye out for common pests like aphids and spider mites—if you spot them, spray plants with a mix of water and mild dish soap, or introduce helpful insects like ladybugs.
Watch for fungal diseases such as powdery mildew and blight, especially in damp weather; prune affected leaves immediately and water only at the base to avoid splashing.
Overwatering, nutrient deficiencies, or poor drainage can also stunt plant growth or cause yellowing leaves, so check soil moisture regularly and use a balanced, slow-release fertilizer as needed.
With a bit of routine care and quick attention to issues, your garden can stay healthy and productive all season long.
Harvesting, Storing, and Enjoying Marjoram
To get the best flavor from marjoram, harvest the leaves just before the plant flowers, typically in late spring or early summer, when the essential oils are at their peak. Use clean scissors or garden shears to snip stems in the morning after the dew has dried, cutting only about a third of the plant to encourage regrowth.
For drying, gather small bunches of marjoram and hang them upside down in a cool, airy place away from direct sunlight. The leaves should be crisp in about one to two weeks. Alternatively, you can use a dehydrator set to low heat or lay the leaves on a paper towel and microwave them in short bursts.
Once thoroughly dried, gently crumble the leaves and store them in an airtight container away from heat and light to preserve their flavor for up to a year. To freeze marjoram, chop fresh leaves and place them in ice cube trays with a little water or olive oil, then pop out cubes as needed for soups or stews.
Fresh marjoram adds a delicate, floral note to salads, roasted vegetables, and pasta, while dried marjoram works well in sauces, meat rubs, and homemade herb blends. For a wellness boost, try steeping a few fresh or dried leaves in hot water to make a soothing herbal tea that can aid digestion.
With the right harvesting and storage methods, you can enjoy marjoram’s subtle, sweet flavor all year long.