Why Grow Beets Indoors?
Starting beets indoors is a great way to enjoy fresher produce, extend your growing season, and make the most of limited space. For urban gardeners, apartment dwellers, or those living in areas with short summers or unpredictable weather, growing beets under grow lights lets you bypass harsh outdoor conditions and harvest tender roots and greens nearly year-round.
Imagine savoring homegrown beets in early spring or late fall, long before or after your neighbors have planted their seeds outside. Even if you only have a windowsill or a modest indoor gardening setup, this method allows you to maximize your available space while bringing colorful, nutrient-rich beets to your table.
That said, growing beets indoors does come with some challenges. You’ll need to provide the right light levels, monitor temperature and humidity, and possibly start with smaller, container-friendly beet varieties. Be prepared for a bit more hands-on care than outdoor gardening—watering, feeding, and watching for any signs of stress are all important.
But with the right setup and a little patience, even first-time indoor gardeners can enjoy the unbeatable taste and health benefits of homegrown beets, no matter the season or climate.
Choosing the Best Beet Varieties for Indoor Success
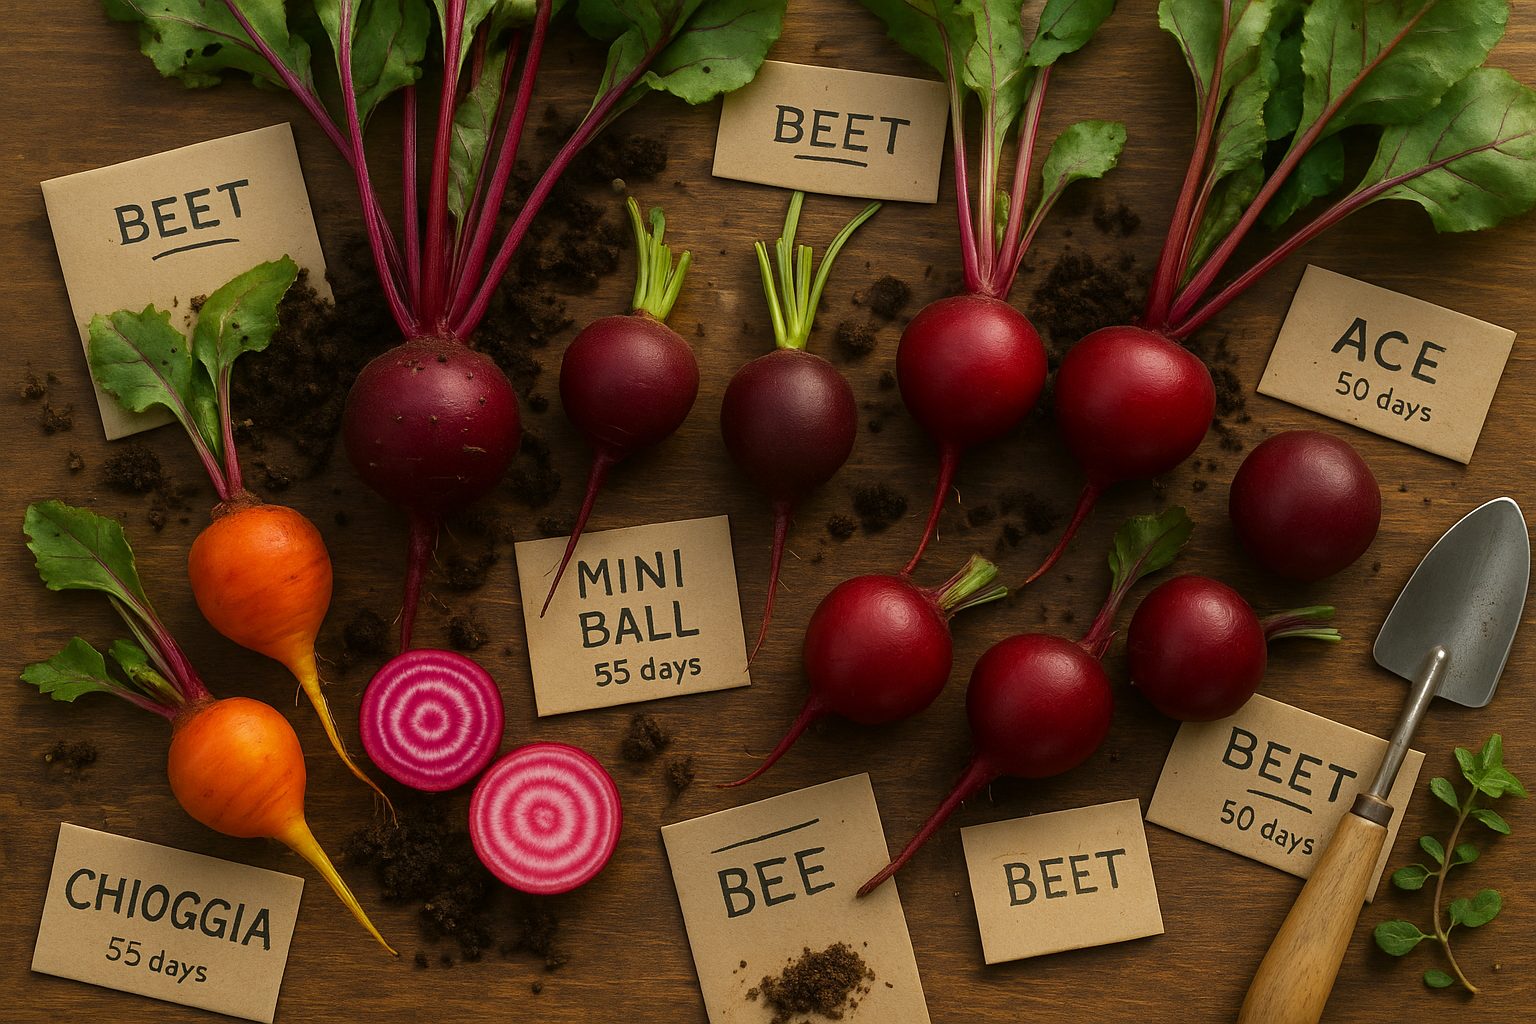
When growing beets indoors, picking the right variety can make all the difference in your harvest. Compact or mini beet varieties like Babybeat, Mini Ball, and Red Ace are excellent choices thanks to their small root size and fast maturity—some can be ready in as little as 35-55 days.
Babybeat is especially prized for its sweet flavor and tender, deep red globes, perfect for limited space pots. Mini Ball produces uniform, petite roots and offers crisp, mild greens that are just as delicious as the roots. Red Ace, a reliable favorite, matures quickly and produces lush, flavorful greens that are ideal for salads.
When selecting seeds, check the packets for days to maturity—shorter times mean you’ll enjoy harvests sooner in small spaces. Also, consider varieties with robust leaf production if you want to use beet greens in your cooking. Some types, like Detroit Dark Red, yield generous, flavorful tops in addition to good-sized roots.
Taste varies among beets: for example, Chioggia beets feature pink-and-white rings and a mild, sweet flavor but may grow larger and benefit from deeper containers. As a rule, stick with bolt-resistant and disease-resistant varieties since indoor conditions can sometimes stress plants unexpectedly.
By focusing on smaller, faster, and leafy options, you’ll get the best results for both root and green harvests in your indoor garden.
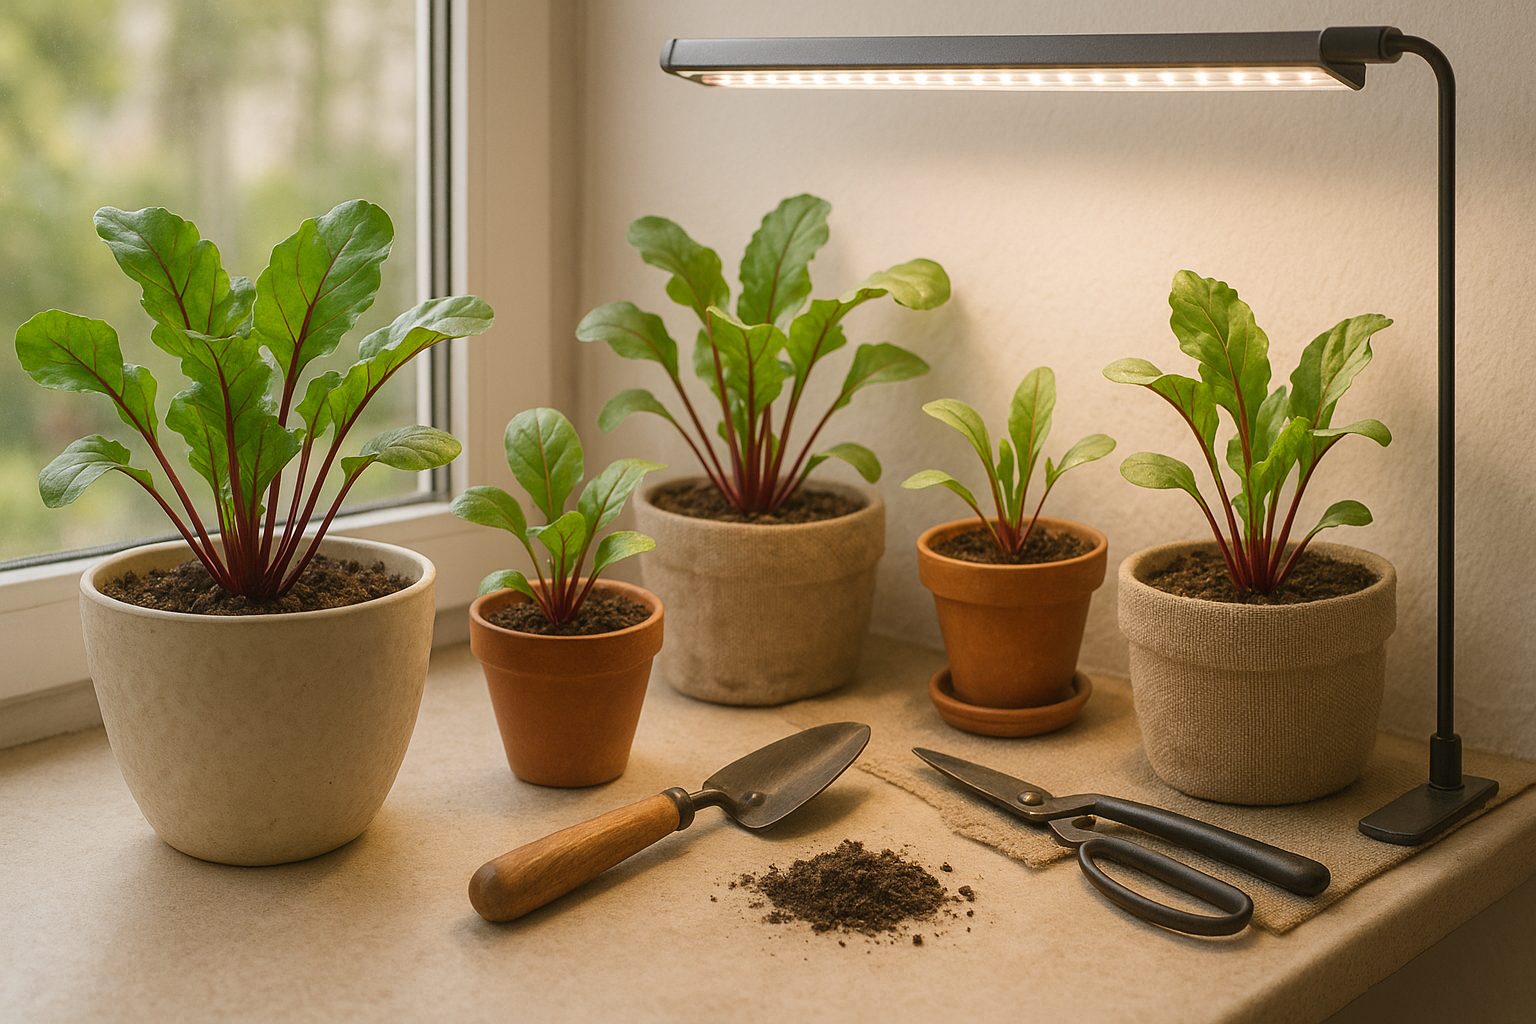
Setting Up Your Indoor Beet Garden: Containers, Soil, and Light
Choosing the right containers is the first step to a thriving indoor beet garden—look for pots that are at least 8–10 inches deep to give beet roots space to develop. Containers made from materials like plastic, ceramic, or fabric work well, but make sure they have several drainage holes in the bottom. Good drainage is key, as waterlogged soil can quickly lead to rot.
Fill your containers with a fluffy, well-draining potting mix; combine standard potting soil with sand or perlite (about 70% soil, 30% amendment) to prevent compaction and keep oxygen flowing to the roots. Mixing in a balanced organic fertilizer or compost will give your beets the nutrients they need without overwhelming them with harsh chemicals.
Place your containers where they’ll get at least six hours of direct sunlight per day—a south-facing window works best. If natural light is limited, invest in an affordable LED grow light and set it about six inches above your plants, keeping it on for 12–16 hours daily.
Avoid common pitfalls by not overwatering (the top inch of soil should dry out between waterings) and by thinning seedlings once they’re a few inches tall—crowded beets don’t form healthy roots. Always check that your containers drain fully after watering, and avoid garden soil, which is too dense and can harbor pests.
With the right setup, indoor beets will thrive year-round, giving you fresh roots and greens right from your windowsill.
Planting and Germinating Beets Indoors
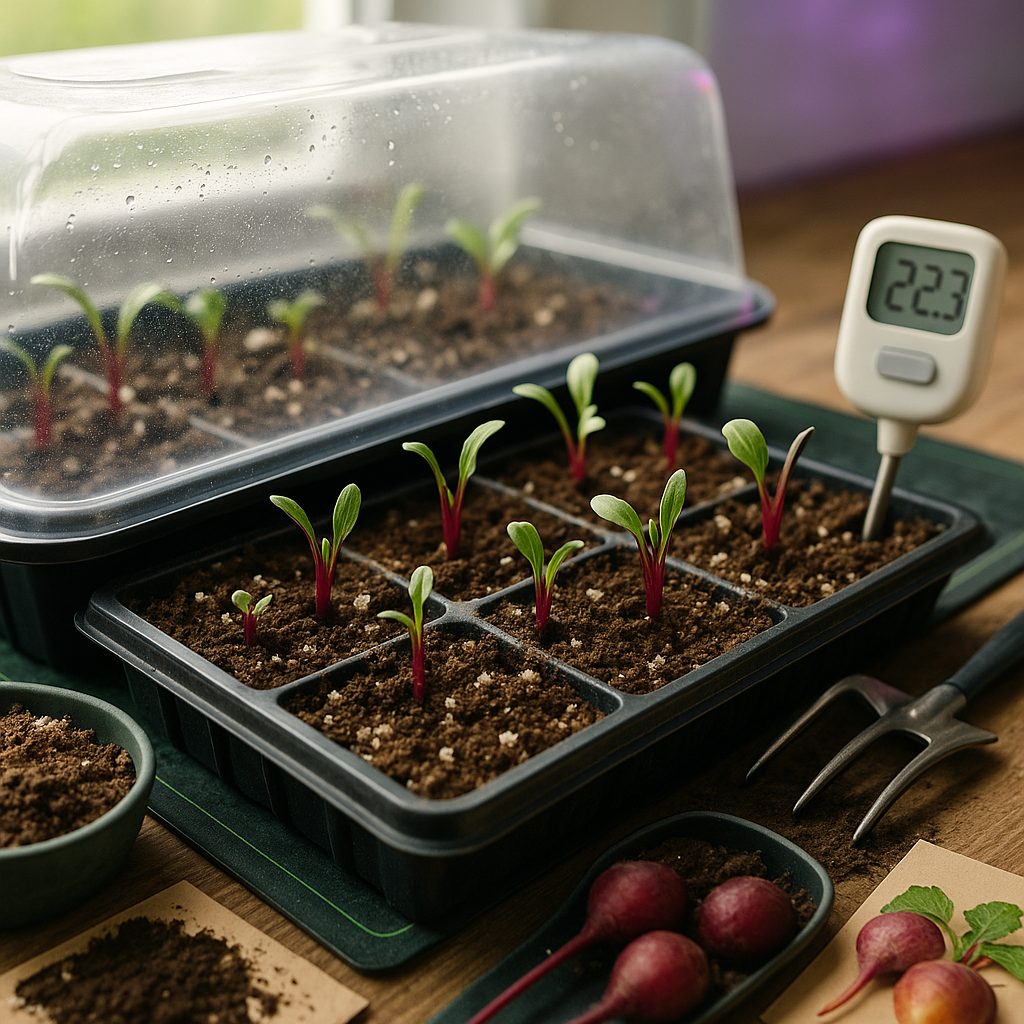
Starting beets indoors lets you give this cool-weather crop a head start, especially when outdoor conditions aren’t ideal. Begin by filling seed trays or small pots with a high-quality, sterile seed-starting mix—this helps prevent disease and gives your seeds the best chance to sprout. Moisten the soil slightly before planting so it’s damp but not soggy.
Since beet “seeds” are actually clusters containing several true seeds, plant them about 1/2 inch deep and 2 inches apart to allow for thinning later. Lightly cover with soil and mist the surface to settle everything in place.
For germination, beets prefer soil temperatures between 60–75°F (16–24°C). If your indoor space is cool, you can use a seedling heat mat. Covering trays with a clear lid or plastic wrap helps retain humidity, but be sure to vent occasionally to prevent mold.
Keep the surface consistently moist by watering gently as needed—avoid both waterlogging and letting it dry out. You should see sprouts in 5–10 days, with tiny beet seedlings sporting slender red-purple stems and pointed green leaves.
Once the seedlings are a couple of inches tall and have developed true leaves, thin them within their containers by snipping out the weaker ones to leave only the strongest.
When it’s time to transplant—usually after 3–4 weeks and once outdoor soil is workable—harden off your seedlings by gradually exposing them to outdoor conditions over several days to avoid transplant shock. Space them about 3 inches apart in the garden bed.
Starting beets indoors early gives you a jump on the growing season, but always handle their fragile root systems gently during transplanting to ensure the best results.
Daily Care and Maintenance for Thriving Beets
Caring for beets indoors starts with a consistent watering routine—moist, but not soggy, soil is key for healthy roots and greens. Check the top inch of soil every other day; if it feels dry, water thoroughly, but allow excess to drain away to prevent root rot. Avoid daily shallow watering, which leads to underdeveloped roots and stunted growth.
Fertilize lightly once a month with a balanced, all-purpose fertilizer; beets especially benefit from nutrients like phosphorus for root development and potassium for vibrant greens. Too much nitrogen, however, can result in lots of leaves but tiny roots, so opt for a blend suited for root crops and always follow label instructions.
Early thinning is critical: when seedlings reach two inches tall, gently pull out the weakest, spacing the remaining plants about three inches apart. This gives each beet room to form robust roots. For a dual harvest, snip a few outer leaves from each plant as greens mature, but leave the inner growth—this lets roots continue developing.
If you notice leggy seedlings with spindly stems, it’s often a sign they need more light; move them to a brighter window or add a grow light. Slow growth can signal crowding, lack of nutrients, or cool temperatures—so double-check spacing, feed if needed, and keep the indoor environment around 65–75°F.
By maintaining good watering habits, properly feeding, managing your space, and monitoring light, your indoor beet crop can provide a season of colorful roots and tender greens.
Dealing With Indoor Pests and Problems
Growing beets indoors is a great way to enjoy fresh greens and roots year-round, but it’s not without its challenges. common pests like aphids and fungus gnats can appear, feeding on tender leaves or hiding in moist soil. Meanwhile, mold and fungal diseases thrive when humidity is too high or airflow is limited.
To tackle aphids, try spraying plants with a gentle solution of water and a few drops of dish soap, or introduce beneficial insects like ladybugs if your indoor setup allows. For fungus gnats, let the top inch of soil dry between waterings to disrupt their breeding cycle, and consider placing yellow sticky traps near your plants.
Mold issues are best prevented by ensuring good air circulation with a small fan and removing any dead or yellowing leaves promptly. Across the board, healthy plants are more resistant to pests and disease. Use well-draining soil, avoid overwatering, and keep your grow space tidy.
Regularly inspecting your beets for early signs of trouble—like sticky leaves or white fuzz—lets you step in quickly and keep your indoor garden thriving without resorting to harsh chemicals.
Harvesting and Storing Your Homegrown Beets
Knowing when to harvest your beets is key to enjoying tender, flavorful roots. Most beet varieties are ready to pull about 50 to 70 days after planting, once the beetroot pokes above the soil and measures between 1.5 and 3 inches across. Any larger, and they may become woody. For the sweetest results, harvest beets when they’re young.
To harvest without damaging the plant, gently loosen the surrounding soil with a garden fork or small spade, being careful not to stab the roots. Grasp the base of the beet’s leafy stems and pull upward with a gentle but steady motion. Shake off loose soil and trim the greens to about an inch above the root; leaving too much can draw moisture away from the beet, causing wilt.
For storage, keep unwashed beet roots in a perforated bag in the refrigerator produce drawer, where they’ll last up to three months. If you plan to use the greens, rinse them, pat dry, and store in a separate bag for up to a week—they’re delicious sautéed or in salads.
With these easy steps, you’ll enjoy fresh beets long after the harvest.