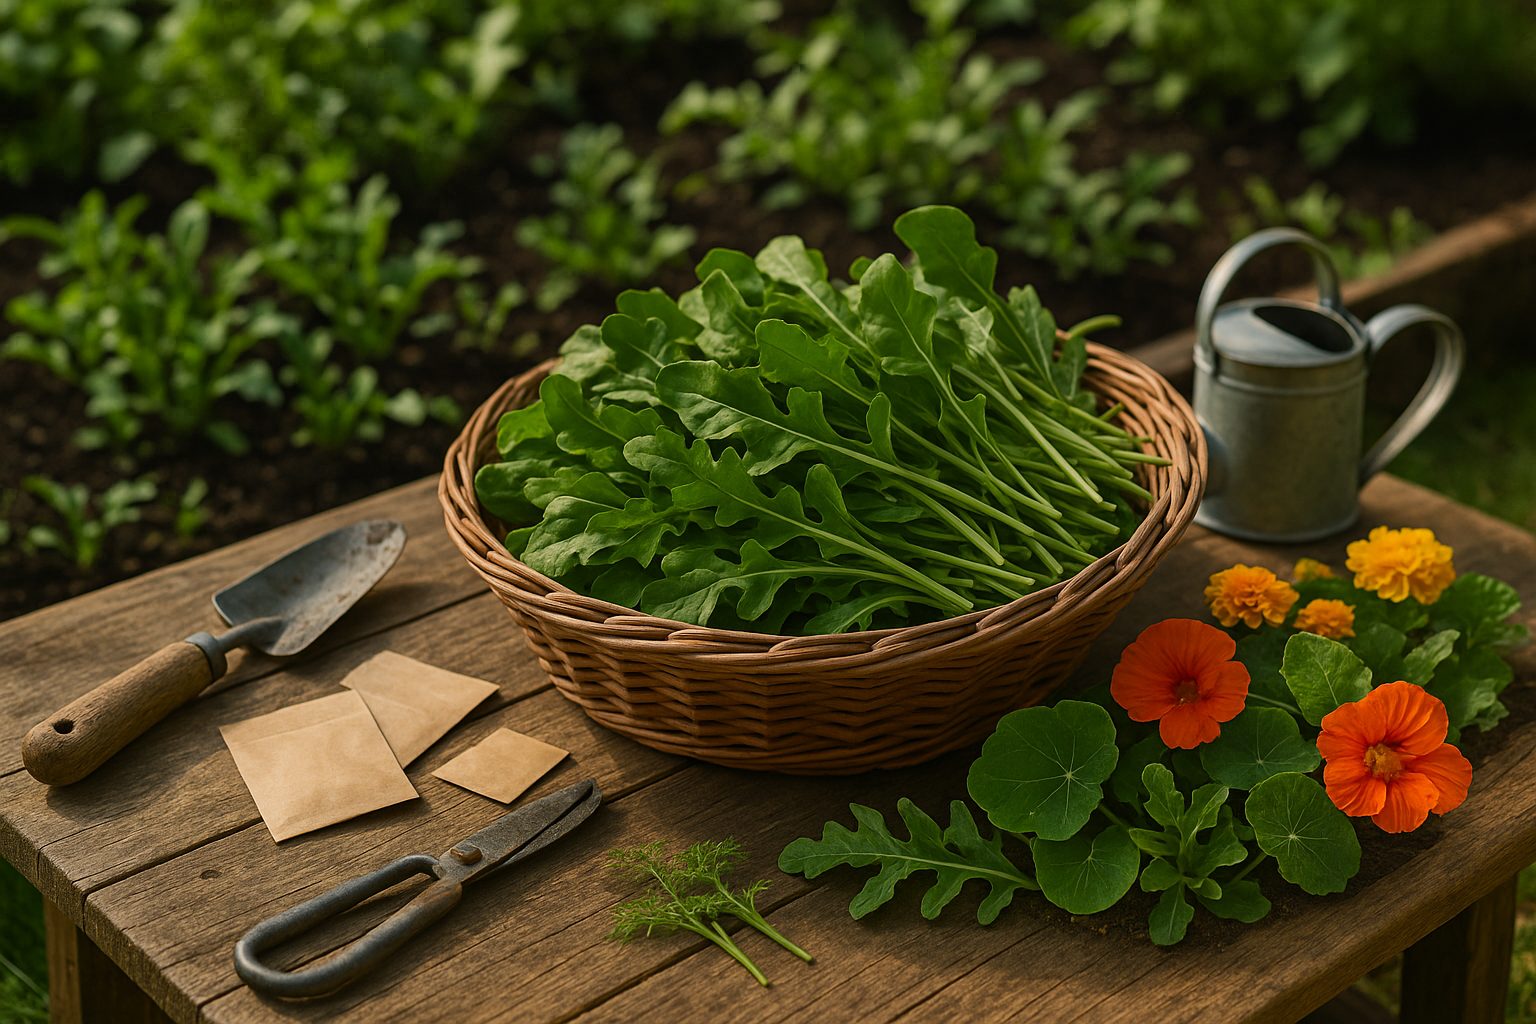
Why Grow Arugula?
If you’ve ever wondered about arugula growing time, you’ll be surprised at just how quickly you can go from seed to salad with this zesty green. Arugula (also known as rocket) is a fantastic crop for home gardeners, especially those seeking fast rewards and minimal fuss. From the day you sow the seeds, you could be enjoying your first arugula harvest in as little as 20 to 40 days, making it one of the speediest greens you can grow. This quick turnaround means you can plant, pick, and replant throughout the growing season, ensuring a steady supply of fresh, peppery leaves.
Arugula isn’t just about speed—it’s also extremely easy to cultivate. It thrives in a variety of conditions, tolerates partial shade, and doesn’t demand rich soil or constant attention. Its compact size means it’s perfect for gardeners short on space; you can tuck arugula into raised beds, window boxes, or even small containers on a balcony. This adaptability makes it an ideal choice for beginners and city dwellers alike. And since arugula has a long growing season—from early spring until late fall—you’re not limited to just one or two harvests. You can sow successive batches or let it self-seed for a continual feast.
Beyond being effortless to grow, arugula packs a nutritional punch. The tender leaves are full of vitamins A, C, and K, plus folate, calcium, and antioxidants that support overall health. In the kitchen, its versatility shines: toss fresh leaves into salads, pile them on pizza or sandwiches, blend into pesto, or stir into pasta right before serving. With its speedy arugula growing time, minimal space requirements, and culinary flexibility, arugula truly deserves a spot in every home garden—whether you’re a seasoned green thumb or just starting out.
When and Where to Plant Arugula
Arugula thrives best when planted in cool weather, making early spring and fall the optimal times for sowing seeds. This timing helps the plant avoid the intense heat that can cause it to bolt and turn bitter. For most climates, plant outdoors about two to four weeks before your last expected spring frost, or again in late summer as temperatures begin to cool off.
Choosing the right spot in your garden is also crucial. Look for an area that gets at least 4–6 hours of sunlight a day, although arugula can also tolerate partial shade—especially beneficial if your region has particularly hot afternoons. The ideal soil is well-draining, rich in organic matter, and slightly acidic to neutral (pH 6.0–7.0). If your garden soil is heavy or clay-like, consider mixing in compost or growing arugula in raised beds for better results.
Temperature-wise, arugula prefers daytime temperatures between 45°F and 75°F; anything hotter can speed up flowering and reduce leaf quality. For those with limited outdoor space or unpredictable weather, arugula is also well-suited to indoor growing. Sow seeds in containers placed on a sunny windowsill that receives plenty of indirect sunlight. If natural light is limited, supplement with a grow light to ensure at least six hours of light per day.
Remember, regular watering is key to keeping the leaves tender, but avoid soggy soil, which can lead to rot. By timing your planting right and choosing a suitable spot, you’ll enjoy fresh, peppery arugula leaves throughout the cooler parts of the year.
Step-by-Step Guide to Planting Arugula
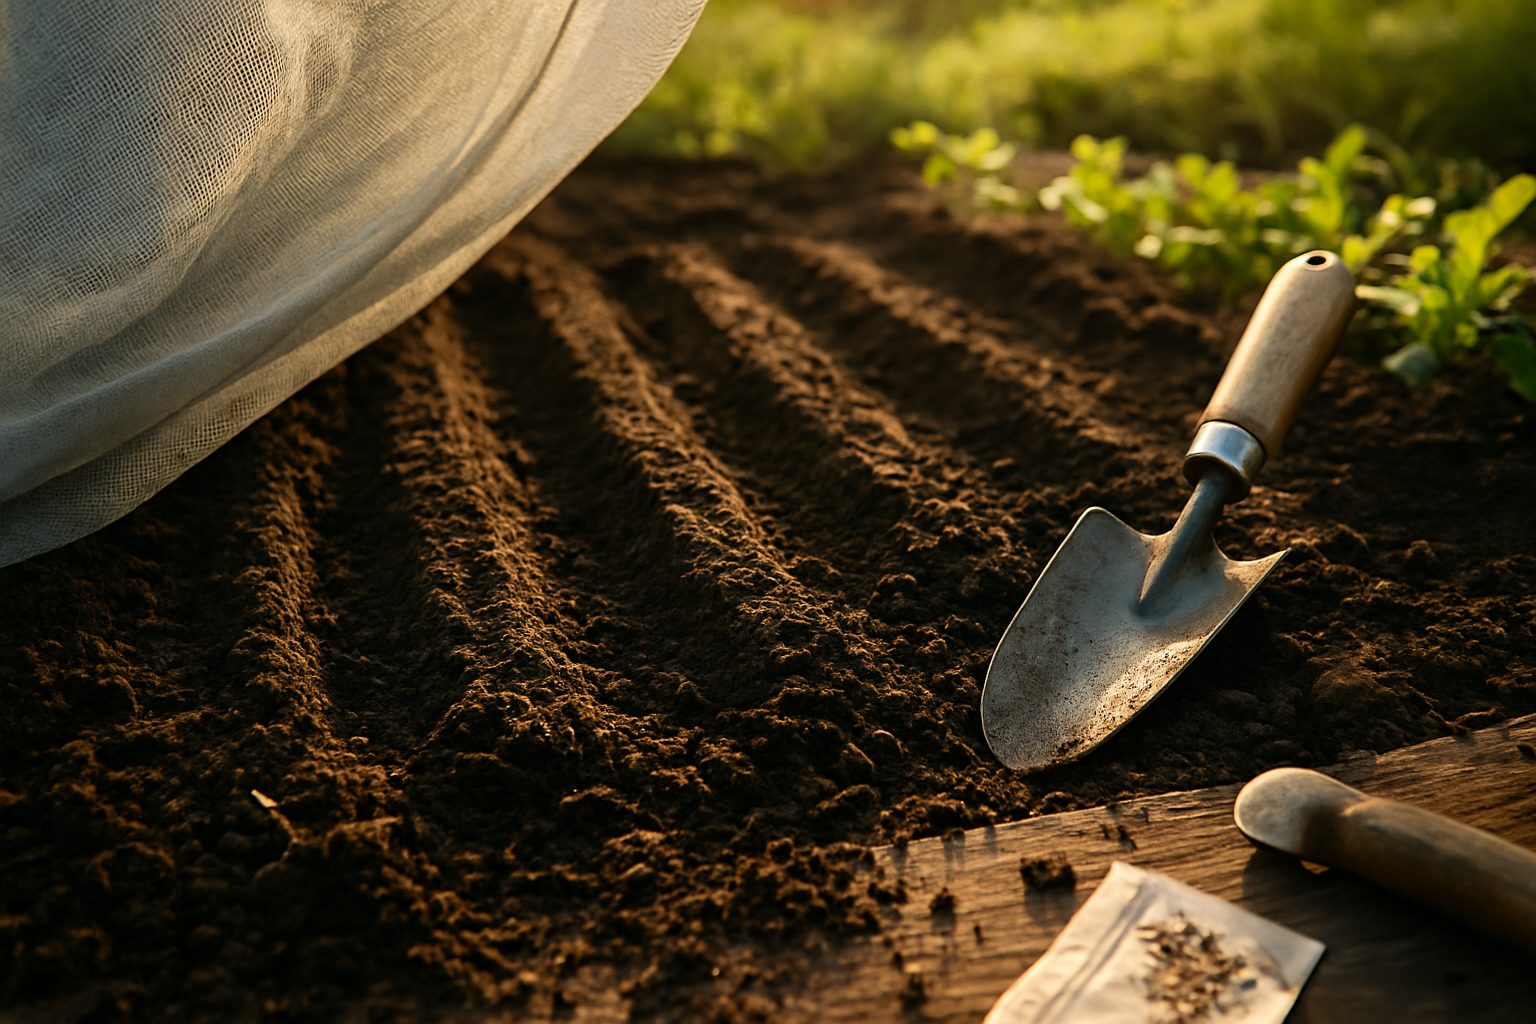
To plant arugula successfully, start by choosing a spot in your garden or a large container that gets partial to full sun and has well-drained soil. Loosen the soil about six inches deep and remove any debris or stones.
Sow arugula seeds directly into the soil, making shallow furrows about a quarter-inch deep. Space rows about 10 to 12 inches apart to allow for good air circulation. Sprinkle seeds thinly along each furrow, then gently cover them with a thin layer of soil and lightly press down.
After sowing, water the area gently but thoroughly to ensure even moisture throughout the top layer of soil. This step is crucial because arugula seeds need consistent moisture to germinate quickly, usually within 5 to 7 days. To maintain soil moisture, use a spray bottle or a watering can with a gentle shower to avoid washing away seeds. Consider adding a thin layer of straw or mulch to prevent drying out, especially in sunny or windy spots.
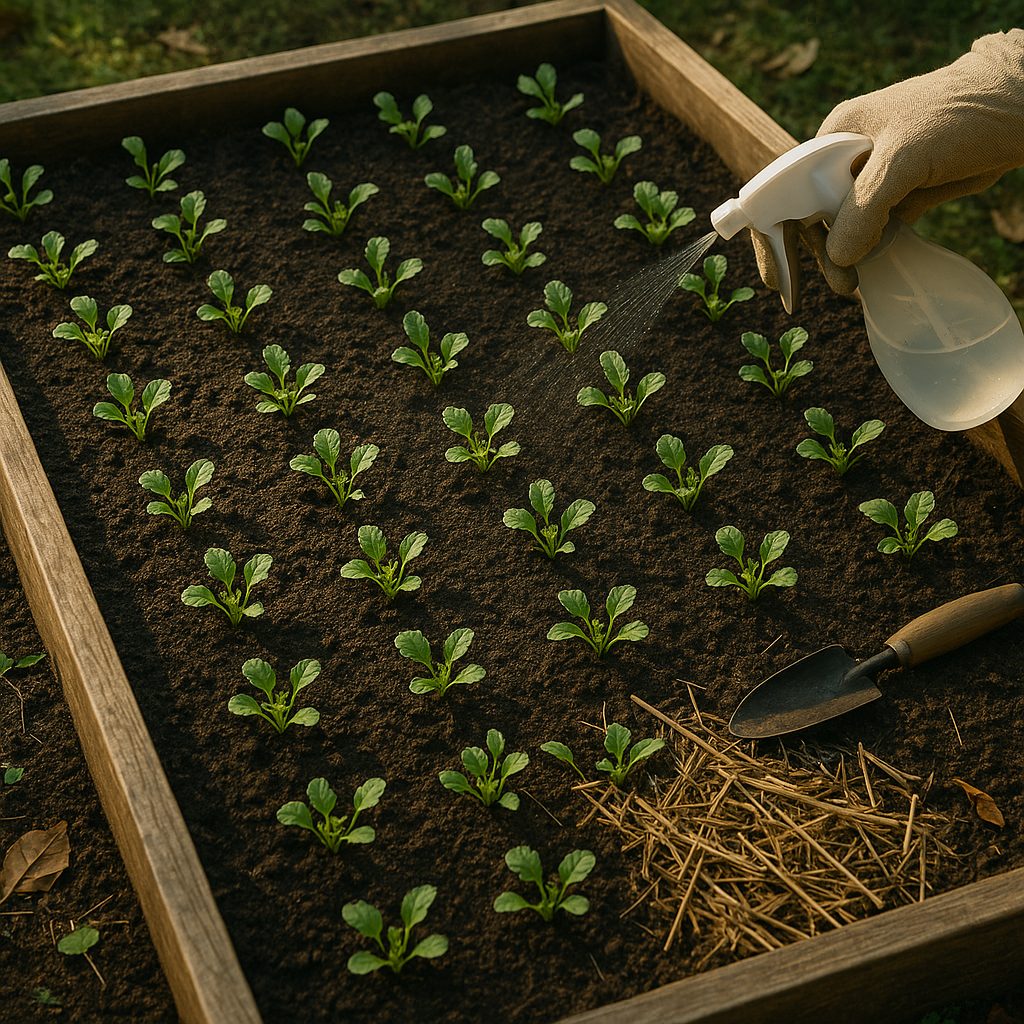
When seedlings reach about an inch tall and have two true leaves, begin thinning them so that plants are spaced about 4 to 6 inches apart. This ensures enough room for each plant to grow without overcrowding.
As the seedlings grow, keep the soil moist but not waterlogged, and watch out for pests like flea beetles, which love young arugula leaves. Using a floating row cover can help protect against insects while conserving moisture.
Within 3 to 4 weeks, your arugula should be ready for its first harvest—just snip the outer leaves and let the plant keep producing. Following these simple steps will help you enjoy peppery-fresh arugula straight from your garden all season long.
Caring for Your Arugula Crop
To keep your arugula thriving, pay close attention to watering and temperature changes. Arugula prefers moist, well-drained soil, so water deeply but allow the top inch to dry out between sessions to avoid soggy roots. Mulching with straw, shredded leaves, or grass clippings helps lock in moisture and keep the soil cool—crucial for arugula, which tends to bolt, or go to seed, quickly in warm weather.
To slow bolting, try planting arugula in a partially shaded area or use shade cloth during hot afternoons. Arugula naturally repels some pests, like aphids and flea beetles, thanks to its peppery scent, but it isn’t immune—handpick pests or spray regularly with a homemade soap solution (mix a teaspoon of mild dish soap in a quart of water) to keep populations under control.
Encourage beneficial insects like ladybugs by planting nearby flowers such as marigold or dill. For healthy growth, side-dress your crop with a balanced organic fertilizer or compost every few weeks—arugula grows fast, so it needs steady nutrients but not heavy feeding.
Snip off yellowing or damaged leaves to maintain airflow and minimize disease; a clean bed makes a big difference in preventing mildew and pests. Harvest leaves when they’re young and tender for the best flavor, and keep picking regularly; this encourages the plant to produce more. If you stagger your planting every couple of weeks, you’ll enjoy a steady supply of crisp, peppery greens all season long.
Arugula is a rewarding, low-maintenance addition to any garden if you give it just a little attention and care.
How & When to Harvest Arugula
Arugula is ready to harvest when its leaves reach about 3-4 inches long, usually 20-40 days after planting, depending on the variety and growing conditions. For the best flavor and texture, look for vibrant green leaves that are tender to the touch—harvesting too late can make the leaves tough and overly spicy. If you prefer a milder taste, harvest early when the leaves are younger and smaller.
You can pick individual outer leaves by pinching or snipping them at the base, which allows the plant to keep growing and producing more leaves for later harvests—a method perfect for salad gardeners who want a steady supply.
For a one-time harvest, use garden scissors to cut the whole plant about an inch above the soil, leaving the roots intact; with luck and good care, your arugula might regrow for another round.
To maximize flavor, pick in the cooler parts of the day, such as early morning, and try to harvest regularly before the plant bolts (sends up a flower stalk) since bolting makes the leaves bitter.
Remember to water your arugula evenly, as stress can make the flavor extra sharp, and try succession planting—sowing new seeds every couple of weeks—to ensure you always have fresh, tender greens ready to pick.
Saving and Using Arugula Seeds
Allowing your arugula plants to produce seeds starts with letting a few healthy plants bolt—that is, letting them flower and develop seed pods. Instead of harvesting all the leaves, choose robust plants and let their tall stalks bloom with delicate white flowers.
Once the flowers fade, you’ll notice slender green pods forming. Leave these to mature and dry on the plant. When the pods turn brown and rattle when shaken, they’re ready for harvest.
Carefully snip the pods into a paper bag to catch any seeds that might spill. Gently crush the dried pods to release the small, round seeds, then remove as much chaff as possible.
For storage, let the seeds air-dry for a few extra days, then place them in a labeled envelope or jar in a cool, dry place away from direct sunlight. Properly stored arugula seeds can last up to three years.
saving your own seeds not only saves money, but also ensures the plants you grow are well-adapted to your garden’s conditions, often resulting in better flavor and resilience. Plus, you’ll experience the joy of truly homegrown crops, knowing your salads start from seeds you’ve nurtured yourself.
Storing, Cooking, and Enjoying Arugula
To keep arugula crisp and fresh after harvesting, rinse the leaves gently to remove any dirt, then dry them carefully with a salad spinner or paper towels. Once dry, wrap the arugula loosely in a paper towel and store it in a breathable bag or container in the refrigerator; this prevents excess moisture from making the leaves slimy.
Arugula shines in salads—its peppery bite pairs well with sweet elements like cherry tomatoes and strawberries, creamy cheeses such as goat cheese or feta, and crunchy nuts like walnuts or almonds. Use it as a fresh garnish atop pizzas, pastas, or fried eggs to add a burst of flavor.
Arugula can also be added in the last minute of cooking soups, stirred into risotto, or blended into vibrant pesto with garlic, olive oil, and Parmesan. For a quick and tasty side, toss arugula with lemon juice, olive oil, shaved Parmesan, and cracked pepper. Or, try making a grilled chicken sandwich with fresh arugula, sliced avocado, and a light smear of pesto.
Its versatility makes it easy to work arugula into many meals—just remember to add it at the end of hot dishes to maintain its signature zing and tenderness.