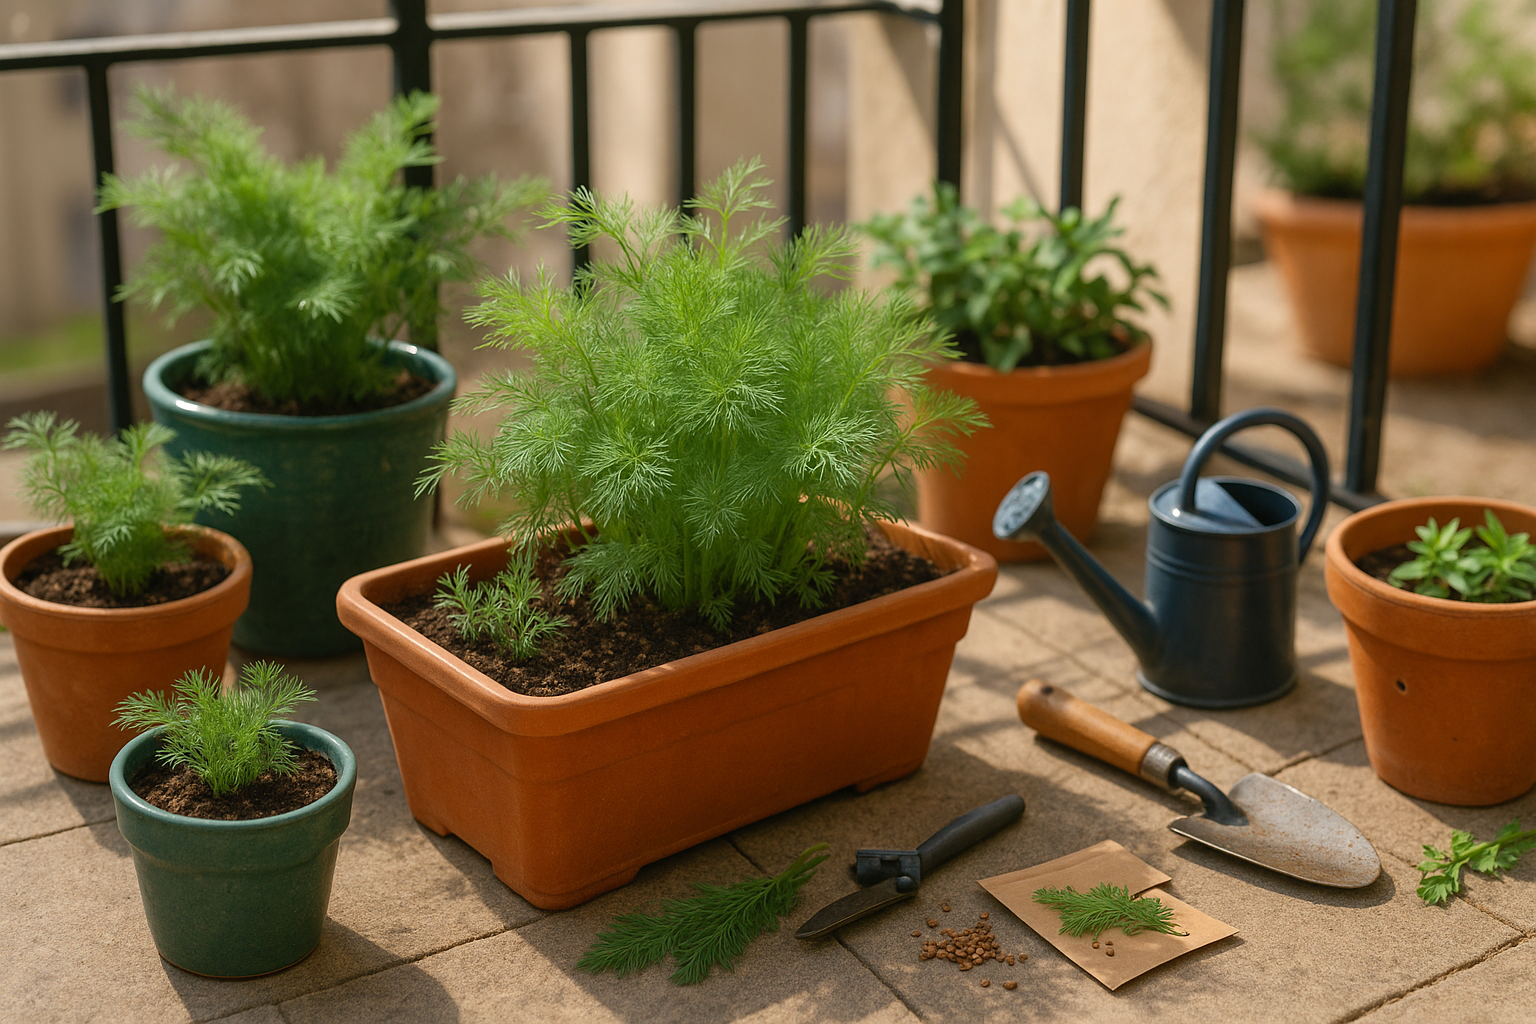
Choosing the Right Dill Variety and Container
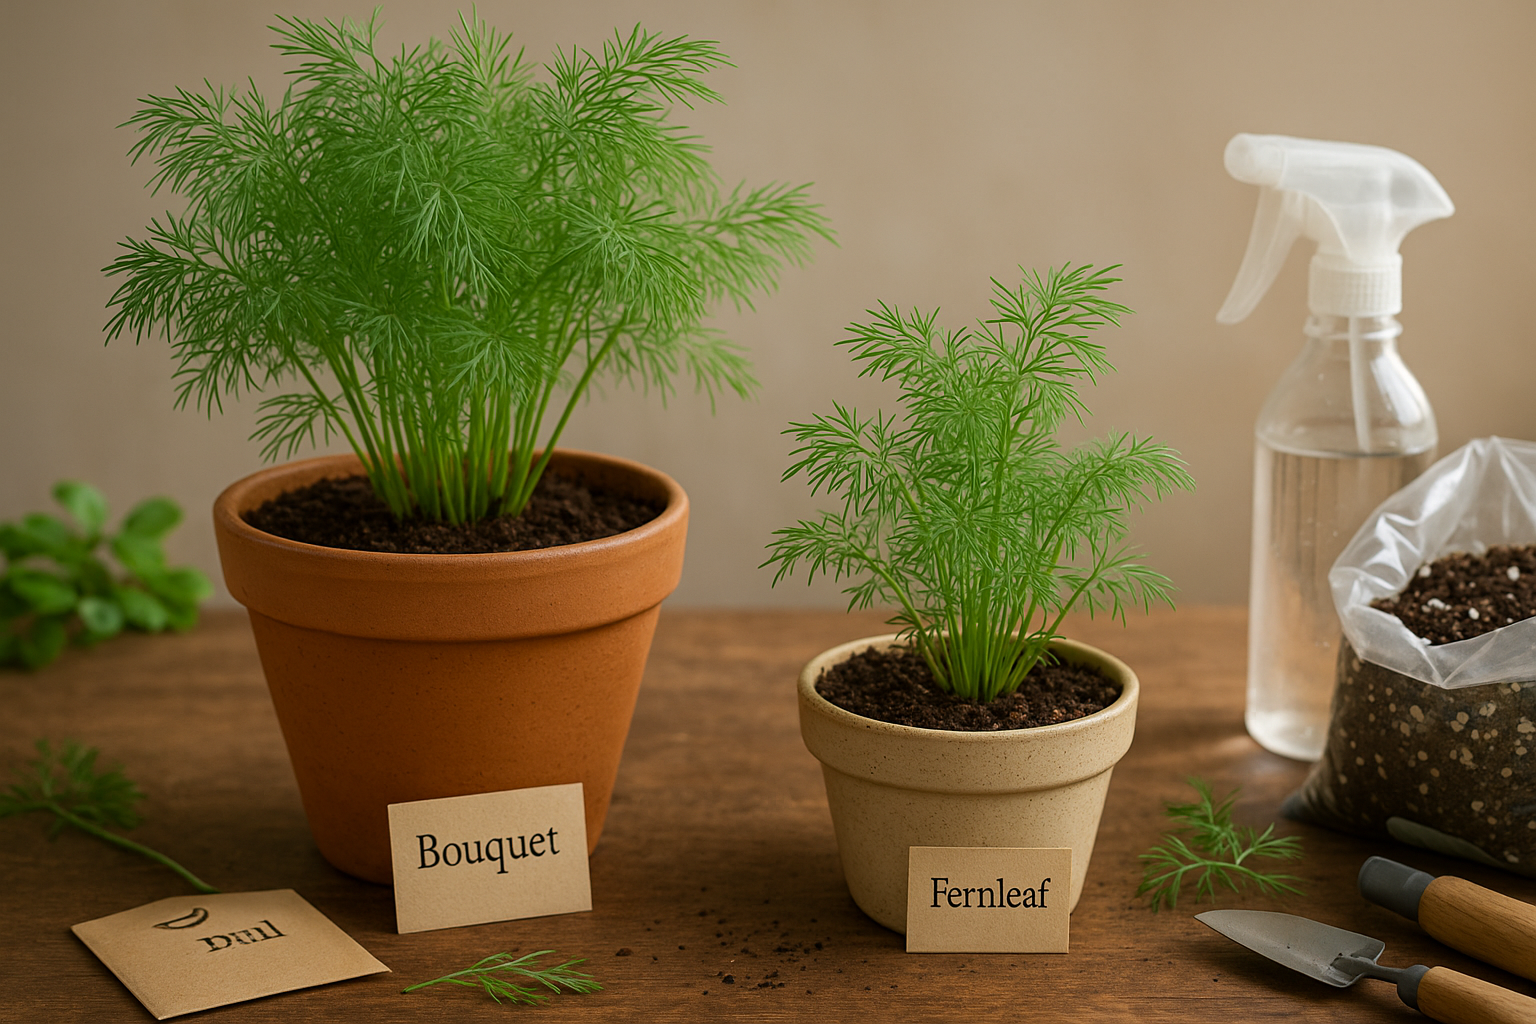
When growing dill in containers, selecting the right variety can greatly enhance both your growing experience and the flavor of your harvest. Two favorites among container gardeners are ‘Bouquet’ and ‘Fernleaf’.
‘Bouquet’ dill is known for its classic feathery leaves, vigorous growth, and aromatic seeds—perfect for pickling and fresh salads. This variety can grow up to 30-36 inches tall, making it ideal for larger containers where you want a continuous supply of foliage and seeds.
For smaller spaces, ‘Fernleaf’ dill is ideal; it’s a compact dwarf variety that typically reaches just 12-18 inches, perfect for window sills, balconies, or patios. Its delicate flavor and slow-bolting habit mean you’ll enjoy fresh leaves for longer throughout the season.
No matter which variety you choose, select a container that is at least 12 inches deep and wide to allow ample room for dill’s taproot to develop. Ensure your pots have drainage holes—overly wet soil is the main enemy of healthy dill roots, which can lead to rot and stunted plants.
Terracotta pots offer breathability and natural moisture regulation but dry out quickly, so you’ll need to water more often. Plastic and glazed ceramic pots retain moisture and are lightweight—ideal for balconies or windy spots—just be careful not to overwater. For urban gardeners on window ledges, lightweight containers with attached trays help keep things neat and safe.
Always place pots in a spot that receives at least six hours of sunlight per day, and you’ll be rewarded with flavorful, healthy dill all season long.
When and How to Plant Dill in Pots
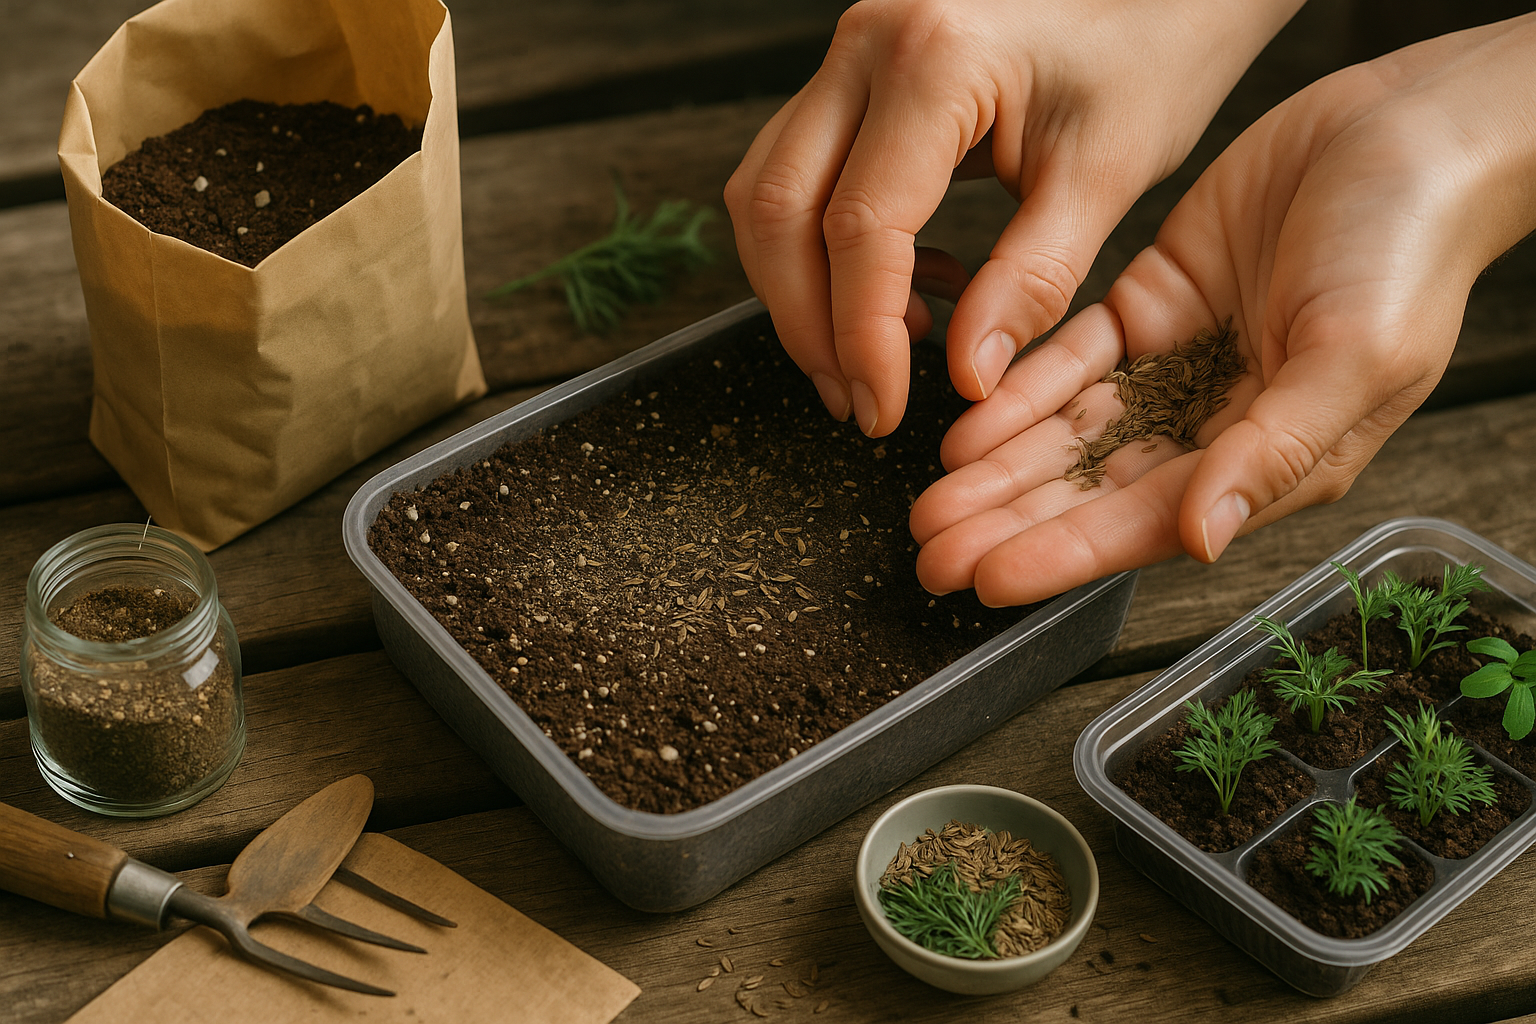
Dill is a versatile herb that thrives in pots, but getting the timing and technique right is key to a healthy harvest. For the best results, sow dill seeds indoors about 4-6 weeks before the last expected spring frost. Alternatively, wait until outdoor temperatures consistently stay above 60°F (15°C) to sow seeds directly outside.
Dill doesn’t like to be disturbed, so transplanting seedlings often has less success than sowing seeds directly where you want the plants to grow. If you must transplant, do so very carefully when the seedlings are small and before their taproots develop.
To plant, scatter seeds evenly across the pot surface, covering them with about 1/4 inch (0.5 cm) of soil. Space seeds or thin seedlings so they are at least 12 inches (30 cm) apart to give each plant enough room for its feathery foliage to develop.
For potted dill, choose a light, well-draining potting mix—look for products containing perlite or vermiculite for extra drainage. Avoid heavy soils that retain moisture, as dill’s roots can rot in soggy conditions. Adding a handful of compost or a slow-release organic fertilizer before planting will provide the gentle nutrients dill needs to establish strong roots.
During the growing season, monitor soil moisture by letting the top inch dry out between waterings. Place your pot in a sunny location, ideally receiving 6-8 hours of light each day. With these steps, even beginners can enjoy lush, homegrown dill right on a windowsill or patio.
Essential Care Tips for Thriving Dill Plants
Dill thrives best when given plenty of sunlight, so aim to place your plants in a location that receives at least 6 to 8 hours of full sun each day. While dill can tolerate a bit of partial shade, especially in hotter climates, too little light can cause it to become spindly and weak.
Proper watering is key—consistently keep the soil lightly moist, but not soggy. Water deeply when the top inch of soil feels dry, but avoid overwatering, which can lead to yellowing leaves and root rot. Signs of underwatering include wilting and dry, crispy leaves. If you’re growing dill indoors or in dry climates, increase humidity by misting the leaves or placing a shallow water tray nearby.
For feeding, apply a balanced, water-soluble fertilizer diluted to half-strength every 4 to 6 weeks during the growing season; organic options like fish emulsion or compost tea work well. Be cautious not to over-fertilize, as too much nitrogen will reduce the plant’s flavorful oils and encourage weak growth.
Dill can sometimes grow tall and leggy, especially if it’s reaching for light. To support these stems, use stakes, bamboo canes, or even a simple string trellis to gently tie and anchor the plants. Regularly pinching back the tops will also encourage bushier growth and help prevent flopping.
With these simple strategies, your dill will stay healthy, upright, and packed with flavor all season long.
Common Challenges
Gardening with potted dill brings fresh flavor to your kitchen, but it can also attract unwanted visitors and problems. Aphids—tiny green or black insects—cluster on stems and leaves, sucking plant sap and stunting growth. If you notice sticky residue or curling leaves, rinse them off with a strong water spray or introduce helpful insects like ladybugs.
Caterpillars, the larval stage of butterflies and moths, chew through dill fronds, leaving visible holes behind. Hand-pick caterpillars in the morning or protect your pots with fine mesh netting.
Diseases like powdery mildew (white, powdery patches) and damping-off (wilting, mushy stems) are common, especially in humid conditions or poorly drained soil. Prevent mildew by ensuring good air circulation, watering at the base, and avoiding overcrowding. Remove infected leaves promptly and treat with a gentle, organic fungicide if needed.
Bolting, when dill quickly produces flowers and seeds, can end your leaf harvest early. This often happens in hot weather or if the plant is stressed. Warning signs include tall, thin stems and clustered buds. To delay bolting, keep soil moist but not soggy, provide partial afternoon shade, and pick leaves regularly to encourage bushy growth.
These steps help keep your dill healthy and productive.
Harvesting and Using Your Dill
To get the most flavor from your dill, timing your harvest carefully is key. For the best leaves, snip them in the morning just after the dew dries, when the essential oils are at their peak. Start harvesting when your dill plant is at least 6 to 8 inches tall—usually about eight weeks after sowing. Use sharp scissors to cut the outer leaves first, and never remove more than a third of the plant at one time.
If you’re after dill seeds for pickling or spice blends, wait until the flowers develop into green seed heads, then turn brown and dry on the stalk. Clip the seed heads into a paper bag to finish drying indoors.
To encourage bushier, longer-lasting plants, pinch off the top growth when it’s about a foot tall, and regularly snip flower stems before they fully bloom. This redirects energy into leaf production, extending your harvest season.
For storage, fresh dill sprigs can be kept in a glass of water (like a bouquet) in the fridge for several days, or wrapped in damp paper towels inside a resealable bag. For longer preservation, freeze clean, dry sprigs in airtight containers or chop and freeze them in ice cube trays with a little water. Alternatively, dry whole stems upside down in a warm, airy spot away from direct light, then crumble the leaves into an airtight jar.
In the kitchen, dill brightens up everything from potato salad and tzatziki to omelets, fish, and homemade pickles. Try snipping a bit over roasted vegetables or mixing it into compound butter for a fresh, tangy pop. With just a bit of care, your homegrown dill will keep your dishes—and your spice rack—extra flavorful all season long.
“`html
Maximizing Productivity
Succession planting is a smart strategy to get the most out of your dill, especially when space is tight. Instead of sowing all your seeds at once, stagger your plantings every two to three weeks throughout the spring and early summer. This simple approach ensures you’ll always have fresh dill leaves to harvest, rather than dealing with a glut one week and nothing the next.
For example, start with a small pot in the sunniest spot on your balcony, then add a new pot every couple of weeks, taking care to rotate them for even light exposure. Companion planting can also boost your yields—try mixing dill with basil, chives, or lettuce in large containers. These herbs and greens share similar light and water needs, and dill’s feathery foliage can help shade lettuce on hot days, preventing it from bolting too quickly.
For truly tiny spaces, think vertically: hang wall-mounted planters, use stair-step plant stands, or even repurpose old shoe organizers with drainage holes to maximize every available inch along railings and windowsills. By spreading out plantings and combining compatible species, you’ll make the most of your patio or kitchen garden all season long, turning even the smallest space into a surprisingly productive herb oasis.
“`